gourmetcubicle

Tech by day. Cook by night.

The food blog of an engineer. Whether you're a tech nerd like me who wants to eat homemade meals and experiment with reproducing that amazing restaurant dish you ate, or a seasoned cook who wants to find inspiration for your next meal, you're in the right place.

  • home
  • blog
  • about
  • recipes
  • pantry essentials
  • contact

Beet Carpaccio with Citrus Vinaigrette

December 18, 2015 by Aurel Pop in Salad, Appetizer

As I was going through my recent blog posts, I realized that over the last couple of months, my focus has been on hearty traditional dishes. I posted my good friend Guy’s Piquant Pulled Pork, a recipe that made it to a few local online publications, followed by ethnic staples like Chicken Khao Soi, Romanian meatballs, and last, but not least, my dear friends Ame and Hanna’s Ethiopian Lentils from the Cooking with Friends series. After so many filling and calorie rich meals I thought it would be a good time to post a lighter dish. I thought of salads, but to be honest, salads aren’t my strong suit. I like them, it’s just that I eat them as a side dish rather than as a meal. Also, since fall has finally arrived in Austin, I was in the mood for something more suitable for colder weather. I opened my recipe notebook and stumbled upon a recipe I developed about a year ago - Roasted Beet Carpaccio.

I LOVE beets. Although as a kid I only ate them pickled, I found later in life that roasted beets are equally delicious. In my mind, beets are totally worth having my kitchen looking like a crime scene and having my hands stained with beet juice. In Romania, pickled beets are very common. In fact, we consider pickled vegetables to be salad. If you happen to be eating in Romania and find something like salata de varza, salata de rosii, salata de castraveti or salata de sfecla on the menu, don’t expect it to be a proper salad in the traditional sense of the word. More likely than not, you’ll end up getting various combinations of cabbage, tomatoes, cucumbers and beets, all pickled in vinegar. We eat them with our main dishes (they make a hell of a side dish for schnitzel and mashed potatoes).

What I recently learned about beets is that the greens are edible, too. Up until not long ago, I would discard the greens without thinking twice. I was a fool! I didn’t know how good they were. All those disposed beet greens would’ve made a great side dish. They can be sautéed or just blanched and then dressed. Soooo good! And I’m not one to throw the expression “soooo good” around when it comes to greens. I eat a variety of greens, but I can’t really say that they are all THAT good.

beets carpaccio-0074.jpg

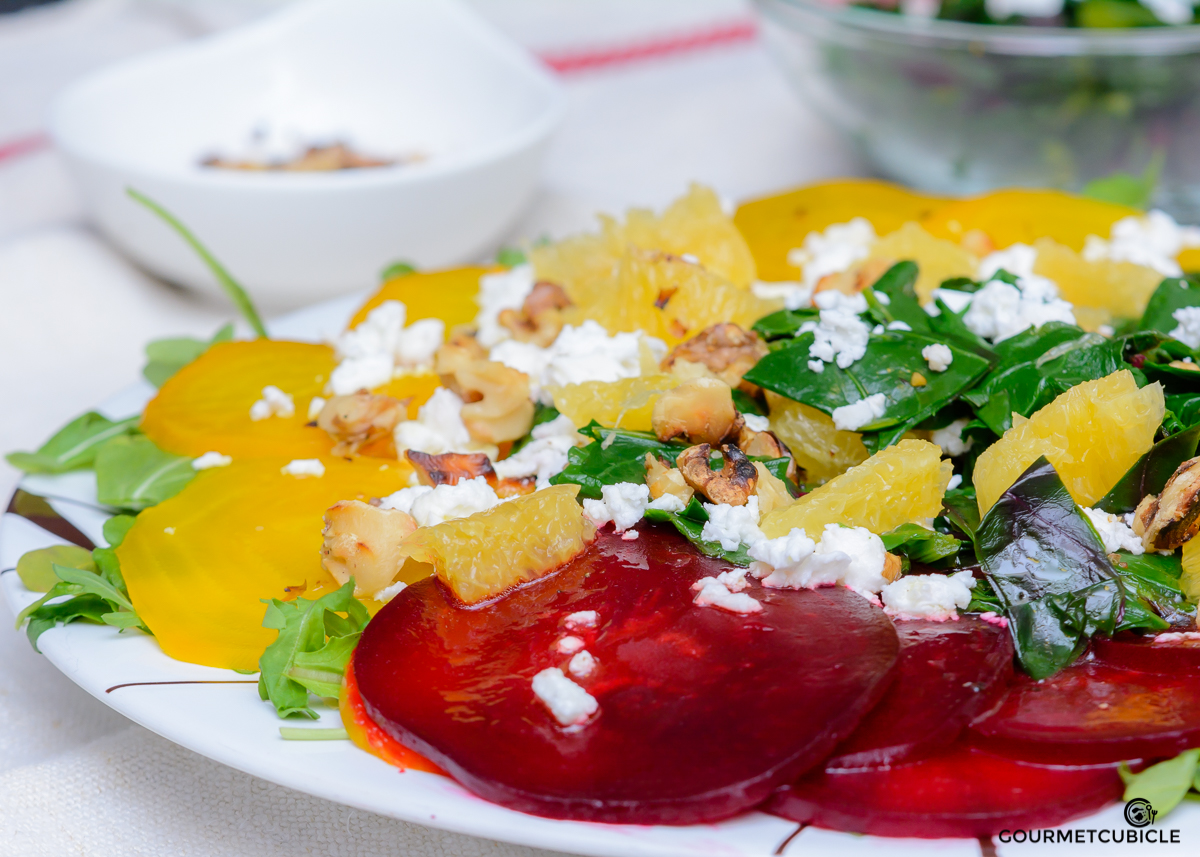
In the spirit of the Romanian definition of salad, I’ll consider this dish a salad as well. It’s perfect for when you want to impress your guests during the colder months. I sometimes serve the beets warm, but even at room temperature or refrigerated they will be tasty. It’s up to you to decide what you like better. If you find the dressing to be too tart for your liking when you taste it on its own, worry not. The sweetness of the beets, the smokiness and pepperiness of the arugula, and the nuttiness of the walnuts all balance out the tartness of the vinaigrette. Try it and tell me what you think. Enjoy!


BEET CARPACCIO WITH CITRUS VINAIGRETTE


Serves 4-6
Prep time: 15 minutes
Cook time: 45 minutes


Ingredients

  • 4-5 beets with greens (about 1 bunch)
  • 3 TBS olive oil
  • 1 tsp salt
  • 1/2 tsp freshly ground black pepper
  • 2 cups arugula
  • 1/4 cup goat feta (or goat cheese)
  • 1/4 cup roasted walnuts
  • 1 orange, peeled and sectioned
  • olive oil, for topping
  • fresh ground pepper, to taste
  • sea salt, to taste

Citrus vinaigrette

  • 1 TBS apple cider vinegar
  • 2 TBS fresh lemon juice (1 small lemon)
  • 3 TBS fresh orange juice (1 small orange)
  • 1/2 tsp orange zest
  • 3/4 cup olive oil
  • 1 TBS honey
  • 1/2 tsp kosher salt
  • 1/4 tsp ground white pepper

Instructions

  1. Preheat oven to 400F (200C) degrees.
  2. Remove the greens from the beets cutting off and discarding the woody stems. Using a brush clean the beets thoroughly, leaving the skin on. Rinse greens and set aside.
  3. In a bowl, mix beet roots, olive oil, salt and pepper. Toss until the beets are evenly coated.
  4. Wrap each beet in aluminum foil. Place beets on the upper rack of the oven and cook for 40-45 minutes or until they can easily be pierced with the tip of a knife.
  5. While the beets are roasting in the oven, prepare an ice bath for the beet greans by filling a medium sized bowl with 1 cup ice and 4 cups cold water.
  6. Fill a medium sized pot halfway with water. Add a tablespoon of salt and bring to a boil over high heat.
  7. When the water is boiling add the beet greens and submerge them under the boiling water. Cook for no more than 2 minutes.
  8. Using a sieve or a slotted spoon, remove the greens from the pot and transfer them into the ice bath. This will stop the cooking process and keep the beet greens crisp and colorful.
  9. Place all the ingredients for the citrus vinaigrette in a jar. Put the lid on and shake well for about 30 seconds. Set aside and shake again before using it.
  10. When the beets are cooked, remove them from the oven, carefully open the aluminum foil and let them cool down.
  11. In the meantime, remove the greens from the ice bath and chop them into bite sizes.
  12. Peel the orange, section it and remove the skins from the slices. Set aside.
  13. Place arugula on a large serving plate. Sprinkle with olive oil and freshly ground black pepper.
  14. When the beets are cold enough to handle, peel them. The skins should slip off easily, but feel free to use a knife for the more stubborn spots.
  15. Using a mandolin, slice the beets into thin slices (about 2-3mm thin). 
  16. Place beets on the arugula bed. Sprinkle beet greens, feta, walnuts and orange all over the beets. Drizzle with vinaigrette and serve cold or at room temperature. Enjoy!

NoteS

  • The time it takes to cook the beets depends on their size. The beets I used were the size of a tennis ball and it took 40 minutes.
  • When opening the aluminum foil, be careful not to get burned with the hot stem that built up inside the packets.
  • You can serve the beets warm, but be careful not to burn yourself when peeling them.

December 18, 2015 /Aurel Pop
beets, goat cheese, arugula, vegetarian, walnuts
Salad, Appetizer
1 Comment

Spicy Coleslaw

October 07, 2015 by Aurel Pop in Side Dish, Salad

Let me preface this post by saying that this recipe is part of a bigger project that I've been working on with one of my colleagues. Coleslaw is the quintessential side dish of southern cuisine. It comes in different varieties from creamy and made with mayonnaise, to simple and made with vinegar, and with a variety of ingredients like shredded cabbage, carrots, vinegar, salt and pepper and sometimes onions, jalapeños, apples, mustard or even ketchup. 

Even though I never tried coleslaw until I was in my twenties, I consider myself a big fan. I often times find myself judging barbecue joints based on the coleslaw they serve. I know that the main focus of a barbecue place should obviously be the meat they smoke, yet still I can't help but take the coleslaw into consideration when rating them. For me coleslaw was love at first sight. I remember eating it on the first day I moved to Austin four years ago. My hotel was really close by Rudy's BBQ so I decided to eat my first lunch there in the sizzling heat of the legendary summer of 2011.

In my book a good coleslaw has to be crispy but not raw, tangy but not sour, spicy but not too hot, and with just the right about of mayo to give it a subtle hint of creaminess. A coleslaw also should never be a soggy soup-like concoction with the mayonnaise overwhelming all the freshness of the cabbage and carrots. So how do you do all of that? First, use a mandolin to shred the cabbage really thin. Then purge it. Purging essentially is the process of brining the cabbage in salt, to get some of the water and that raw bitter flavor out of the cabbage. 

I used kewpie mayo because I find it less heavy with a nice piquant aftertaste. I also choose to add leeks for a subtle hint of onion-like flavor. If finding leeks is challenging where you live, just use scallions or chives. Experiment with the flavors and ratios until you reach the combination that makes you happy. Enjoy!


Spicy Coleslaw


Yields about 1-2 quarts
Prep time: 20 minutes
Inactive time: 90 minutes

coleslaw-0719.jpg

Ingredients

  • 1/2 lb red cabbage, shredded
  • 1 lb white cabbage, shredded
  • 1 cup leek, thinly sliced (about 1/2 large leek)
  • 1 TBS table salt
  • 2 large carrots, peeled and grated
  • 1 large jalapeño, halved, deseeded and finely sliced (about 1/4 cup)
  • 2 tsp dried chili flakes
  • 1/2 tsp white pepper
  • 1/2 cup kewpie mayonnaise 
  • 2 TBS white wine vinegar (or apple cider vinegar)
  • salt, to taste
  • freshly ground black pepper, to taste

Instructions

  1. In a large mixing bowl, combine red cabbage, white cabbage and leeks. Sprinkle with salt and toss well. Set bowl aside and let the mixture rest for 10-15 minutes. This process is called purging the cabbage and it's essential for the texture of the coleslaw. 
  2. After the cabbage has been rested, you'll see a lot of juice in the bowl. Dispose it and transfer the cabbage to a colander. Run it under cold tap water to get rid of the excess salt. 
  3. Rinse the big mixing bowl and transfer the cabbage from the colander back into the bowl. Squeeze, handful by handful, the salty juice out of the mixture. 
  4. Add carrots, jalapeño, white pepper and chili flakes. Mix to combine and add the mayonnaise and vinegar. Stir until the coleslaw is evenly coated. Taste and adjust seasoning.
  5. Cover with a plastic wrap and place it in the refrigerator for an hour before serving.

Notes

  • Use the white part of the leek. For instruction on how to clean leek check out my Creamy Leeks with Pan Roasted Chicken recipe
  • The green part of the leeks can be used for making stock.
October 07, 2015 /Aurel Pop
bbq, vegetarian, carrots, cabbage, leeks, spicy
Side Dish, Salad
1 Comment

Green Papaya Salad (Som Tum)

August 19, 2015 by Aurel Pop in Salad

Austin is pretty much an oven these days. My appetite decreases, but oddly enough I crave spicy foods. Really spicy. Not your average Tex-Mex spicy, but more like habanero level heat. I just realized that I eat something spicy with every each meal I ate. I add a few spoonfuls of my Fiery Jalapeño Salsa to my scrambled eggs for breakfast, a few drops of Sriracha or chili oil to my lunch and then when dinner comes I add a jalapeño or chili to whatever salad we're having. It's pretty crazy if you ask me.

Have you ever wondered why cultures from hotter climates eat really hot food? Just think about traditional Latin American, Indian, African and Southeast Asian food. We love our favorite Ethiopian, Mexican and Indian restaurants for how hot and spicy their dishes are. There is something about spicy food that makes you feel good.


In my opinion it only gets better during the hot summer days. I mean, come on, if you are already sweating, at least do it with a purpose. Spicy food cools you down. Yes it will first make your forehead sweat, but soon after you'll feel a lot better. This is not something that I made up, it's science, bitch, to quote Jesse Pinkman. The scientific term is called gustatory hyperhidrosis also known as gustatory sweating. What happens when eating spicy food is that your internal temperature goes up trying to match the outside temperature. Your blood circulation increases and then you start sweating. Sweat helps the body cool down by producing fluid that evaporates from our skin. If you've ever used a sauna, the effect is similar although the process is different.

I was inspired to make this salad by Roni's latest trip to Thailand and Bhutan. While she was gone, I annoyed her daily with texts asking for pictures of the food she was eating there. This green papaya salad, called Som Tum in Thai, is one of the most common salads that you can find in Thailand. It is a sweet, sour and spicy delight made fresh to order. One suggestion for eating in Thailand is to specify how many chilies to put in your dish at the time of ordering. This rule applies not only to this salad, but to every dish that you eat in Thailand. The level of heat they're accustomed to may be unbearable to us farang (“westerner” in Thai).

The ingredients for this salad can be found at any Asian store. You can even add dried shrimp to make it more authentic. Although I like the taste and texture of dried shrimps, I found that it's not everyone's cup of tea. I usually add 8-10 thai chilies to this dish and the level of heat is higher than the average, but not too crazy. I had a few of my friends over for dinner last week and I served this salad as an appetizer without any major incidents. To cut the heat, just add more tomatoes, lime and if you don't like your salad too sour, a bit more sugar too. Enjoy!


Green Papaya Salad (Som Tum)


Serves 4-6
Prep time: 25 minutes


Ingredients

  • 5-10 Thai chilies, roughly chopped (depending how spicy you like it)
  • 4 garlic cloves, crushed
  • 1 TBS palm sugar (or brown sugar)
  • 1 TBS fish sauce  (replace with seaweed sauce if vegetarian/vegan)
  • 2 limes, juiced
  • 2 tomatoes, quartered
  • 1/4 cup roasted peanuts
  • 1 green papaya, shredded
  • 1/2 cabbage, shredded
  • 1 cup green beans, cut into 2 inch pieces - optional
  • 1/4 cup roasted peanuts
  • salt or soy sauce, to taste

Instructions

  • In a mortar combine chilies and garlic. Smash them with the wooden pestle until they release the flavor and the oils, about 2-3 minutes. Add sugar and pound until it dissolves into the chili and garlic mix. Add the fish sauce next. Use a spoon (or spatula) in conjunction with the pestle to push the mixture stuck to the sides of the mortar down.
  • Squeeze lime wedges and add tomatoes, a handful of peanuts and pound more with the pestle while pushing down the ingredients stuck to the sides of the mortar with the spatula, about 1-2 minutes. I toss a few whole lime wedges in the mortar and only discard them when eating the salad, too.
  • Taste and adjust sweetness and sourness, by adding more lime juice or palm sugar.
  • In a large mixing bowl, combine papaya and cabbage. Pour the chili concoction from the mortar over the salad and mix well until it is evenly coated. Sprinkle with the rest of the peanuts and serve cold.

NOTES

  • If using a food processor, combine chilies and garlic and pulse for a few times. Add the rest of the ingredients (do not leave the lime wedges in when using the food processor) and give it a few more pulses. Remember, you want a paste with some texture and not completely smooth, so don't overdo it.
  • Most Asian stores carry pre-shredded green papaya. If you can't find that shred it yourself by using a julienne peeler. You can also grate the papaya on a box grater, although I like the papaya crunchier. Alternatively, you can use the traditional way of shredding, but I recommend that you watch a video before as it requires above average knife skills. Stop grating/shredding when you get close to the center. Those white immature seeds are not pleasant to taste. 
  • I prefer consuming this salad fresh so that the papaya and cabbage don't lose their crunchiness, but it stays good for a couple of days in the refrigerator. 
August 19, 2015 /Aurel Pop
Thai, papaya, chili, vegetarian, vegan, spicy, summer
Salad
Comment

Grilled Corn and Spinach Salad with Avocado Yogurt

July 28, 2015 by Aurel Pop in Salad

It seems like I brought the heat from Asia with me to Austin when I returned from Singapore earlier this month. Up until then, it felt like we were in the middle of the monsoon season with rains and flash flooding hitting Austin. A lot of people complained and begged for the normal Texas summer. Now it's here. It's been here for the last few weeks and it's as hot as ever. The heat combined with the extra pounds that I gained eating ramen every single day (sometimes even twice a day) made my appetite drop a bit.  

Starting this week I want to start eating more healthfully and to work out more so I can get rid of those extra pounds. Although I'm really good at finding excuses when it comes to working out, this time I mean it. Things like it’s too hot, Popsi injured her hind leg and I don't have running buddy, or I need to cook more aren't going to cut it anymore. 

I decided to start with eating healthier. I still eat a lot of cheese and fatty meats which don't exactly qualify as healthy, but I'm doing my best. Fortunately corn is in season which means that it can be found at any grocery store for really cheap. It is one of the most versatile and hard to mess up vegetables. It doesn't matter if you boil it, grill it or fry it, the flavor is going to be consistently good no matter what. 

Grilled corn is one of my favorite things to eat during the summer. My family in Romania boils corn which I almost never do anymore. It's not because I don't like it that way, but mostly because it takes too long. As a kid my favorite way of eating corn on the cob was by brushing it with butter, seasoning it with salt, wrapping it in aluminum foil and tossing it in the fire for about 10-15 minutes. We'd do the same with potatoes every time we made a camp fire. It's very simple, yet so delicious especially when served with butter. 

The inspiration for this salad came when Roni introduced me to a Tacodeli salad bowl. I think she was dieting or something because we almost never order salad at Tacodeli. The sweetness of the corn goes extremely well with the saltiness of the bacon, while the texture of the avocado contrasts nicely with the crunchy pumpkin seeds and the crispy bacon. It's heavenly!

I decide to grill a pork chop to add some extra protein to my salad. I need that, otherwise I get hungry half an hour after eating it. It is a very lean cut, so make sure you don't overcook it. It's usually best at 145F (63C) inside temperature, but I take it off the grill at around 140-142F (60C) and then wrap it in aluminum foil for about 10 minutes. The meat will continue cooking for a bit even after you removed it from the grill which will make the chop to reach 145F. Cheers!


GRILLED CORN AND SPINACH SALAD WITH AVOCADO YOGURT


Serves 2-4
Prep time: 15 minutes
Cook time: 25 minutes


Ingredients

  • 2 ears fresh corn
  • 1/2 TBS olive oil
  • 1 pork chop, 1 inch thick
  • 1/2 tsp kosher salt
  • 1/2 tsp black pepper, freshly ground
  • 5 slices bacon
  • 3-4 oz. fresh baby spinach
  • 1 medium avocado, pitted and sliced
  • 1/2 cup pickled onions
  • 1/4 cup pumpkin seeds, roasted
  • 2 TBS olive oil
  • 2 tsp black pepper, freshly ground
  • coarse sea salt, to taste

Avocado Yogurt Dressing

  • 1 thai chili, deseeded and chopped (or jalapeño, serrano, etc)
  • 1 medium shallot, finely sliced
  • 1 cup plain yogurt
  • 1 medium avocado, pitted and chopped
  • 1 TBS bacon fat (or olive oil)
  • 1/2 lemon, juiced
  • 1 tsp black pepper, freshly ground
  • salt, to taste

Instructions

  1. Preheat grill to 450F (230C) degrees.
  2. Pull the outer husks down the ear to the base. Strip away the silk from each ear of corn by hand. Lightly brush corn with oil.
  3. Pat the pork chop dry. Sprinkle with salt and pepper on both sides and let it rest for 5-10 minutes.
  4. Meanwhile, in a large cold skillet, lay bacon strips without overlapping them. In order for your bacon to become crisp don't overcrowd the pan and start with a cold skillet.
  5. Heat skillet over medium-low heat and cook bacon slowly. When it starts to buckle and curl, about 5 minutes, flip it to the other side. Keep flipping until you reach the crispiness level of your desire.
  6. Transfer bacon from the skillet to a wire rack or a paper towel lined plate. Save about 1-2 tablespoons of fat for the dressing. Once the bacon is cooled off, chop it roughly into bite-sized pieces.
  7. Crank up the heat under the skillet to medium-high. If you have too much grease left in the skillet, spoon out as much as you'd like, but leave about 1-2 tablespoons. Once it starts shimmering add the chilis. Cook for about 5 minutes, then reduce the heat to medium and add shallots. Cook, stirring occasionally until the shallots are soft and brown, about 10 minutes. Remove from the heat and scoop the shallot and chili mix into a food processor. Add yogurt, avocado, bacon fat, lemon juice, salt and pepper. Pulse until dressing becomes smooth and glossy. Let it rest in the refrigerator until you take care of the rest.
  8. Place corn and pork chop on the grill. Grill until corn starts to pop, about 5 minutes. Continue cooking and turning until all sides are slightly charred. The pork chop will need about 10-12 minutes on the first side. Flip over to the other side and cook for 6-7 more minutes or until the thermometer reads 140-145F (60-62C). Once the pork chop is ready, remove from the grill and wrap it in aluminum foil. Let it rest for 10 minutes before carving it. Remove the corn as well and let it cool until you can handle it.
  9. Cut the kernels from the cobs and add them to a large bowl. Add spinach, pumpkin seeds, bacon and pickled onions. Add a tablespoon of avocado dressing and toss until well mixed.
  10. Place salad on a plate, add avocado slices, pork chops slices and more dressing on the side. Sprinkle with coarse sea salt and fresh cracked pepper. Enjoy!

NOTE:

  • If you like bacon really crispy I recommend you use a wire rack. It's a restaurant secret.
  • When measuring the temperature use the thermometer where the meat is the thickest.
July 28, 2015 /Aurel Pop
bacon, spinach, corn, avocado, pork, onions
Salad
6 Comments

Grilled Carrots and Parsnips with Orange Yogurt

May 11, 2015 by Aurel Pop in Salad

A few weeks ago I felt like I desperately needed a full day for myself to decompress and do only what I wanted to do, which was absolutely nothing. On days like this I sleep in, prepare a quick breakfast, play a bit with my dog, then get cozy on the couch with a book or Netflix and Popsi snoring at my feet until it's my own nap time.

To the amusement of my friends, I still take naps. They constantly remind me that they quit taking naps when they were 7. I'm 31, but I still do it and get excited about it just like I did when I was a kid. Probably even a little bit more because it’s much harder to find time to do so now than when I was young.

I feel like in this fast paced world that we are living in, we barely have time to allow ourselves a little downtime. When was the last time you didn't have plans on a given weekend?

I used to think that I was wasting my day by doing nothing and even felt guilty for doing so. Not anymore though. Nowadays I just embrace these lazy days and enjoy them while they last.

On my days off, I rarely want to cook at home and prefer to go out and look for new ideas and recipes that inspire. I'm not pretentious when it comes to food, but I have certain expectations. I want simple dishes cooked with fresh ingredients.

The inspiration for this recipe came on one of these days at a local Italian food truck called Patrizi's. Although I almost always go with their roasted garlic bruschetta for the appetizer, this time I decided to try one of their specials- Roasted Carrots with Orange Yogurt. It sounded so light and refreshing that I couldn't pass on it.

I was so blown away by the sweet and tart combination of the carrots and orange that I knew I wanted to try to make something similar at home sometime soon. That time came earlier than expected when we received our CSA box of veggies from Johnson's Backyard Garden that week. It was loaded with gorgeous, fresh organic carrots and parsnips. 

In my recipe, I'm using both carrots and parsnips, and instead of roasting them I decided to grill them for that added charred flavor that develops while grilling. I also added fresh oregano and orange zest to the yogurt sauce, and mint and orange juice to the grilled vegetables. The idea of adding fresh herbs came mostly out of convenience as not long ago I started to grown my own herbs in small pots outside on the patio. 

I served this appetizer with a side of arugula salad sprinkled with olive oil and topped with sour cherries, walnuts and goat cheese, but it stands well served on its own. It's delicious, healthy and flavorful. Enjoy!


Grilled Carrots and Parsnips with Orange Yogurt


Serves 4
Prep time: 10 minutes
Cook time: 35 minutes


Ingredients

Grilled Carrots and Parsnips

  • 2 bunches carrots (10-12 whole), scrubbed or peeled
  • 1 bunch parsnips (4-6 whole), scrubbed or peeled
  • 2 TBS olive oil
  • 1 tsp kosher salt
  • 1 tsp black pepper, freshly ground
  • 1/4 cup fresh orange juice
  • 8 fresh mint leaves, finely chopped
  • 1 TBS olive oil

Orange Yogurt

  • 1 cup plain yogurt
  • 1/4 cup fresh orange juice
  • 1 TBS orange zest
  • 1 TBS fresh oregano, finely chopped
  • 1 tsp caraway seeds, ground
  • 1/2 tsp black pepper, freshly ground
  • kosher salt, to taste 

Instructions

  1. In a medium-large mixing bowl combine cleaned carrots, parsnips, 2 TBS olive oil, salt and pepper. Mix well until the root vegetables are evenly coated.
  2. Fire up the grill to medium-high heat, around 425-475F (220-245C). If using a stovetop cast iron grill, set burners to medium-high heat.
  3. Place carrots and parsnips on the grilling grate. Cover (use aluminum foil if grilling on stove top) and grill for 5-10 minutes until the vegetables develop sear marks. Flip them over and continue grilling them until the crunch is gone but the resistance remains, about 20-25 more minutes. Make sure you're flipping them every 10 minutes so they don't get burned.
  4. In the meantime, prepare the orange yoghurt by combining all the ingredients in a medium mixing bowl. Stir them together and let it sit in the refrigerator until the carrots are cooked. This way the flavors will blend and the sauce will taste better.
  5. Once cooked, remove the vegetables from the grill and toss them in a mixing bowl with the orange juice, chopped mint leaves and the rest of the olive oil.
  6. Serve the carrots and parsnips at room temperature over 2-3 tablespoons of yoghurt and sprinkle more mint on top.
May 11, 2015 /Aurel Pop
vegetarian, carrots
Salad
3 Comments
  • Newer
  • Older

Copyright ©2017 Aurel Pop & gourmetcubicle. All rights reserved. Don't steal, ask.