gourmetcubicle

Tech by day. Cook by night.

The food blog of an engineer. Whether you're a tech nerd like me who wants to eat homemade meals and experiment with reproducing that amazing restaurant dish you ate, or a seasoned cook who wants to find inspiration for your next meal, you're in the right place.

  • home
  • blog
  • about
  • recipes
  • pantry essentials
  • contact

Muhammara: Syrian Red Pepper and Walnut Dip

October 17, 2016 by Aurel Pop in Appetizer

Muhammara is my go-to party food. Every time I host a party, I make sure to prepare muhammara. It’s usually the appetizer (meze in Middle Eastern cuisine) that gets the most attention and praise. One of the main reasons I like making it – other than it’s quick and easy to prepare— is that it fits into most people’s diet. It’s very versatile: vegans, vegetarians, and gluten-free people alike can enjoy it.

If all of the above aren’t enough to convince you, then here is another good one: it’s different than the usual suspects (hummus and babaganoush- I’m talking about you). The smoky sweetness of charred the red peppers, delicately balances the nuttiness of the lightly toasted walnuts, the rich fruitiness of the pomegranate molasses, and the subtle kick of the garlic. All in all, it’s a complex dish.

Muhammara is originally from Syria. Aleppo to be more specific. Most of you have heard of Aleppo, but most likely because of other reasons than this red pepper dip. Syrian food plays an important part in the Middle Eastern cuisine, as it’s heavily influenced by the civilizations that settled in that area: Arab, Persian, and Turkish. As a result, the food is very similar to Levantine cuisine.

As a rule of thumb, muhammara is a dip, rather than a spread. It’s best eaten with fresh warm pita bread, but can be savored with fresh vegetables as well. I’ve even heard of muhammara served with meats and fish, but honestly, I haven’t tried it that way before. Regardless of your diet, or preference you won’t be disappointed in it.

Enjoy!


MUHAMMARA: Syrian RED PEPPER AND WALNUT DIP


Serves 6-8
Prep time: 15 minutes
Cook time: 30 minutes
Total time: 45 minutes


Ingredients

  • 2 large red bell peppers (or 3 large roasted peppers)
  • 1 cup raw walnuts
  • 1 clove garlic
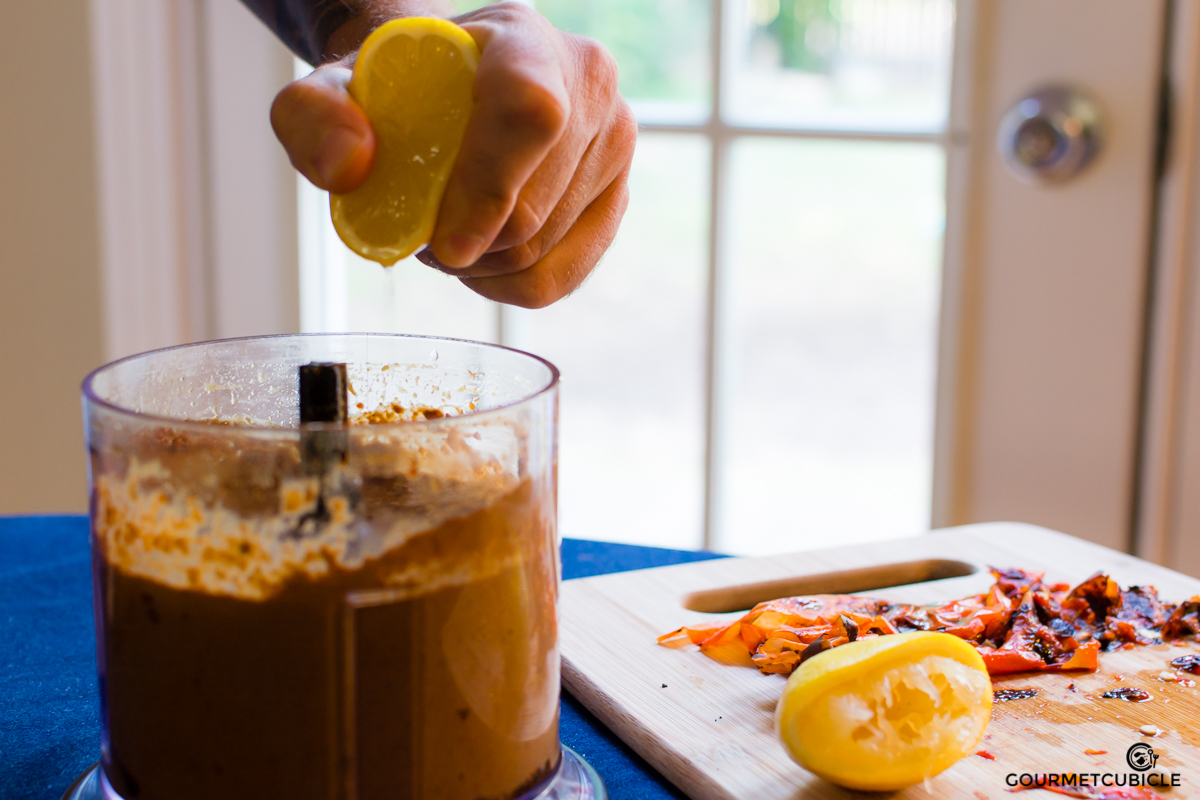
  • 2 Tbsp. fresh lemon juice (1 medium-sized lemon freshly squeezed)
  • ½ cup pomegranate molasses
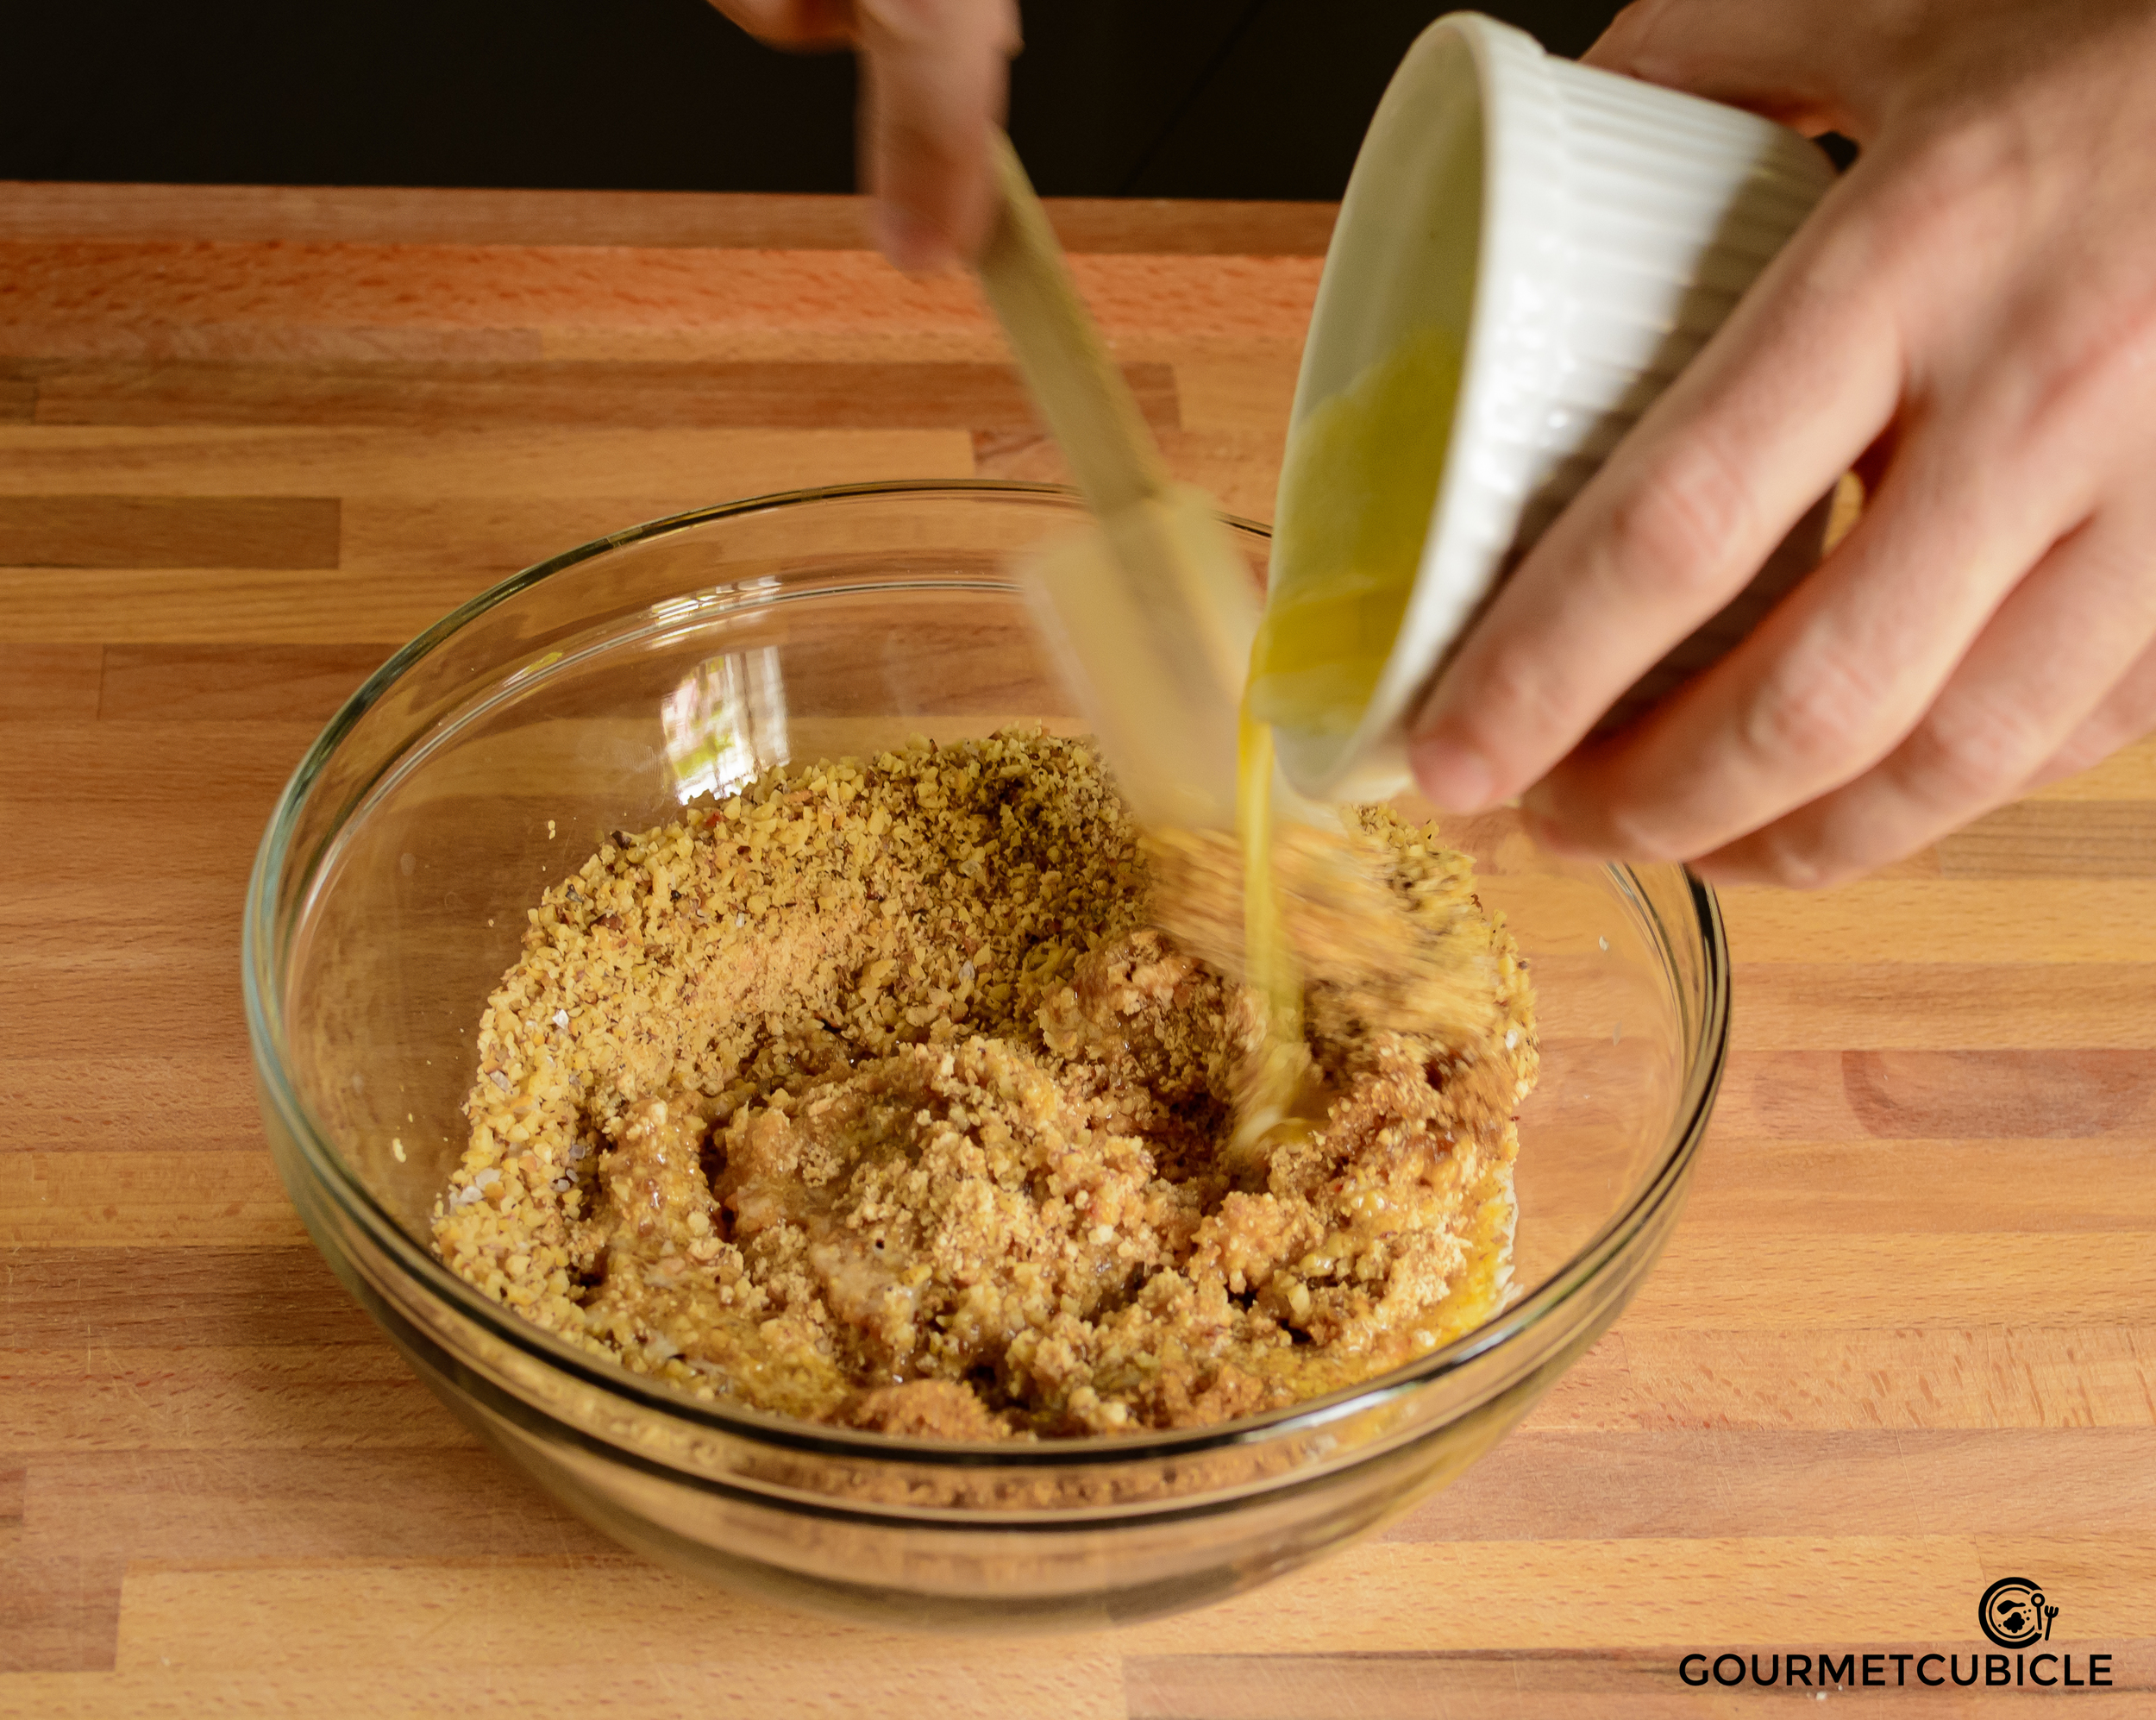
  • 2 Tbsp. olive oil
  • ½ Tbsp. smoked paprika
  • ½ tsp. crushed red pepper
  • ¾ tsp. ground cumin
  • 1 tsp. salt
  •  ¾ tsp. white peppe

Instructions

  1. Pre-heat the oven to 400F (200C) degrees.
  2. Spread walnuts in a single layer on a baking sheet. Roast for 5 minutes. Toss walnuts around for even roasting, and then return to the oven for 3 more minutes. Remove from the oven and let them cool down.
  3. Fire up the grill. When it reaches 450F (230C), place the peppers on the open grill. Roast for 25 minutes, turning them occasionally until they are charred, soft, and collapsing.
  4. Remove peppers from the grill, place them in a bowl, and cover them with a plastic wrap. Let them rest for 5 minutes.
  5. Peel the roasted peppers, and discard the charred skin and the seeds.
  6. Place the red pepper flash, walnuts, garlic, lemon juice, pomegranate molasses, olive oil, smoked paprika, crushed pepper, and cumin in a food processor, and purée until smooth, scraping the sides of the bowl regularly.
  7. Taste and adjust the seasoning by adding salt and pepper.
  8. Refrigerate until ready to serve.
  9. Spread muhammara into a bowl and make a well in the center with the back of the spoon. Top with a drizzle extra virgin olive oil, and garnish with crushed roasted walnuts and smoked paprika. Serve with warm pita bread.

Notes

  •  If you don’t have a grill, char the fresh red peppers on all sides directly on the burner of a gas stove until blistered all over. This should take significantly less time than grilling. Another alternative is roasting them in the oven.


October 17, 2016 /Aurel Pop
vegetarian, vegan, walnuts, red peppers, Middle Eastern
Appetizer
Comment

Beet Carpaccio with Citrus Vinaigrette

December 18, 2015 by Aurel Pop in Salad, Appetizer

As I was going through my recent blog posts, I realized that over the last couple of months, my focus has been on hearty traditional dishes. I posted my good friend Guy’s Piquant Pulled Pork, a recipe that made it to a few local online publications, followed by ethnic staples like Chicken Khao Soi, Romanian meatballs, and last, but not least, my dear friends Ame and Hanna’s Ethiopian Lentils from the Cooking with Friends series. After so many filling and calorie rich meals I thought it would be a good time to post a lighter dish. I thought of salads, but to be honest, salads aren’t my strong suit. I like them, it’s just that I eat them as a side dish rather than as a meal. Also, since fall has finally arrived in Austin, I was in the mood for something more suitable for colder weather. I opened my recipe notebook and stumbled upon a recipe I developed about a year ago - Roasted Beet Carpaccio.

I LOVE beets. Although as a kid I only ate them pickled, I found later in life that roasted beets are equally delicious. In my mind, beets are totally worth having my kitchen looking like a crime scene and having my hands stained with beet juice. In Romania, pickled beets are very common. In fact, we consider pickled vegetables to be salad. If you happen to be eating in Romania and find something like salata de varza, salata de rosii, salata de castraveti or salata de sfecla on the menu, don’t expect it to be a proper salad in the traditional sense of the word. More likely than not, you’ll end up getting various combinations of cabbage, tomatoes, cucumbers and beets, all pickled in vinegar. We eat them with our main dishes (they make a hell of a side dish for schnitzel and mashed potatoes).

What I recently learned about beets is that the greens are edible, too. Up until not long ago, I would discard the greens without thinking twice. I was a fool! I didn’t know how good they were. All those disposed beet greens would’ve made a great side dish. They can be sautéed or just blanched and then dressed. Soooo good! And I’m not one to throw the expression “soooo good” around when it comes to greens. I eat a variety of greens, but I can’t really say that they are all THAT good.

beets carpaccio-0074.jpg

In the spirit of the Romanian definition of salad, I’ll consider this dish a salad as well. It’s perfect for when you want to impress your guests during the colder months. I sometimes serve the beets warm, but even at room temperature or refrigerated they will be tasty. It’s up to you to decide what you like better. If you find the dressing to be too tart for your liking when you taste it on its own, worry not. The sweetness of the beets, the smokiness and pepperiness of the arugula, and the nuttiness of the walnuts all balance out the tartness of the vinaigrette. Try it and tell me what you think. Enjoy!


BEET CARPACCIO WITH CITRUS VINAIGRETTE


Serves 4-6
Prep time: 15 minutes
Cook time: 45 minutes


Ingredients

  • 4-5 beets with greens (about 1 bunch)
  • 3 TBS olive oil
  • 1 tsp salt
  • 1/2 tsp freshly ground black pepper
  • 2 cups arugula
  • 1/4 cup goat feta (or goat cheese)
  • 1/4 cup roasted walnuts
  • 1 orange, peeled and sectioned
  • olive oil, for topping
  • fresh ground pepper, to taste
  • sea salt, to taste

Citrus vinaigrette

  • 1 TBS apple cider vinegar
  • 2 TBS fresh lemon juice (1 small lemon)
  • 3 TBS fresh orange juice (1 small orange)
  • 1/2 tsp orange zest
  • 3/4 cup olive oil
  • 1 TBS honey
  • 1/2 tsp kosher salt
  • 1/4 tsp ground white pepper

Instructions

  1. Preheat oven to 400F (200C) degrees.
  2. Remove the greens from the beets cutting off and discarding the woody stems. Using a brush clean the beets thoroughly, leaving the skin on. Rinse greens and set aside.
  3. In a bowl, mix beet roots, olive oil, salt and pepper. Toss until the beets are evenly coated.
  4. Wrap each beet in aluminum foil. Place beets on the upper rack of the oven and cook for 40-45 minutes or until they can easily be pierced with the tip of a knife.
  5. While the beets are roasting in the oven, prepare an ice bath for the beet greans by filling a medium sized bowl with 1 cup ice and 4 cups cold water.
  6. Fill a medium sized pot halfway with water. Add a tablespoon of salt and bring to a boil over high heat.
  7. When the water is boiling add the beet greens and submerge them under the boiling water. Cook for no more than 2 minutes.
  8. Using a sieve or a slotted spoon, remove the greens from the pot and transfer them into the ice bath. This will stop the cooking process and keep the beet greens crisp and colorful.
  9. Place all the ingredients for the citrus vinaigrette in a jar. Put the lid on and shake well for about 30 seconds. Set aside and shake again before using it.
  10. When the beets are cooked, remove them from the oven, carefully open the aluminum foil and let them cool down.
  11. In the meantime, remove the greens from the ice bath and chop them into bite sizes.
  12. Peel the orange, section it and remove the skins from the slices. Set aside.
  13. Place arugula on a large serving plate. Sprinkle with olive oil and freshly ground black pepper.
  14. When the beets are cold enough to handle, peel them. The skins should slip off easily, but feel free to use a knife for the more stubborn spots.
  15. Using a mandolin, slice the beets into thin slices (about 2-3mm thin). 
  16. Place beets on the arugula bed. Sprinkle beet greens, feta, walnuts and orange all over the beets. Drizzle with vinaigrette and serve cold or at room temperature. Enjoy!

NoteS

  • The time it takes to cook the beets depends on their size. The beets I used were the size of a tennis ball and it took 40 minutes.
  • When opening the aluminum foil, be careful not to get burned with the hot stem that built up inside the packets.
  • You can serve the beets warm, but be careful not to burn yourself when peeling them.

December 18, 2015 /Aurel Pop
beets, goat cheese, arugula, vegetarian, walnuts
Salad, Appetizer
1 Comment

Zserbó Cake (Gerbeaud Cake)

May 28, 2015 by Aurel Pop in Dessert

Hungarians don't talk half as much about food as Americans do, but they love to eat. Eating is sacred and home cooking is present in every household. A regular meal consists of a hearty dish followed by a fruity desserts. Zserbó is one of the latter. It is one of the most famous Hungarian desserts, along with Somlói Galuska and Kürtőskalács. Interestingly enough, all three of them have walnuts as a main ingredient.

The cake was invented by a Swiss chocolatier named Emil Gerbeaud who moved to Budapest in 1884 to take charge of a famous patisserie called Kugler. His staple dessert, a layered apricot and walnut cake (zserbó), slowly became famous all over Hungary. Although the original recipe calls for apricot preserves, it is not unusual to find the cake using ginger and apple, plum jam or honey and walnut filling.

Even though I am not a big fan of sweets, growing up I couldn't ever resist zserbó. My Hungarian grandma, Iolika, made this cake all the time. The main reason was that she and my grandpa had a huge apricot tree with a bench under it right next to their kitchen. As a kid I couldn't wait for June and July to come, not only because of my birthday and summer break, but also because that was the time when the cherries and apricots ripened. All the fruit trees were so full that often times I didn't even have to climb them (or the bench for that matter) to get to fresh juicy fruits. The branches would bend under the weight of the apricots, cherries or pears to the right height for the little chubster Aurel to reach them.

While my other grandpa, Bunu, grew amazing vegetables, grandpa Tatus (his name was Aurel like mine and my father's) had a huge orchard in his backyard. He had a variety of trees and bushes full of red and black currants, strawberries, cantaloupes, grapevines, apricots, white peaches, cherries, pears, apples, quince and plums. Can you imagine spending summers there and eating all of these homegrown fruits? No wonder the first thing on my shopping list to this day is fruit.

July, August and September were also the months Iolika would make preserves out of the fruit we couldn't eat during the summer. It was a delight to open a jar of sour cherry compote during the cold winter nights and eat it while Tatus was watching soccer and drinking homemade wine. Breakfasts during during those days consisted of apricot or plum jam thickly spread over an equally thick loaf of fresh, warm bread and huge cup of chocolate milk.

My grandpa Tatus was a big man. Over 6 feet tall and probably around 300 pounds on a good day. He loved eating and I inherited that habit from him. As a kid, I used to have eating contests with him. I remember one time, I must have been 5 or 6, for dinner we each ate seven loafs of bread with homemade dry sausage, tomatoes, peppers, onions and radishes. The memory of that night is still sharp in my mind, not only because I was able to eat as much as Tatus for the first and probably last time in my life (although I'm sure he had more once I fell into a food coma and passed out), but also because it was the best day I ever spent with him.

When Iolika was baking or preparing homemade noodles and pasta, she would pass me a piece of the dough to knead, roll and shape to my liking. I remember the little green chair I used to sit on while she was at the table doing serious stuff. I didn't have my own mini table, but I was given a big white chair to serve as my work station instead. I even had my own mini rolling pin. We listened to the radio and sang Hungarian songs while the  kitchen filled with the smell of freshly baked goods. It was amazing and I am so grateful to have lived such a great childhood.

This cake has new meaning to me nowadays. On my first date with Roni, one of her questions after finding out my Hungarian heritage was if I could make zserbó. Without any hesitation I replied, "Of course, I can." even though I had never made one before on my own. I liked her way too much to let her slip between my fingers just because of a stupid cake that I've seen my grandma make several times before.

Roni's obsession with with this Hungarian delight comes from her own heritage. Her maternal grandparents were Hungarian and her whole family is crazy about zserbó . Last year when I went home to visit my family, Roni asked me to bring her zserbó. I wasn't sure if she was kidding or not, so I decided not to take the risk and actually did it. Imagine how awesome it was going through 3 airports with a cake in my hand. In the end, the airline made me check in my carry-on, which they in turn lost, and the zserbó arrived several days later in broken chunks and crumbs. Roni polished it off anyway.

Every time I make it, Roni's mom, Rachel,stops by our place as soon as the cake is done. Last time I made it, I had to put the cake in the freezer so that they could eat it sooner. If we happen to have leftovers the next day, Rachel usually comes over again and leaves with a tupperware full of cake. All of this makes me happy though, because the best reward I get out of cooking is making my beloved ones happy. After all, Roni's family is my family here in the U.S.

20150517-zserbo9.jpg

This recipe belongs to my mother, though. Shortly after committing to making the cake for Roni I Skyped my mom and asked for the recipe. I had to do all the translation and conversion from the metric system though, so I feel like it's partially mine, too. 

I also added a little spin by making my own apricot jam, mainly because I find the preserves to be too sweet here in the U.S. but also because apricots were on sale. You can save 20-30 minutes by using only store-bought apricot jam (one 14oz jar will do), but I recommend you adding a little bit of orange or lemon juice to make it more tart. I hope you'll try this amazing dessert and if you're going to like it at least half as much as Roni's family, I will consider it a huge success.

Egészségedre! (Cheers!)


ZSERBÓ Cake (Gerbeaud Cake)


Serves 8
Prep time: 45 minutes
Cook time: 45 minutes
Inactive time: 1 hour


Ingredients

Dough

  • 1/2 cup whole milk
  • 3/8 oz dry yeast (1 packet)
  • 1 tsp cane sugar
  • 3 cups flour, all-purpose
  • 8 oz unsalted butter (2 sticks), softened 
  • 1-2 eggs, pasture raised
  • 1/2 tsp kosher salt
  • 1 tsp baking soda
  • 3 1/2 oz sugar, powdered, brown or mix of both

Walnut Filing

  • 3 1/2 cups walnut halves
  • 3/4 cup sugar, brown, powdered or mix of both
  • 1 lemon, zested

Apricot Jam Filling

  • 1/2 cup brown sugar
  • 1 pound apricots, pitted and quartered
  • 6 cardamom pods
  • 8 fresh mint leaves, finely chopped
  • 1/4 cup brandy
  • 6 oz apricot preserves

Chocolate glaze

  • 2 TBS brown sugar
  • 2 TBS unsweetened cocoa powder
  • 2 TBS water
  • 4 oz dark chocolate, chopped 
  • 2 oz unsalted butter

Instructions

  1. Preheat oven to 365F (185C). Heat up milk to around 110F (45C). Add yeast, 1 teaspoon sugar and mix well. Set aside for 10-15 minutes until the milk starts to bloom (you'll see it bubble up).
  2. In the meantime, combine flour, chunks of soft butter butter, egg, salt and baking soda. Mix it well and then add the rest of the sugar and yeast mixture. If using a stand mixer with a dough hook set it to low and let it run until the dough becomes smooth, but still sticky. I prefer kneading it with my hands, but that's just a personal preference. Once the dough is nice and smooth, put it in a bowl, cover it with plastic wrap and let it rest for 20-30 minutes.
  3. While the dough is rising, put walnuts, sugar and lemon zest into food processor and pulse a few times until the walnuts are finely chopped. I prefer it chunkier, but smooth is fine, too.  
  4. Heat sugar in a medium sauce pan over medium heat, stirring constantly with a spatula or wooden spoon for about 5 minutes. Toss in the apricots, cardamom pods and mint and cook for about 5 minutes. Carefully pour in brandy. Ignite mixture with a matchstick or by slowly tilting the pan to the side so the flames can reach it. Let the flames die out and cook for another 10-15 minutes, stirring occasionally. Remove cardamom pods and mint leaves and transfer the mixture to a food processor. Add apricot preserves and pulse until you get a jam like consistency. 
  5. Butter a 13x9-inch baking pan. Alternatively you can use parchment-paper to line the baking pan. 
  6. Divide the dough into 3 equal parts.  Roll them out to the size of the baking sheet. Transfer one layer of dough into the pan, pressing it into the corners to fit.  Spread half the apricot preserves over the entire layer, followed by a layer of walnuts mixture. Repeat the dough/jam/walnut procedure one more time then cover with the third layer of dough. Using a fork, poke a few holes in the top layer. That will keep the dough from bubbling up. Bake for 25-30 minutes until the top is golden brown. I using more than 3 layers you may have to bake it longer.
  7. Remove from the oven and let is cool for about 30 minutes.
  8. While the cake is cooling prepare the chocolate glaze by dissolving sugar and cocoa powder in water over medium heat in a small saucepan or a double boiler. Add chocolate chunks and using a whisk stir until the chocolate is melted. Bring mixture to a boil and add the butter. Remove the saucepan/double boiler from the heat and mix well until the butter is completely melted.
  9. Cool the mixture for about 5 minutes and then stir the glaze again. The consistency is right when the glaze is thick enough to coat the spoon you're using for tasting. When it's ready it will be warm and still pourable.
  10. Pour evenly over the cake. Chill for at least one hour before serving. If you have any walnut filling left sprinkle it over the top. It's not the traditional way, but I don't like wasting anything.
May 28, 2015 /Aurel Pop
walnuts, cake, apricots, Hungarian
Dessert
11 Comments
key lime pie gc.jpg

Key Lime Pie With Walnuts, Sea Salt and Meringue

April 30, 2015 by Aurel Pop in Dessert

I don't consider myself a baker. As a matter of fact, I had never made any desserts (other than crepes, but I usually fill them with ham and cheese) up until a couple of years ago. The reason is simple- I'm not a fan of sweets. I will eat a light fruit dessert, but I seldom have a sweet tooth. When I tell this to people, usually their first reaction is to ask me if I'm kidding. 

Growing up, I was the odd kid for not liking chocolate and sweets. When I got candy for Easter, Christmas or other special occasions from relatives and friends, I would just save them in my drawer and later trade them for fruit or sell them so that I could buy savory things. My sister was OK with this as she always got to eat my piece of cake. We fought a lot as kids, but it was never over dessert.

The situation hasn't changed much to this day, except now my girlfriend gets to eat all the chocolate and sweets in the house. Desserts are never a topic that we argue about. In her book, no dinner is complete without something sweet at the end. She doesn't have a sweet tooth, but rather a sweet megalodon.

As you might have guessed key lime pie isn’t exactly a dessert I had growing up in Eastern Europe. I first tasted it a few years ago and instantly liked it. The creamy texture of the filling combined with the crunchiness of the crust was something that got my attention. I found it to be my type of dessert- not too sweet, tart, and with an added citrus kick from the lime zest.

Although I knew that I found my favorite American dessert, It never actually crossed my mind to try making it on my own, thinking that it required some sort of special baking skills. Also, I feel like baking leaves me with little room for creativity. Baking is chemistry and bakers are very precise, something that I can't say about myself even though I'm an engineer. If you mess up the ratios in a cake recipe it is very likely that your dessert is either going to look like crap or taste like crap, if not both. Neither scenario is encouraging to me.

It was just this year that I made my first key lime pie. The inspiration came when we were visiting Roni's mom while she was recovering from surgery. I was warned that her sister would bring a key lime pie. THE key lime pie, as her family refers to it. What I wasn't warned about was that the pie would disappear within the blink of an eye. Suddenly I realized how different my life would've been, had I actually liked sweets as a kid. It would have been a struggle having to fight over every piece of dessert with my sister in the same way I now had to fight with Roni's family to get a bite of THE pie.

"I can totally make one of these”, I caught myself saying aloud and then started to browse the internet for recipes. I studied recipe after recipe and to my surprise none of them sounded that difficult. Why had I been so scared about baking it? This particular time I was scared because I have the bad habit of talking before thinking and found myself promising my girlfriend's family to match THE pie both in taste and presentation. 

And I did! I did match it and honestly think that I topped it. It wasn't easy, but by no means was it difficult. 

I prefer to use key limes (obviously), because I feel like they are less tart and a tad more bitter and smoother than the Persian ones. If it's difficult for you to get a hold of them, use regular Persian ones, but maybe reduce the amount of lime juice to 3/4 of a cup, unless you like your pie really tart.

My twist to the traditional recipe is the use of two secret ingredients: sea salt and walnuts. They will make the crust even crunchier adding more texture to the pie. The crust will contrast well with the smooth and creamy filling and the fluffiness of the meringue. 


KEY LIME PIE WITH WALNUTS, SEA SALT AND MERINGUE


Serves 8
Prep time: 30 minutes
Cook time: 35 minutes


Ingredients

Crust

  • 1 1/2 cup graham crackers
  • 1/2 cup English walnuts
  • 1/4 cup brown sugar
  • 1/2 tsp sea salt
  • 3/4 stick unsalted butter, melted

Filling

  • 3-4 egg yolks (pasture raised)
  • 1 TBS lime zest
  • 20 oz condensed milk
  • 15-20 key limes, juiced (about 1/2 cup)

Meringue

  • 3-4 egg whites
  • 1/2 tsp kosher salt (a pinch)
  • 1/2 TBS lime zest
  • 1 TBS lemon juice
  • 2-3 TBS white sugar

Instructions

  1. Preheat oven to 375F (190C).
  2. Whiz the graham crackers and walnuts in a food processor. In a bowl mix the crumbled crackers and walnuts, brown sugar and sea salt. Slowly add melted butter and mix well until the crumbs are evenly coated.
  3. Press mixture firmly into the bottom and up the sides of a 9-inch pie dish. Put it in the oven to bake  for about 12 minutes until golden brown. Remove from the oven and let it cool to room temperature. Don't worry too much if it doesn't look cooked yet, as it will return to the oven soon.
  4. Lower the heat in the oven to 340F (170C).
  5. In a separate bowl combine egg yolks and lime zest. Beat the mixture until the eggs become thick. Pour in the condensed milk and whisk for about 2-3 minutes. Finally add the lime juice and mix until well blended and smooth (another 2-3 minutes).
  6. Pour the filling into the cooled crust to the top edge. Return the pie to the oven and cook for not more than 10-12 minutes.
  7. In the meantime, mix egg whites, salt, lime zest and lemon juice in a bowl. Beat with an electric mixer on medium speed until foamy. Turn the mixer on high and slowly pour in the sugar. Beat until stiff and glossy peaks form. A good test to see if they are stiff enough is to slowly turn the bowl sideways or upside down without the meringue slipping out. 
  8. Remove the pie from the oven then raise the heat to 375F (190C) again. Cover the pie with the meringue and return it to the oven for about 8 more minutes until the peaks become golden brown. 
  9. Allow the pie cool down to room temperature then chill it in the refrigerator for about 2-3 hours. Serve cold and enjoy!
April 30, 2015 /Aurel Pop
pie, lime, walnuts
Dessert
1 Comment

Copyright ©2017 Aurel Pop & gourmetcubicle. All rights reserved. Don't steal, ask.