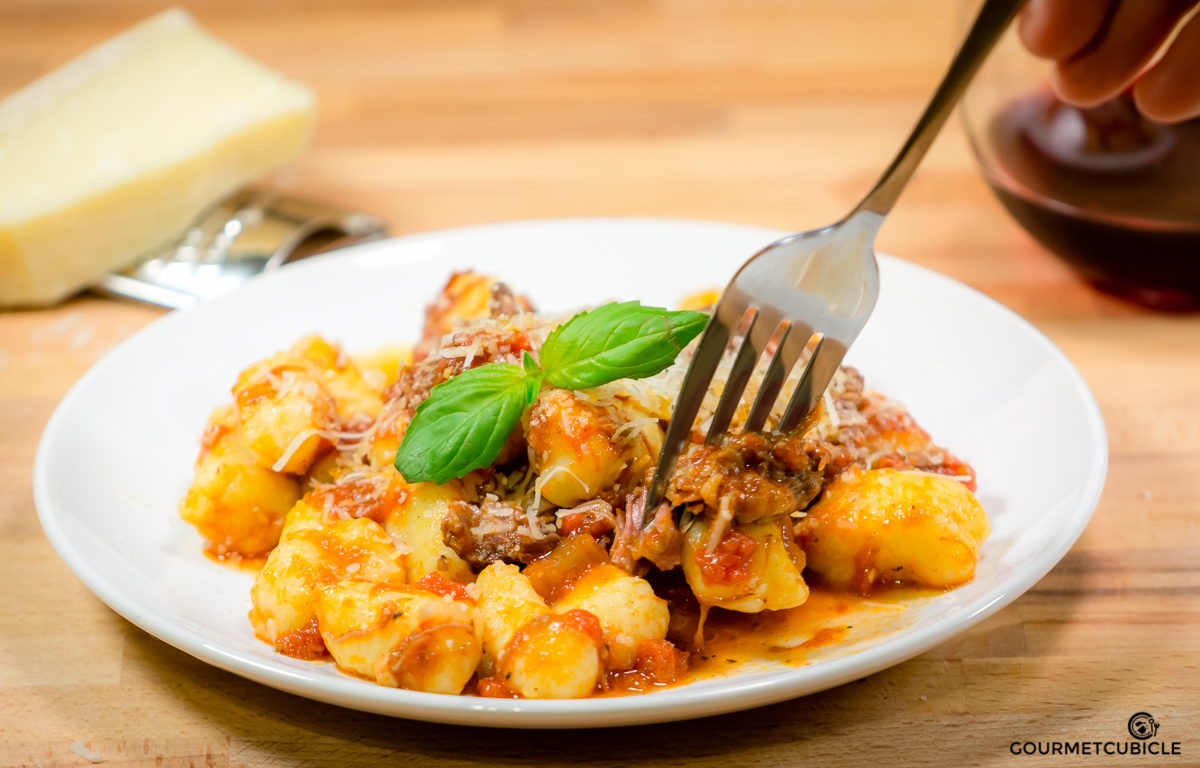
Slow Cooked Oxtail and Short Rib Ragù With Homemade Gnocchi
Today is my favorite day of the year- it's my birthday! I'm turning 32 which feels great, but scary at the same time. I'm getting old. It feels like it was not long ago that I left my hometown of Satu Mare, Romania to move to college to Timisoara. The first year was perhaps the best year out of the five that I spent there. I lived with three of my best friends from high school: Ovi, George and Cristi. We were a crazy bunch, but somehow we always stayed out of trouble even thought we often towed the line.

Ovi and Cristi played backgammon (Table in Romanian) every single night. Sometimes I would wake up in the morning and they would still be in the kitchen playing. They kept a running score and after a year, the score of the sets was something ridiculous like four hundred and something to four hundred and something. This may not seem to be a lot at first glance, but let me clarify that each set consisted of a best-of-eleven series. The funniest part wasn't even that, but the amount that they bet: 5 RON (less than 50¢).

George and I weren't into board games or gambling, but we were obsessed with this computer game called Football Manager. We'd spend most of our free time playing it. I think the most we played in one sitting was twenty-something hours. The boys didn't really know how to cook so I was responsible for feeding our crew. In exchange, they would wash the dishes (dishwashers are not common in Romania), clean the house and run errands. It was a pretty sweet deal for me, because I loved cooking.
The all-time favorite dish in our house was a bolognese pasta that I made with fresh vegetables, ground meat, and lots of cheese. Not parmesan though because it was way too expensive for our broke-college-student taste. We always served this with cheap wine that we either bought from Recaș, a winery close to Timisoara, or from the tiny convenience store next to our apartment for the equivalent of $1 for 2 liters.

This oxtail and short rib recipe is a lot different though. It is without a doubt the most time consuming of all of my recipes. I make it only once or twice a year and that's not because of the time it takes to cook, but mostly because it yields so much ragù that we stock up our freezer with leftovers.
Next week, I'll go on a three-week long business trip. First, I'll head to Hungary for a conference where I will be presenting, and then to Singapore to help a customer get a system up and running. Although very exhausting I love these kinds of trips. I enjoy traveling to new places, and even though I've been to both Hungary and Singapore before, I managed to get the return ticket with a two-day layover in Tokyo. I've never been there before, but based on what Anthony Bourdain keeps mentioning in his shows, Tokyo is the food mecca where chefs want to retire and die.
One of the reasons I decided to make this hearty dish now, in the middle of the summer, is this trip. I wanted to stock up the freezer for Roni for when I'm gone. She hardly ever cooks, but now with my blog up and running, she does it even less often. When I'm not at home to make food she will eat tacos for breakfast, lunch and dinner seven days a week. Although I don't mind her eating tacos, I don't want the crew at El Tacorrido to get false hopes that she was back to eating there every day only to get heartbroken again when I return.

This is a recipe you must try. I know it's a lot of time that you will need to sacrifice in order to make it, but it's worth it. Once you taste it you'll understand what I'm talking about. Words can't describe how delicious this dish is. It's a hearty piece of heaven, the perfect dish for a dinner with friends and family. Open a bottle of good red wine, share stories about your old college shenanigans, and have great laugh. After all that is what food should be about: love, friendship and joy.
Slow Cooked Oxtail and Short Rib Ragù With Homemade Gnocchi
Serves over 20
Prep time: 30 minutes
Cook time: 7 hours
Inactive time: 6 hours
Ingredients
Ragù
- 3 TBS unsalted butter
- 1 lb oxtail
- 2 lbs beef short rib, bone in
- 1/4 cup olive oil
- 1 big yellow onion, finely chopped
- 1 leek, cleaned and finely chopped
- 4 celery stalks, finely chopped
- 4-5 carrots, finely chopped
- 7 cloves garlic, crushed and minced
- 2 TBS unsalted butter
- 1/2 TBS black pepper, freshly ground
- 1 1/2 cups whole milk
- 2 cups dry red wine
- 1 cup beef stock
- 1 1/2 TBS dried oregano
- 1 tsp nutmeg, ground
- 1 star anise, whole
- 3 dried bay leaves, whole
- 3 big cans (32 oz) San Marzano tomatoes
- 1 cups beef stock
- 4 sprigs fresh thyme
- 1 bunch fresh basil, finely chopped
- 2 inches of parmesan rind
- 7 anchovy fillets
- 1 TBS olive oil
- 1/2 cup parmesan, freshly grated
- 2 tsp black pepper, freshly ground
- salt, to taste
Gnocchi
- 2 pounds russet potatoes
- 2 1/2 TBS salt
- 1 1/2 cups "00" flour
- 2 egg yolks
Instructions
Ragù
- In a large-heavy bottomed deep skillet melt 3 tablespoons butter over medium high heat. When the butter starts foaming (don't wait any longer otherwise it will brown and then burn) place the short ribs and oxtail in the pan and brown the meat for about 3-4 minutes on each side. Do not overload the skillet with the short ribs and oxtail. You risk reducing the heat in the pan to the point where the meat will not brown and will become greasy. Instead, work in batches if you have to.
- Remove the meat from the pan and set aside. Add olive oil to the same skillet and scrape off the burnt pieces of meat. Toss in chopped onions, leeks, celery and carrots (mirepoix) and sauté, stirring occasionally, until the onions become translucent, about 10-12 minutes. Add crushed garlic and cook for another 5 minutes.
- In the meantime take a large cast-iron dutch oven and melt the rest of the butter over medium heat. Add the browned meat and season with half tablespoon freshly cracked black pepper. Add milk and let it cook while you take care of the mirepoix and wine reduction.
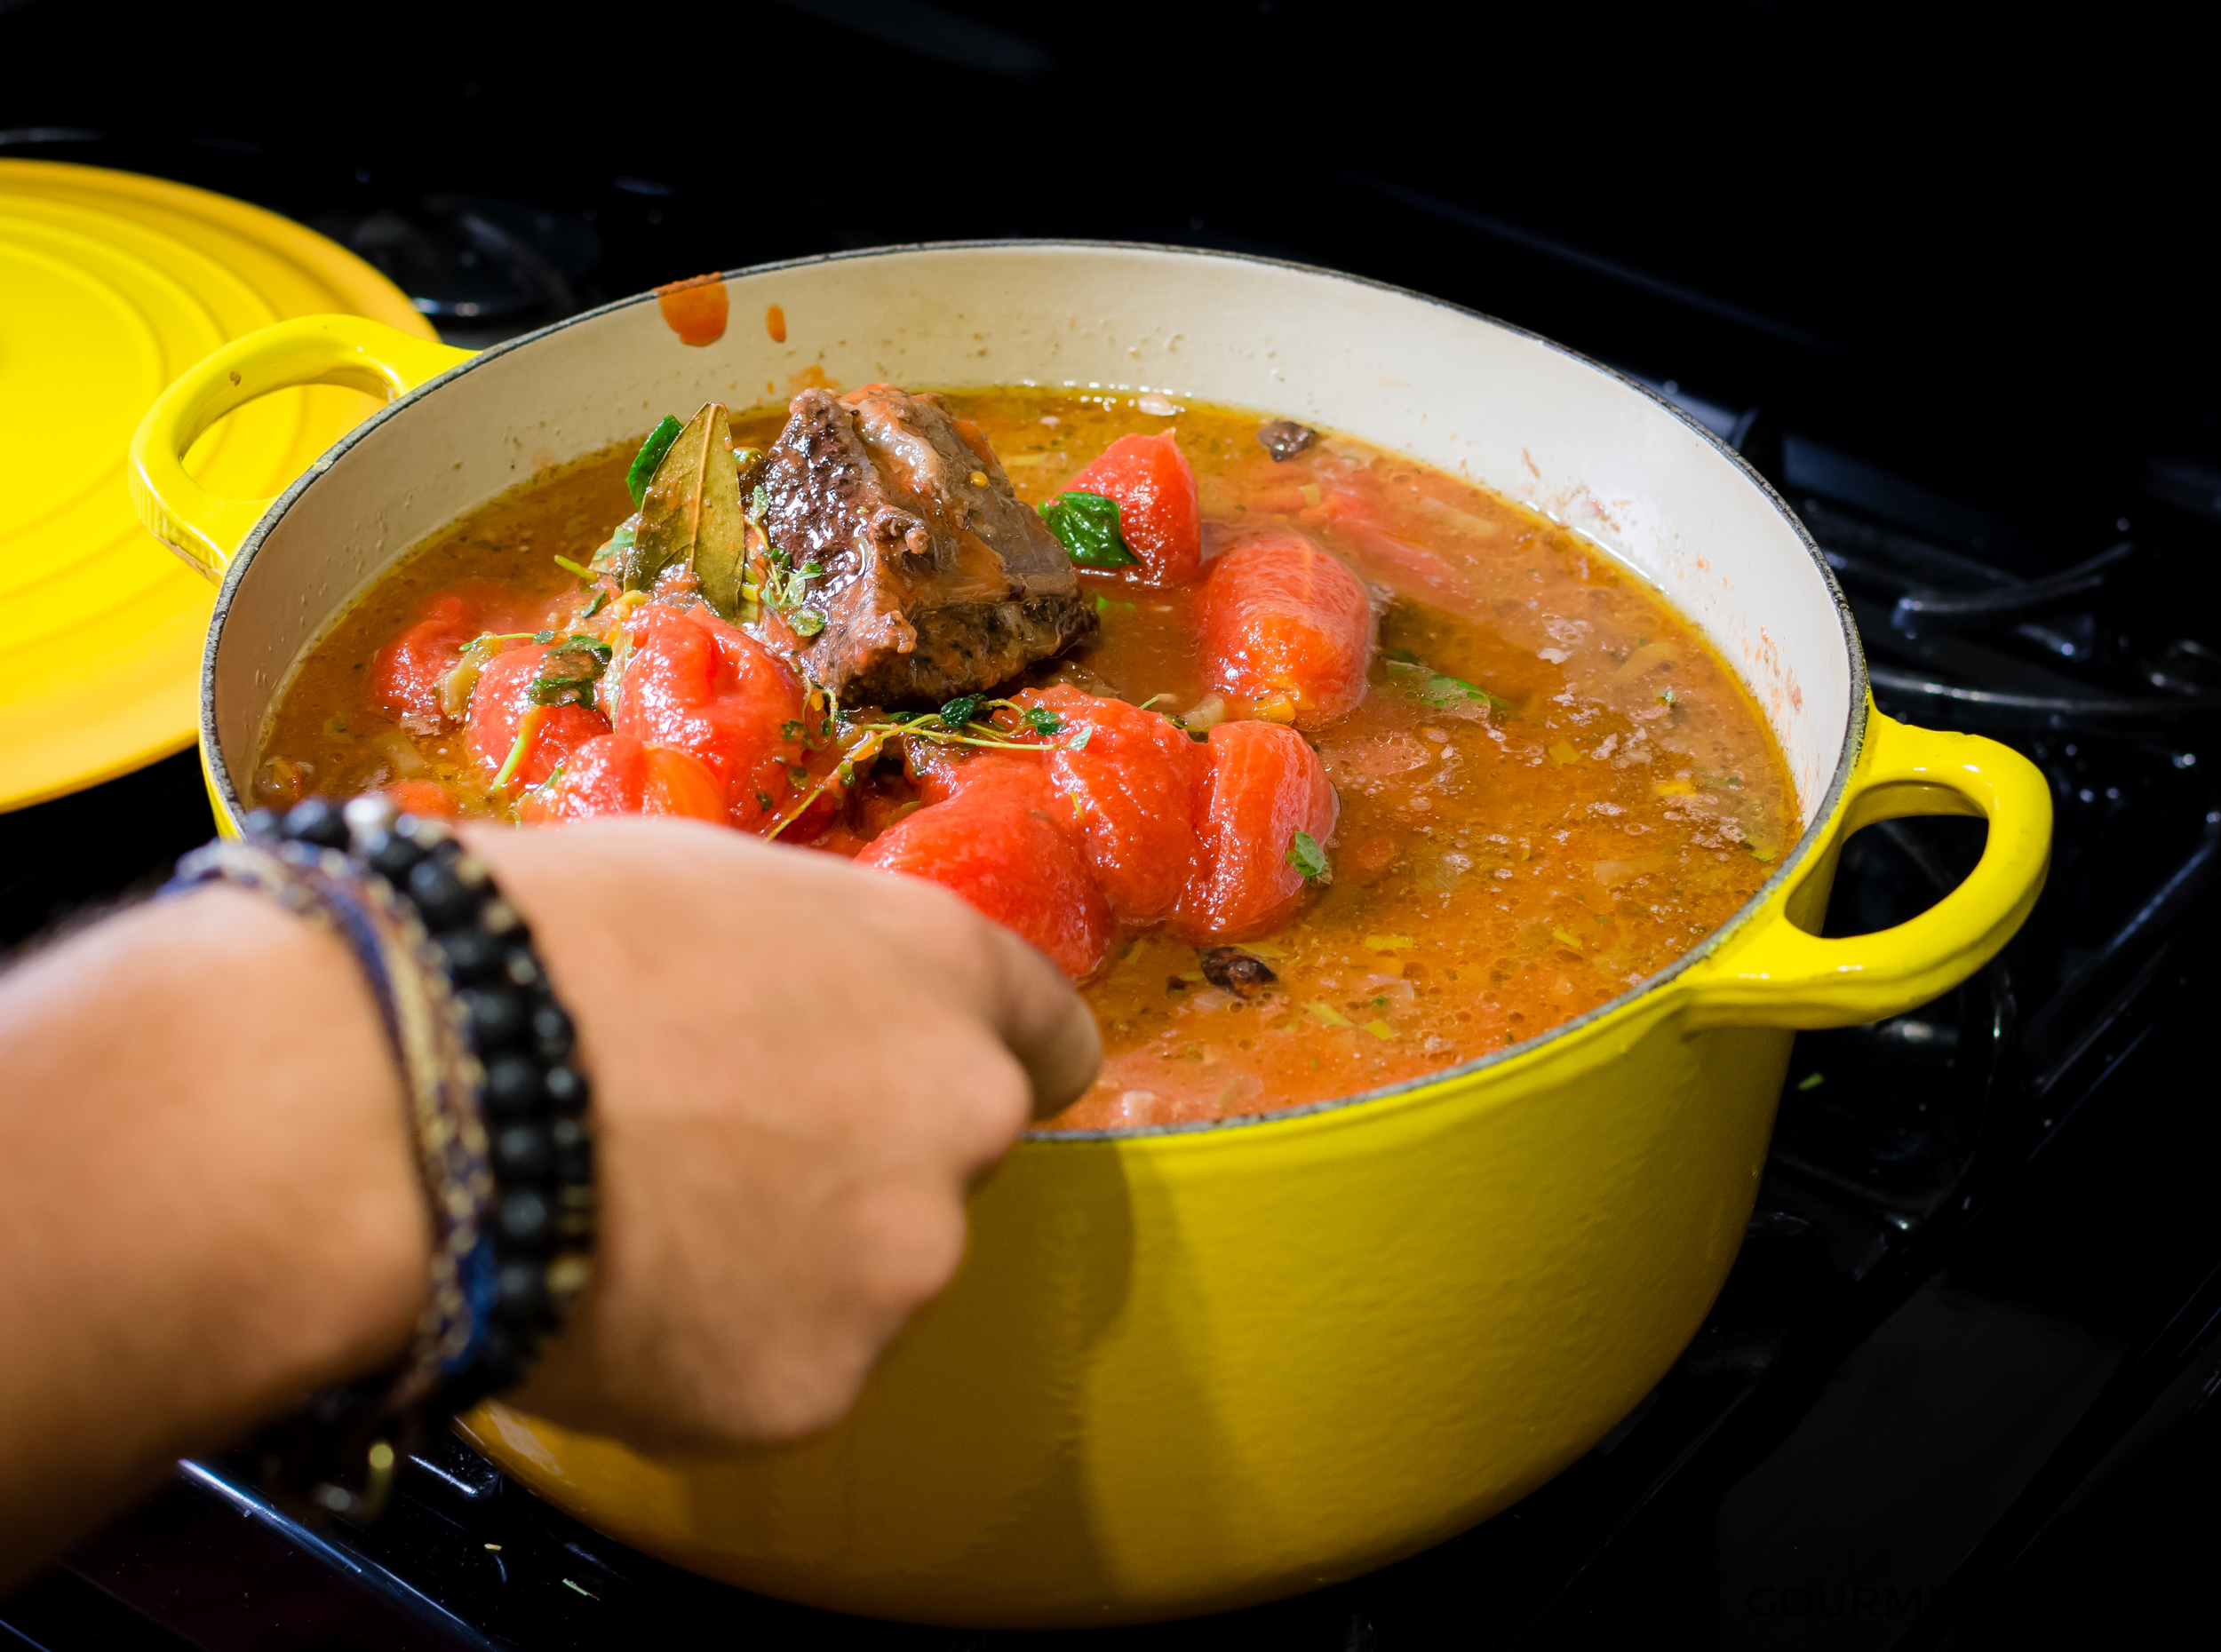
- When the mirepoix is tender pour it over the meat and milk mixture. In the same skillet that you used to brown the meat and sauté the mirepoix add wine and bring to a boil over medium-high heat. Add oregano, nutmeg, black pepper, anise and bay leaves and reduce the heat to medium. Simmer for about 5-7 minutes.
- Pour the wine mixture into the dutch oven and add one cup beef stock. The milk, mirepoix, wine and beef broth mixture should cover the meat by 1-2 inches. If not add more stock to completely cover the meat. Reduce the heat to medium-low, cover the dutch oven and simmer for an hour.
- Remove the lid from the dutch oven and pour in the San Marzano tomatoes. Set the heat to medium-high and bring mixture to a boil. Add the rest of the beef stock, thyme, basil and Parmesan rind, reduce the heat to low and let the sauce gently simmer (it will bubble very slowly). Cover the dutch oven and cook for about 4-5 hours. Every half an hour or so check the sauce, gently stir and make sure nothing is burned and stuck to the bottom. It shouldn't be the case if you're simmering it on low heat and using a cast-iron dutch oven, but check it just in case. You don't want to burn your sauce after spending so much time and money on the ingredients.
- After 4-5 hours the meat should already be falling off the bones. Remove the bones and discard them. Add the anchovy fillets. You're almost there. Set the burner to minimum heat, stir in the parmesan cheese and simmer uncovered for another hour. If you're making the gnocchi, now it's the right time to start preparing it.
- Add olive oil to a medium size skillet, add gnocchi and sauce to your liking, and bring to a simmer over medium-high heat. Sprinkle with freshly grated parmesan cheese and serve hot.
Gnocchi
- Put potatoes in a large saucepan and cover with cold water by 2 inches. Add a tablespoon of salt and bring to a boil over high heat. Reduce to a simmer (medium heat) and cook potatoes for 15-20 minutes depending on the size. When pierced with a fork the potatoes should feel very tender.
- Drain potatoes and run them under cold tap water. Remove peel (they should slip off easily) and pass them through a potato ricer, food mill or grater. I don't have the first two kitchen tools so I grated the potatoes on a small hole cheese grater.
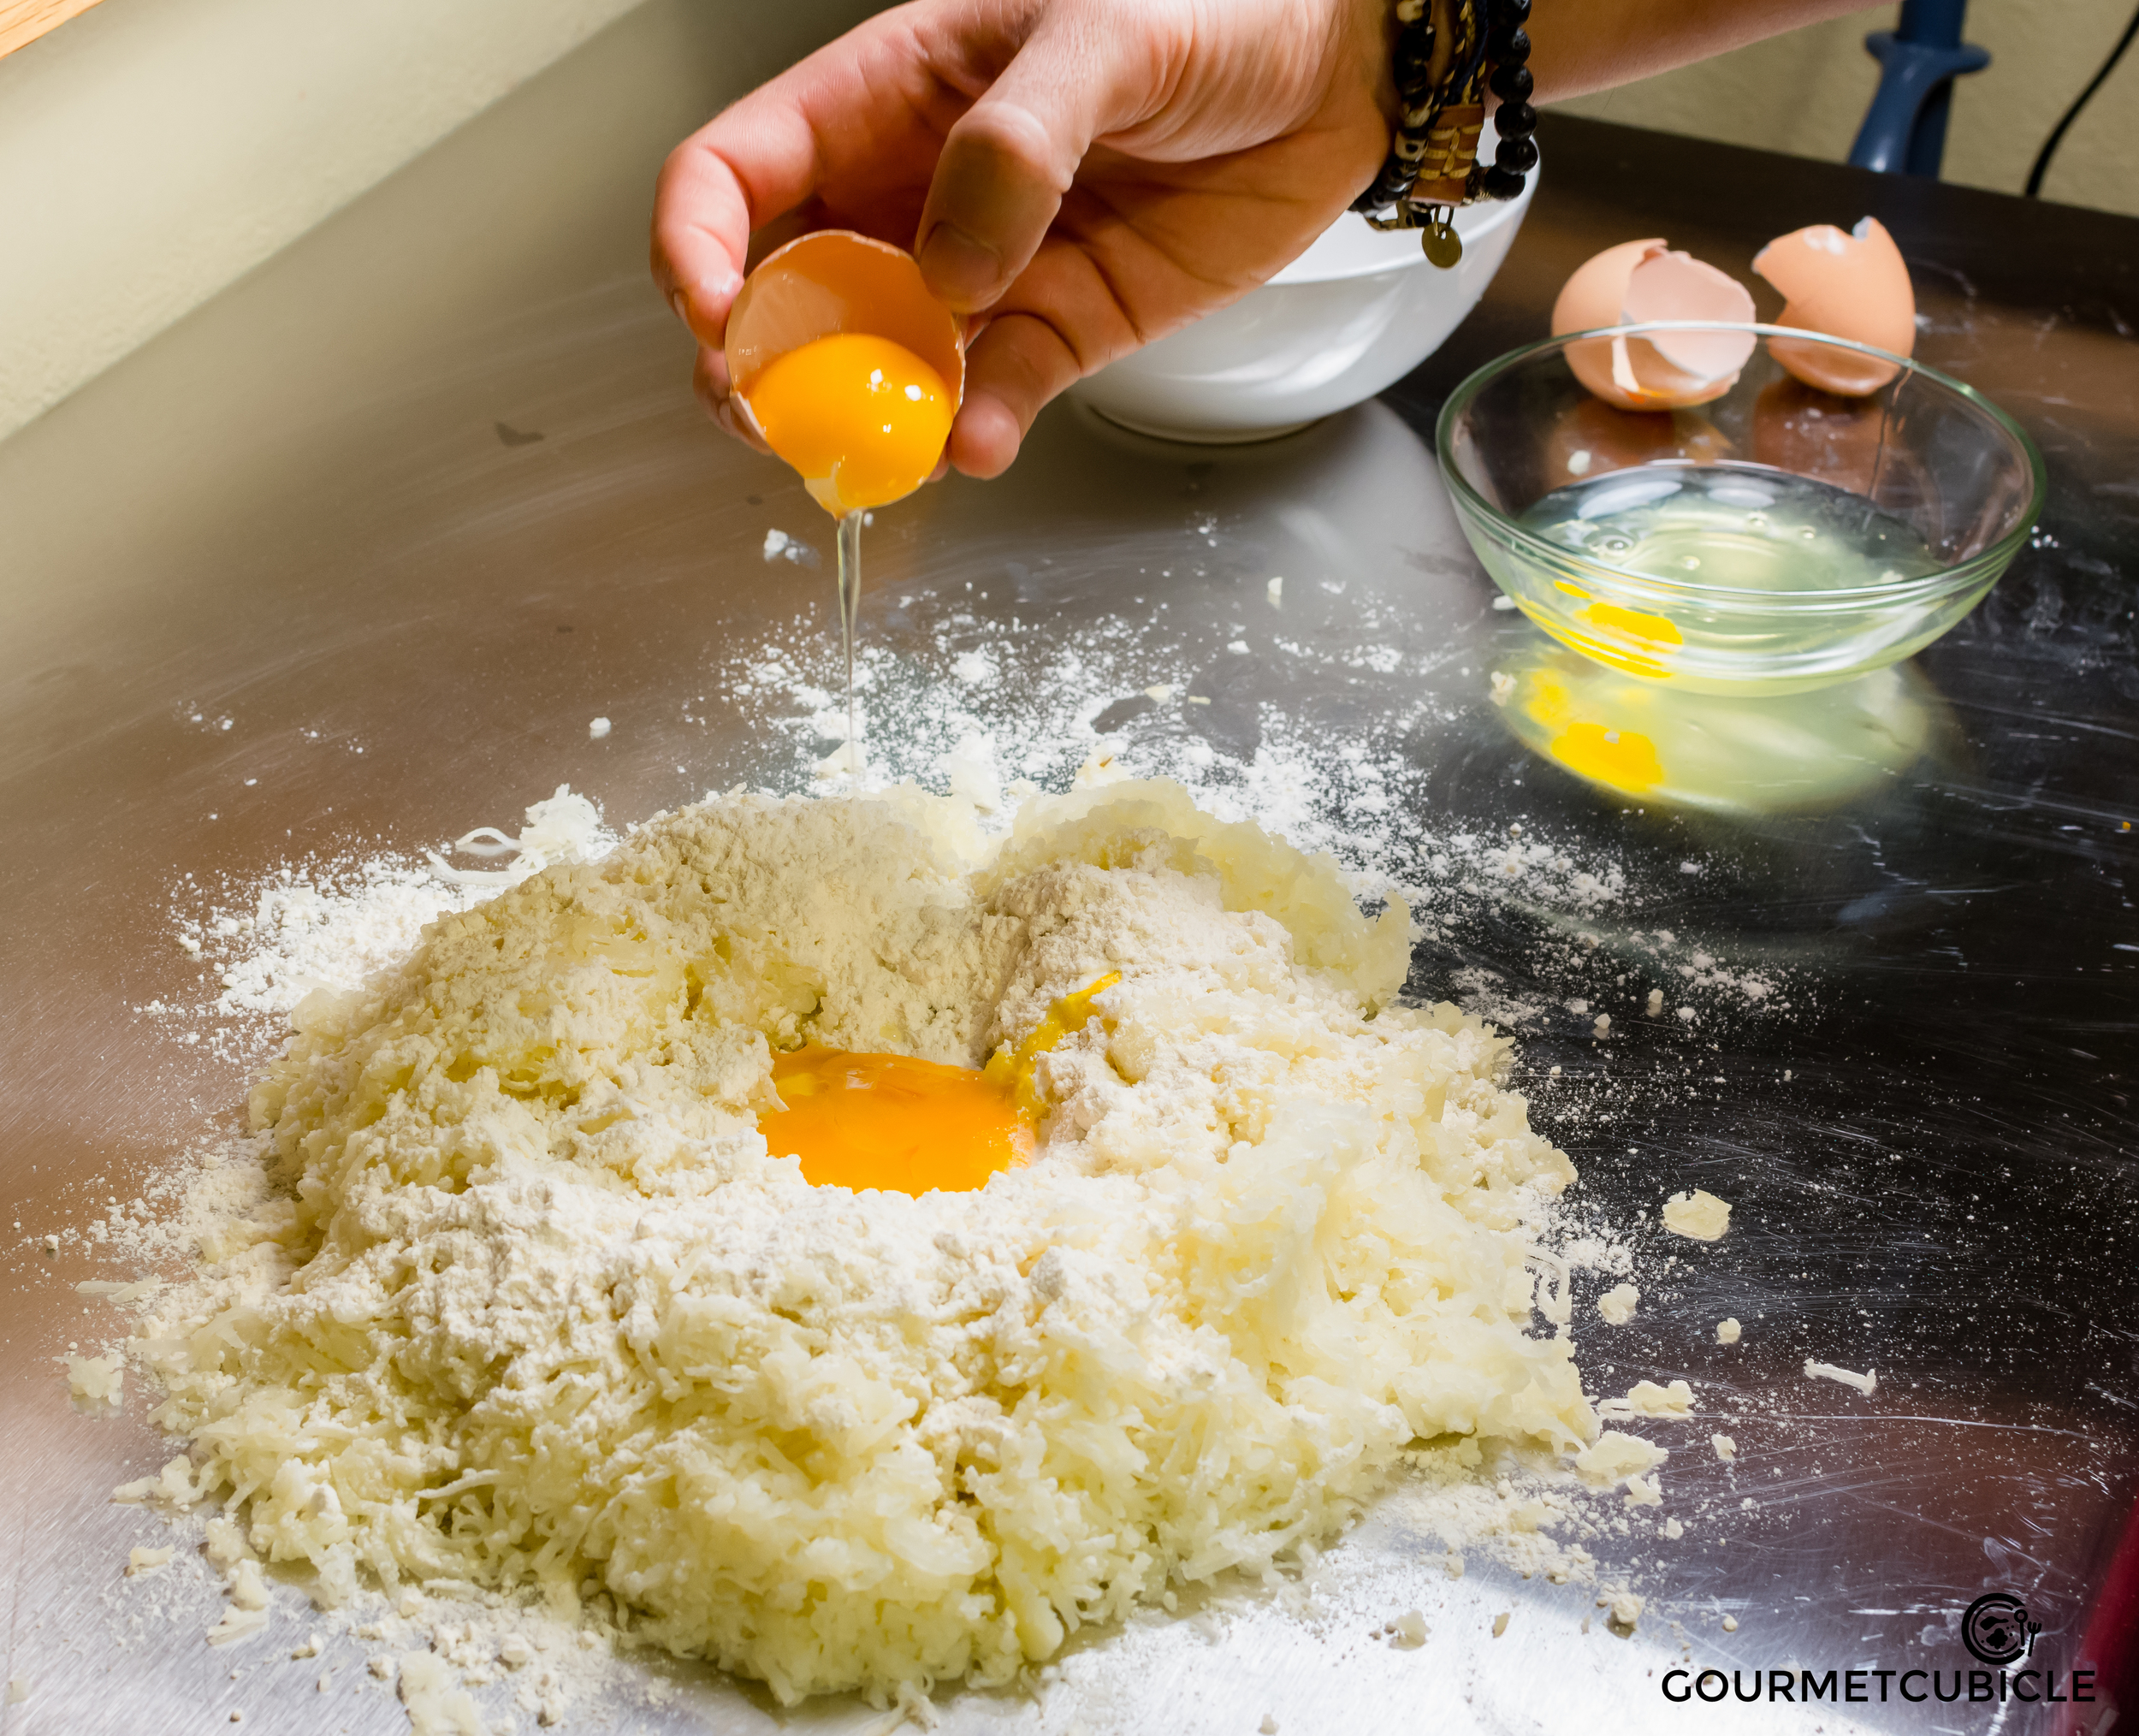
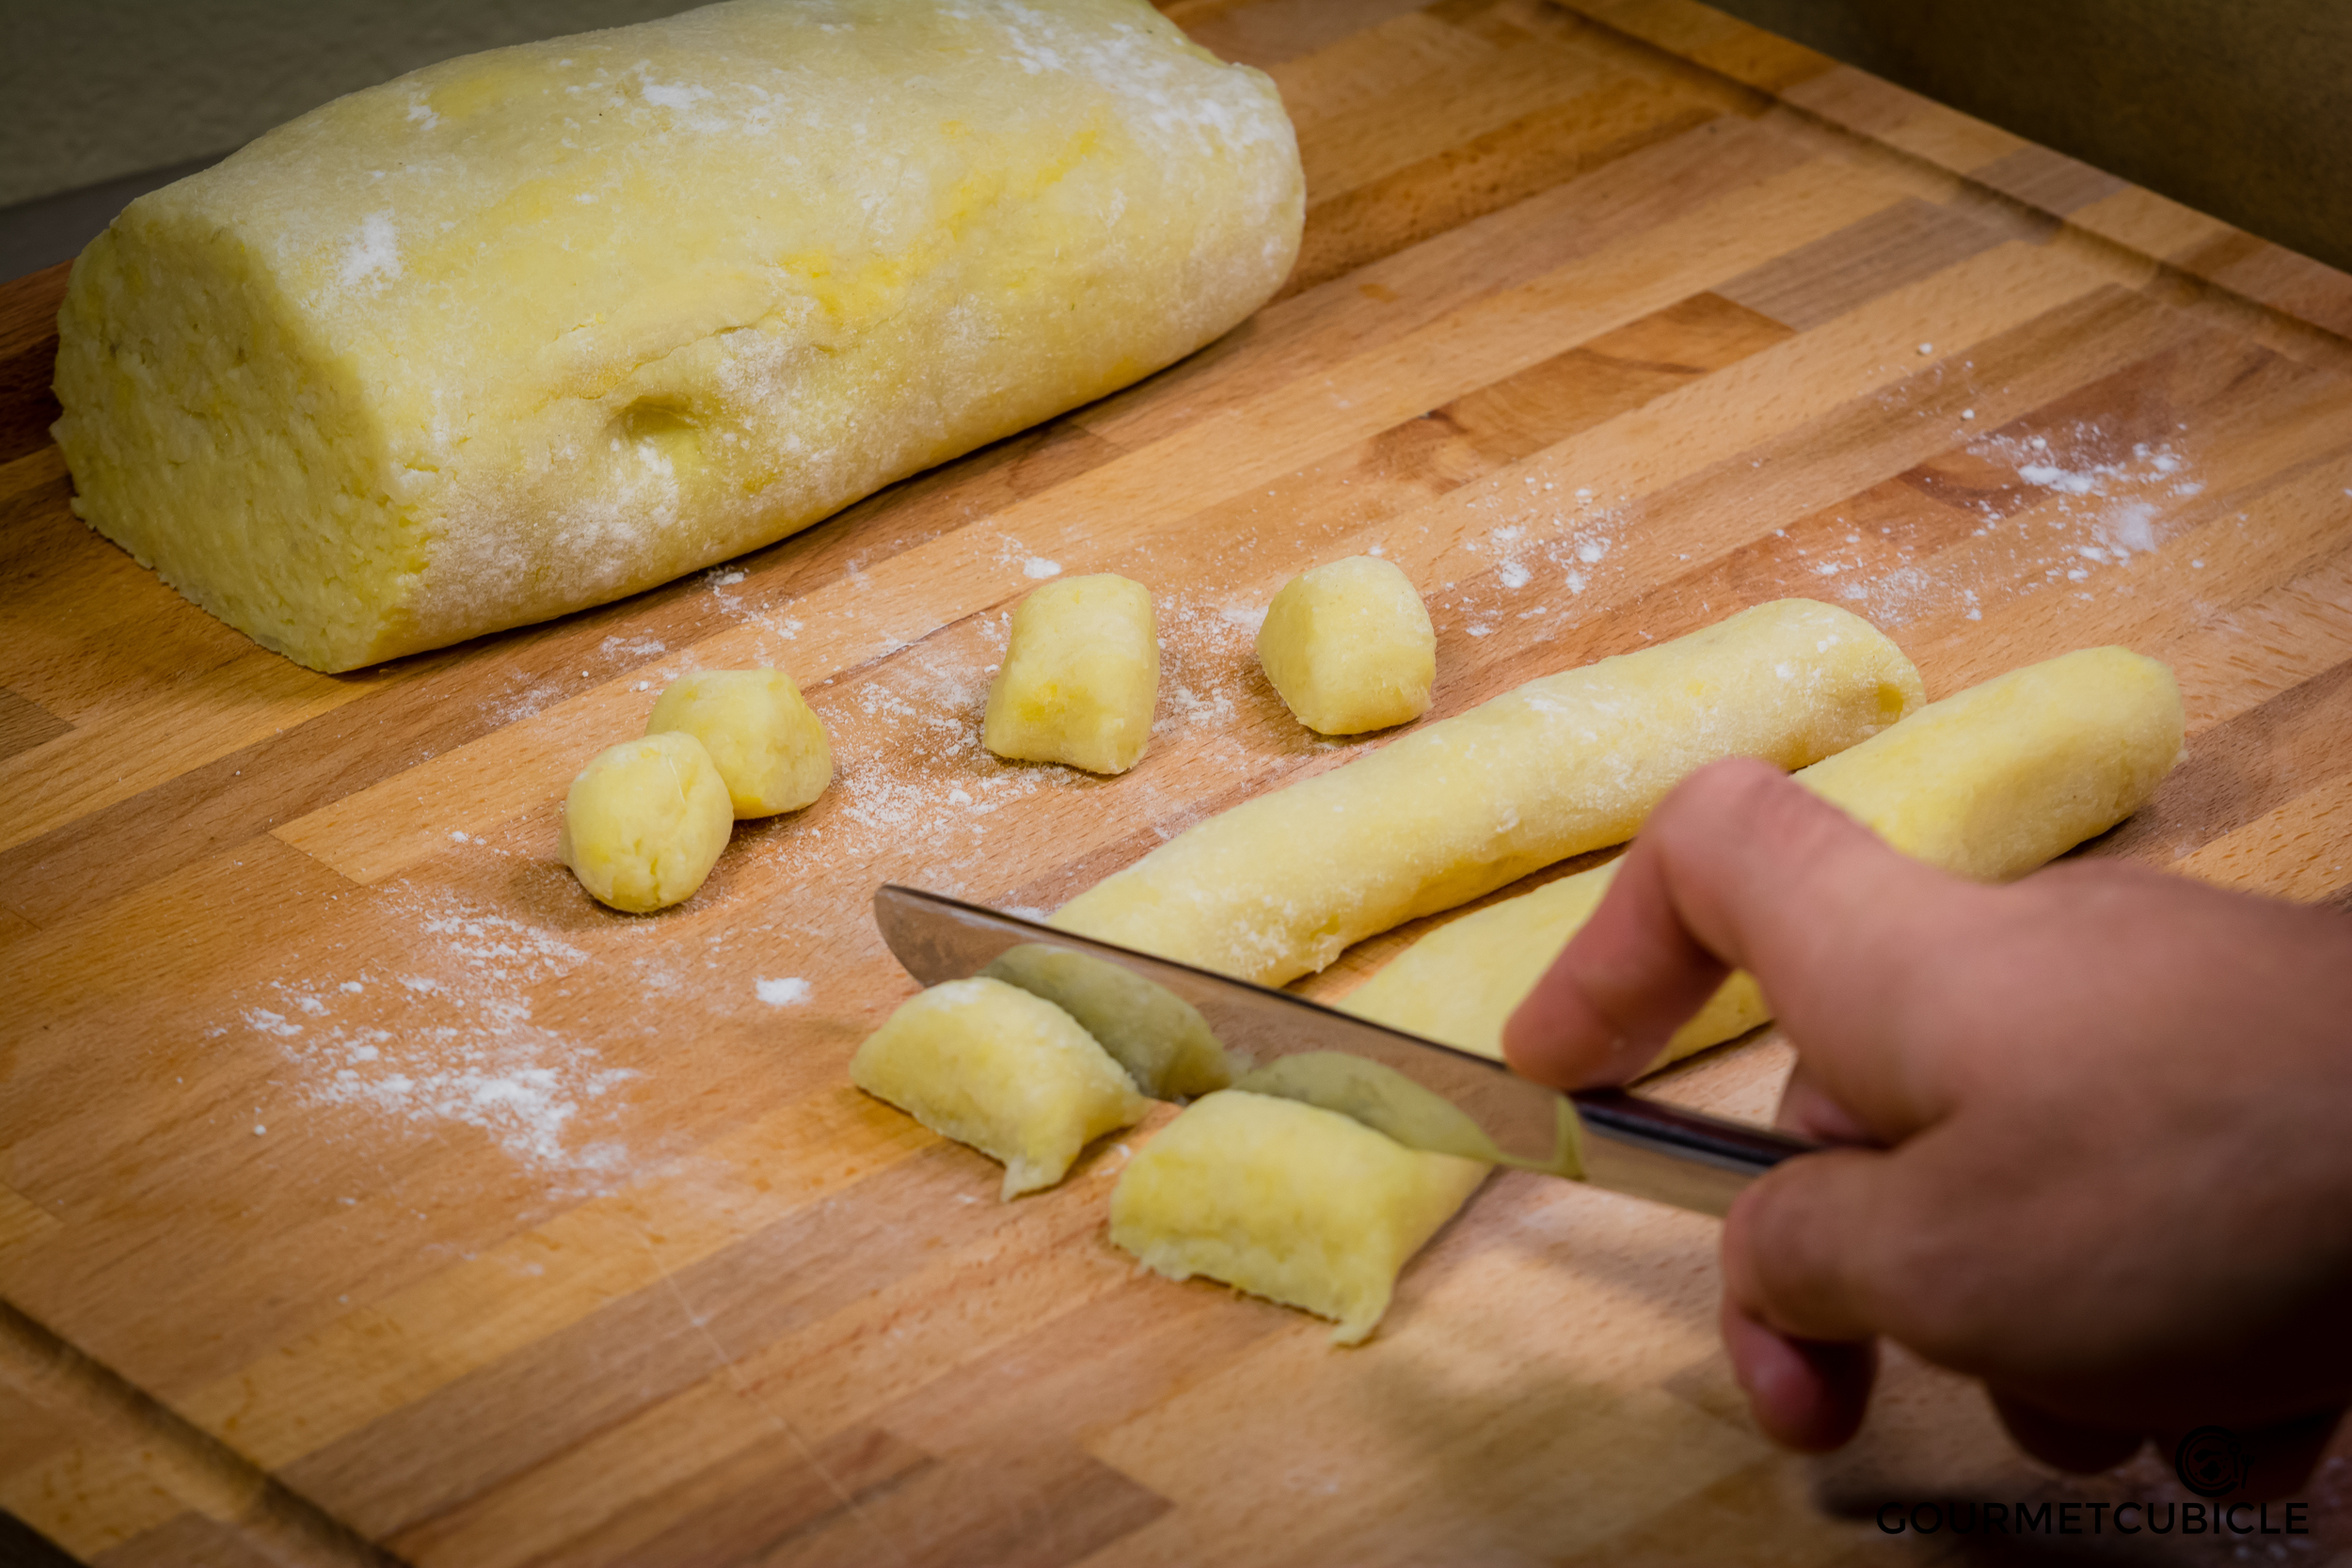
- Sprinkle potatoes with the flour, add the egg yolks and half tablespoon salt. Knead well until the ingredients are mixed well and the dough is smooth, about 3 minutes. Cut the dough into 5 pieces, sprinkle flour on the rolling surface and roll them out into long ropes (about 3/4 on an inch thick). Cut dough into thumb size pieces (or smaller if that's what you prefer) and place them on a piece of parchment paper. Sprinkle with flour and let them rest.
- To cook, bring a large pot of generously-salted water to a boil. Add gnocchi to the pot making sure you don't over fill it. Work in batches if you have to. Stir gnocchi and let them cook for about 1 minute until they float to the top. Remove them from the water using a sieve.
NOTES
If using a non-stick dutch oven for the ragù, the cooking times may reduce a bit. I prefer the cast-iron though because the heat is distributed evenly and the temperature swing is minimal.