gourmetcubicle

Tech by day. Cook by night.

The food blog of an engineer. Whether you're a tech nerd like me who wants to eat homemade meals and experiment with reproducing that amazing restaurant dish you ate, or a seasoned cook who wants to find inspiration for your next meal, you're in the right place.

  • home
  • blog
  • about
  • recipes
  • pantry essentials
  • contact

Homemade Tagliatelle Cacio e Pepe with Brussels Sprouts

July 31, 2015 by Aurel Pop in Main Dish

I know a lot of people get nervous when it comes to making homemade pasta, but I've never been intimidated by it. This may come off as cocky, but believe me, it's actually quite simple to make pasta. It consists of four basic ingredients: flour, eggs, olive oil (or water) and salt. Nothing else. It's not like baking or bread making where you have to be super precise, pay attention to the hydration of the dough and all that jazz. 

Making pasta was one of my favorite pastimes with my Hungarian grandmother Jolika. She made pasta quite often (that was the only option during the communist regime, as the stores didn't sell such things). Most of the times she made either a traditional Hungarian type of pasta stuffed with prune preserves called derelye (coming soon, I promise) or a thinner variation of the well-known angel hair pasta which she used in her homemade chicken noodle soup. The process is the same as with any other type of pasta. It doesn't matter if you're making tagliatelle, spaghetti, ravioli or linguini you will have to knead, rest, roll, cut and dry the pasta. Five steps and you're done.

Preparing homemade pasta from scratch can be time consuming and exhausting. Nowadays though the process is overly simplified by all the available tools and gadget. Kitchen mixers and pasta machines can be found in a lot of households, but even if you don't have any of these tools, you can still make it happen the old school way. I don't own a mixer, so I have to knead the dough by hand which I actually like doing even though it can be tough on your arms. It gives me a better feel for the consistency of the dough which lets me adjust it by adding water or an extra egg when too dry, or flour when too wet. 

When Jolika used to make it, she had to roll out the dough with a rolling pin and then cut it with a very sharp knife. I mentioned in one of my previous posts that whenever she was making pasta she would give me a tiny piece of dough to practice rolling with my own mini rolling pin. It actually helped me a lot, as I still remember what the right consistency for the dough needs to be.  Another important thing that I learned from Jolika was to use the right type of flour. Even in Hungary, when making tészta (pasta), we always used nullás liszt "0" which, as you may already have guessed, is the "00" flour. One day I'll have a kid and I'll do the same thing as Jolika did when I was a child

The inspiration for this recipe came from an episode of Anthony Bourdain's No Reservation. It's the Sicily episode where he's going to this cute little trattoria and eats what "could be the greatest thing in the history of the world" according to him. When I heard this, I already knew what dinner was going to be the next day. I know that brussels sprouts aren't normally part of this dish, but they were in season and cheap when I came up with this recipe last fall, so I tossed them in. As for the lemon and sunflower seeds, I took a tip from a Bon Appétit Foodcast podcast (How to Make a Killer Summer Pasta episode) that suggested adding a bit of acid and nuts or seeds to elevate the taste of the pasta. Buon appetito!


HOMEMADE TAGLIATELLE CACIO E PEPE WITH BRUSSELS SPROUTS


Serves 2-4
Prep time: 60 minutes
Cook time: 30 minutes
Inactive time: 30 minutes
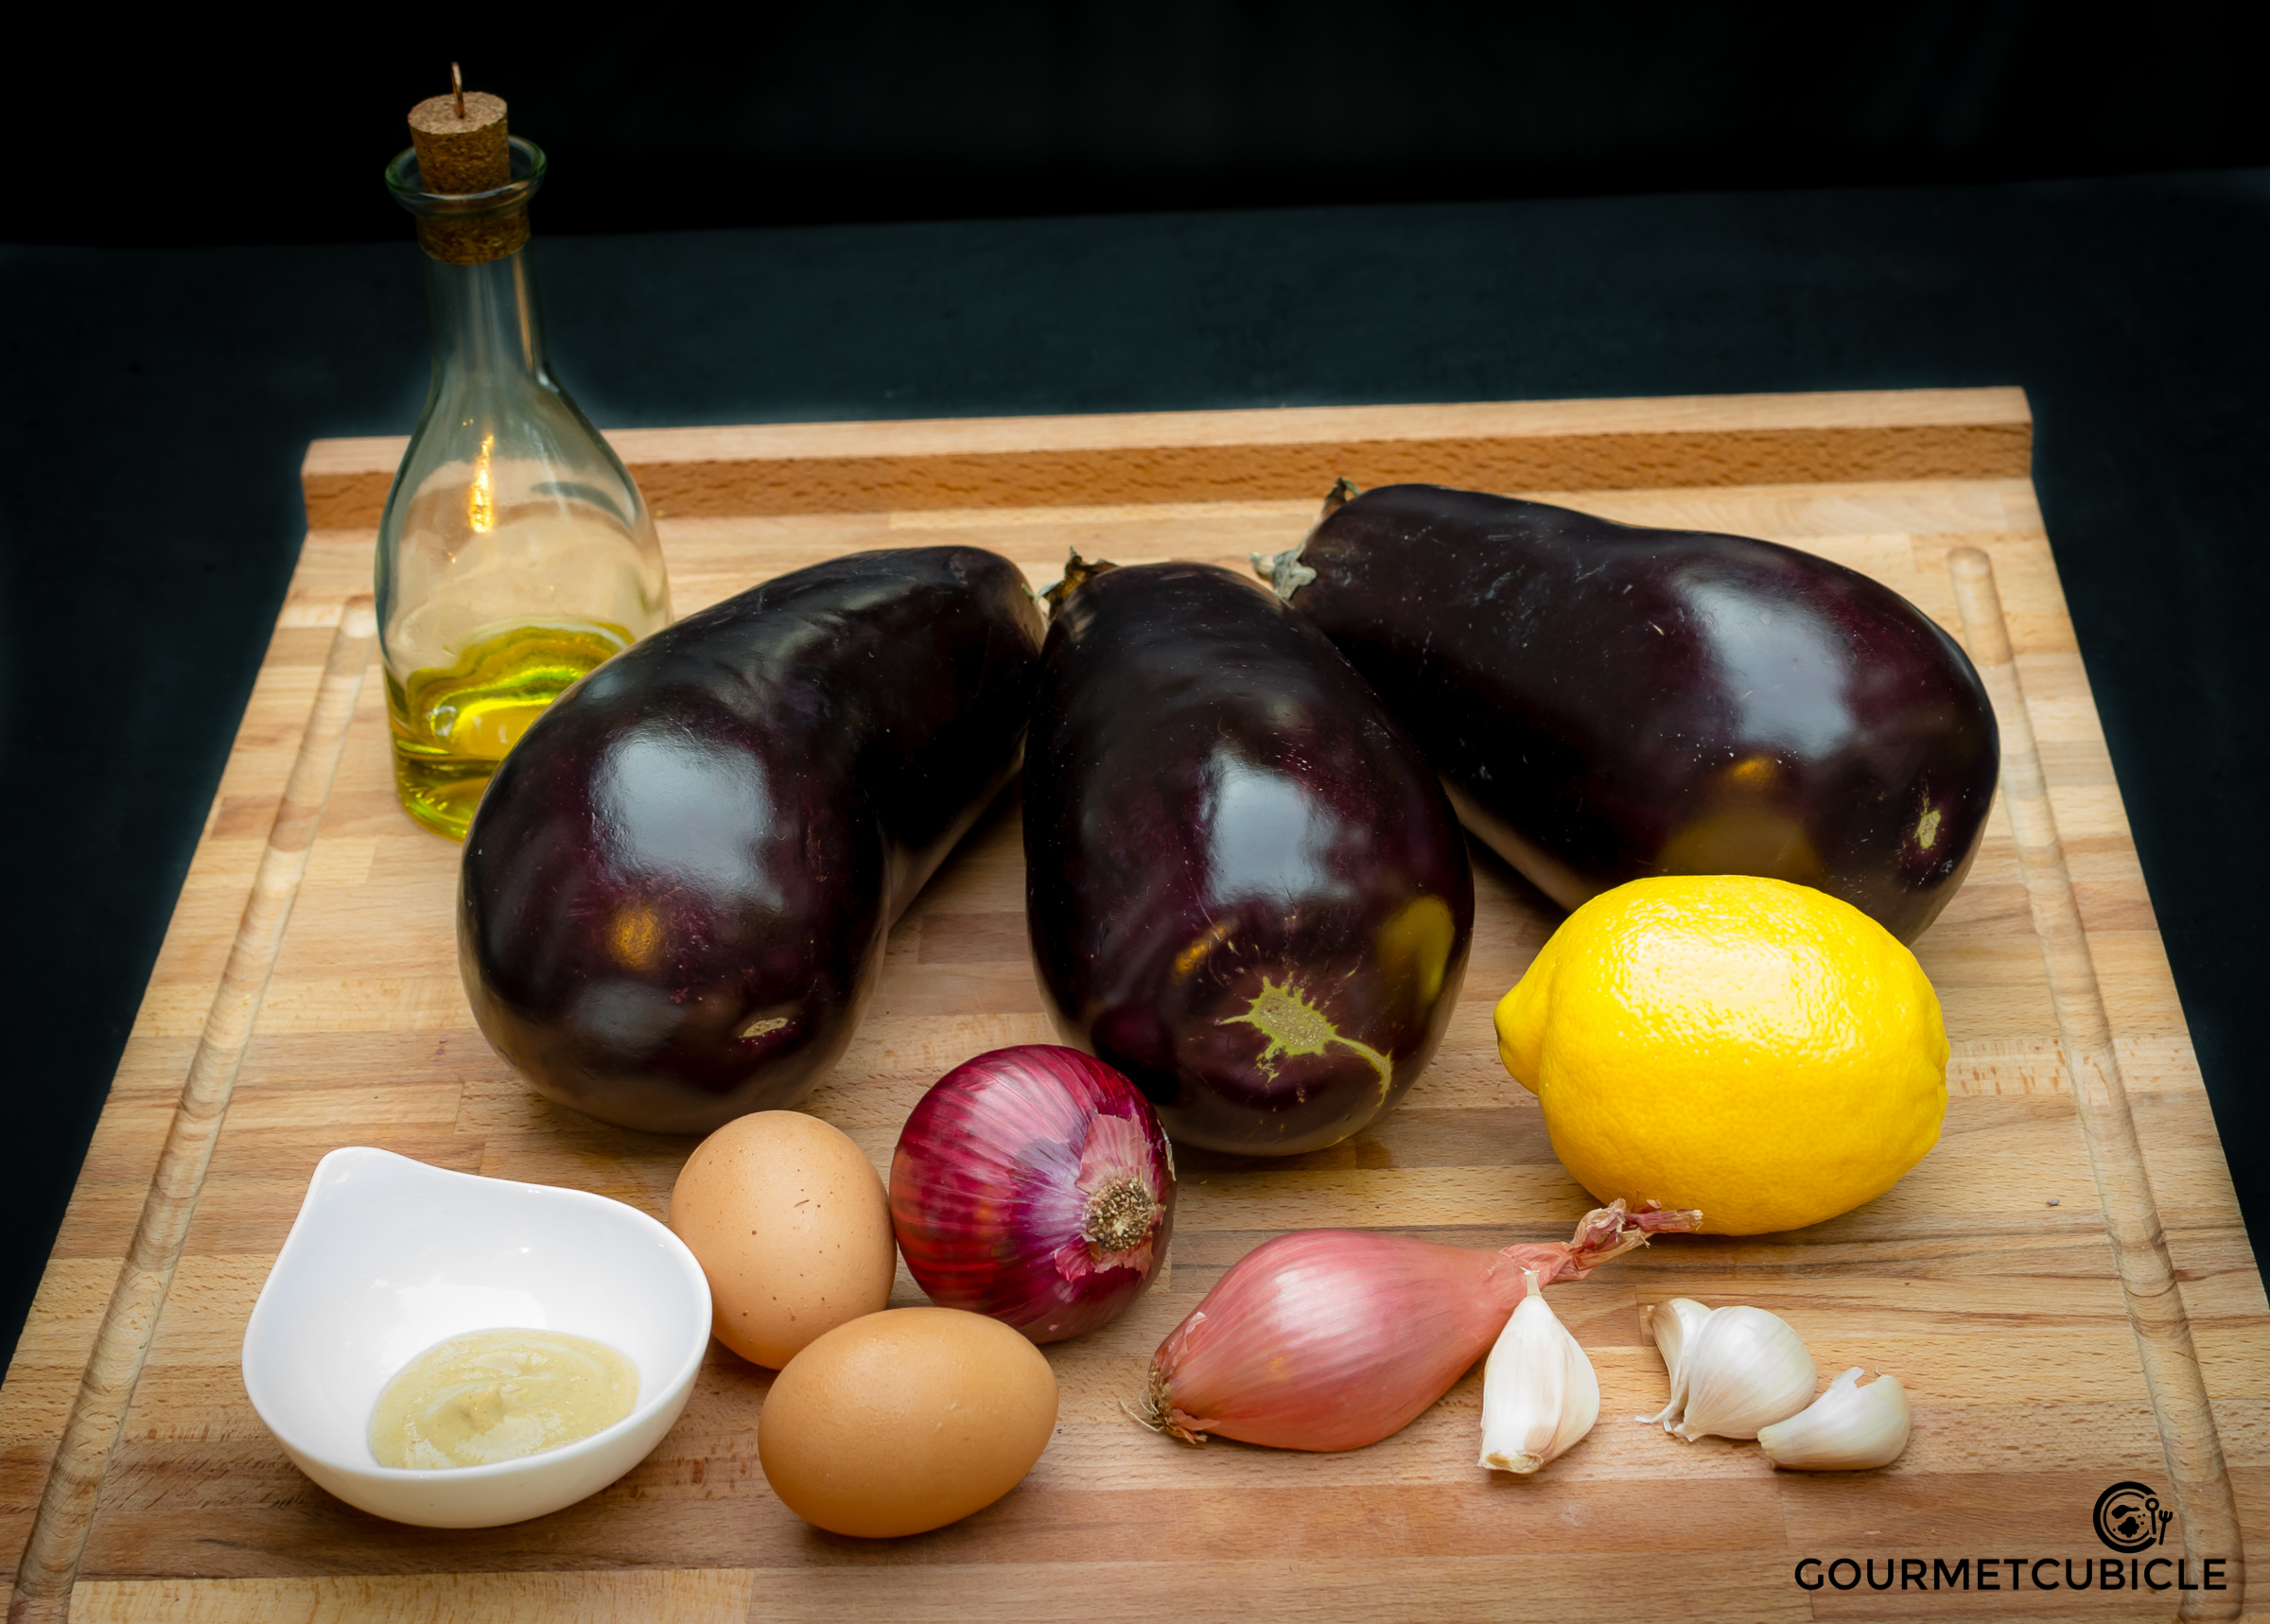

Ingredients

  • 1/2 lb "00" flour 
  • 2 whole eggs, pasture raised
  • 2 egg yolks, pasture raised
  • 1/4 tsp salt
  • 1 TBS olive oil, extra-virgin
  • 1 TBS water (if needed)
  • 1/2 cup "00" flour, for kneading and rolling
  • 1 1/2 TBS salt, for boiling the pasta
  • 2 TBS butter, unsalted
  • 2 thai chilis
  • 2 cloves garlic, crushed and finely chopped
  • 1 lb brussels sprouts, cleaned and halved
  • 1 TBS olive oil, extra-virgin
  • 1 TBS black pepper, freshly ground
  • 1 cup Pecorino Romano (or Parmigiano-Reggiano), freshly grated
  • 1/4 cup sunflower seeds, toasted
  • 1/2 lemon

Instructions

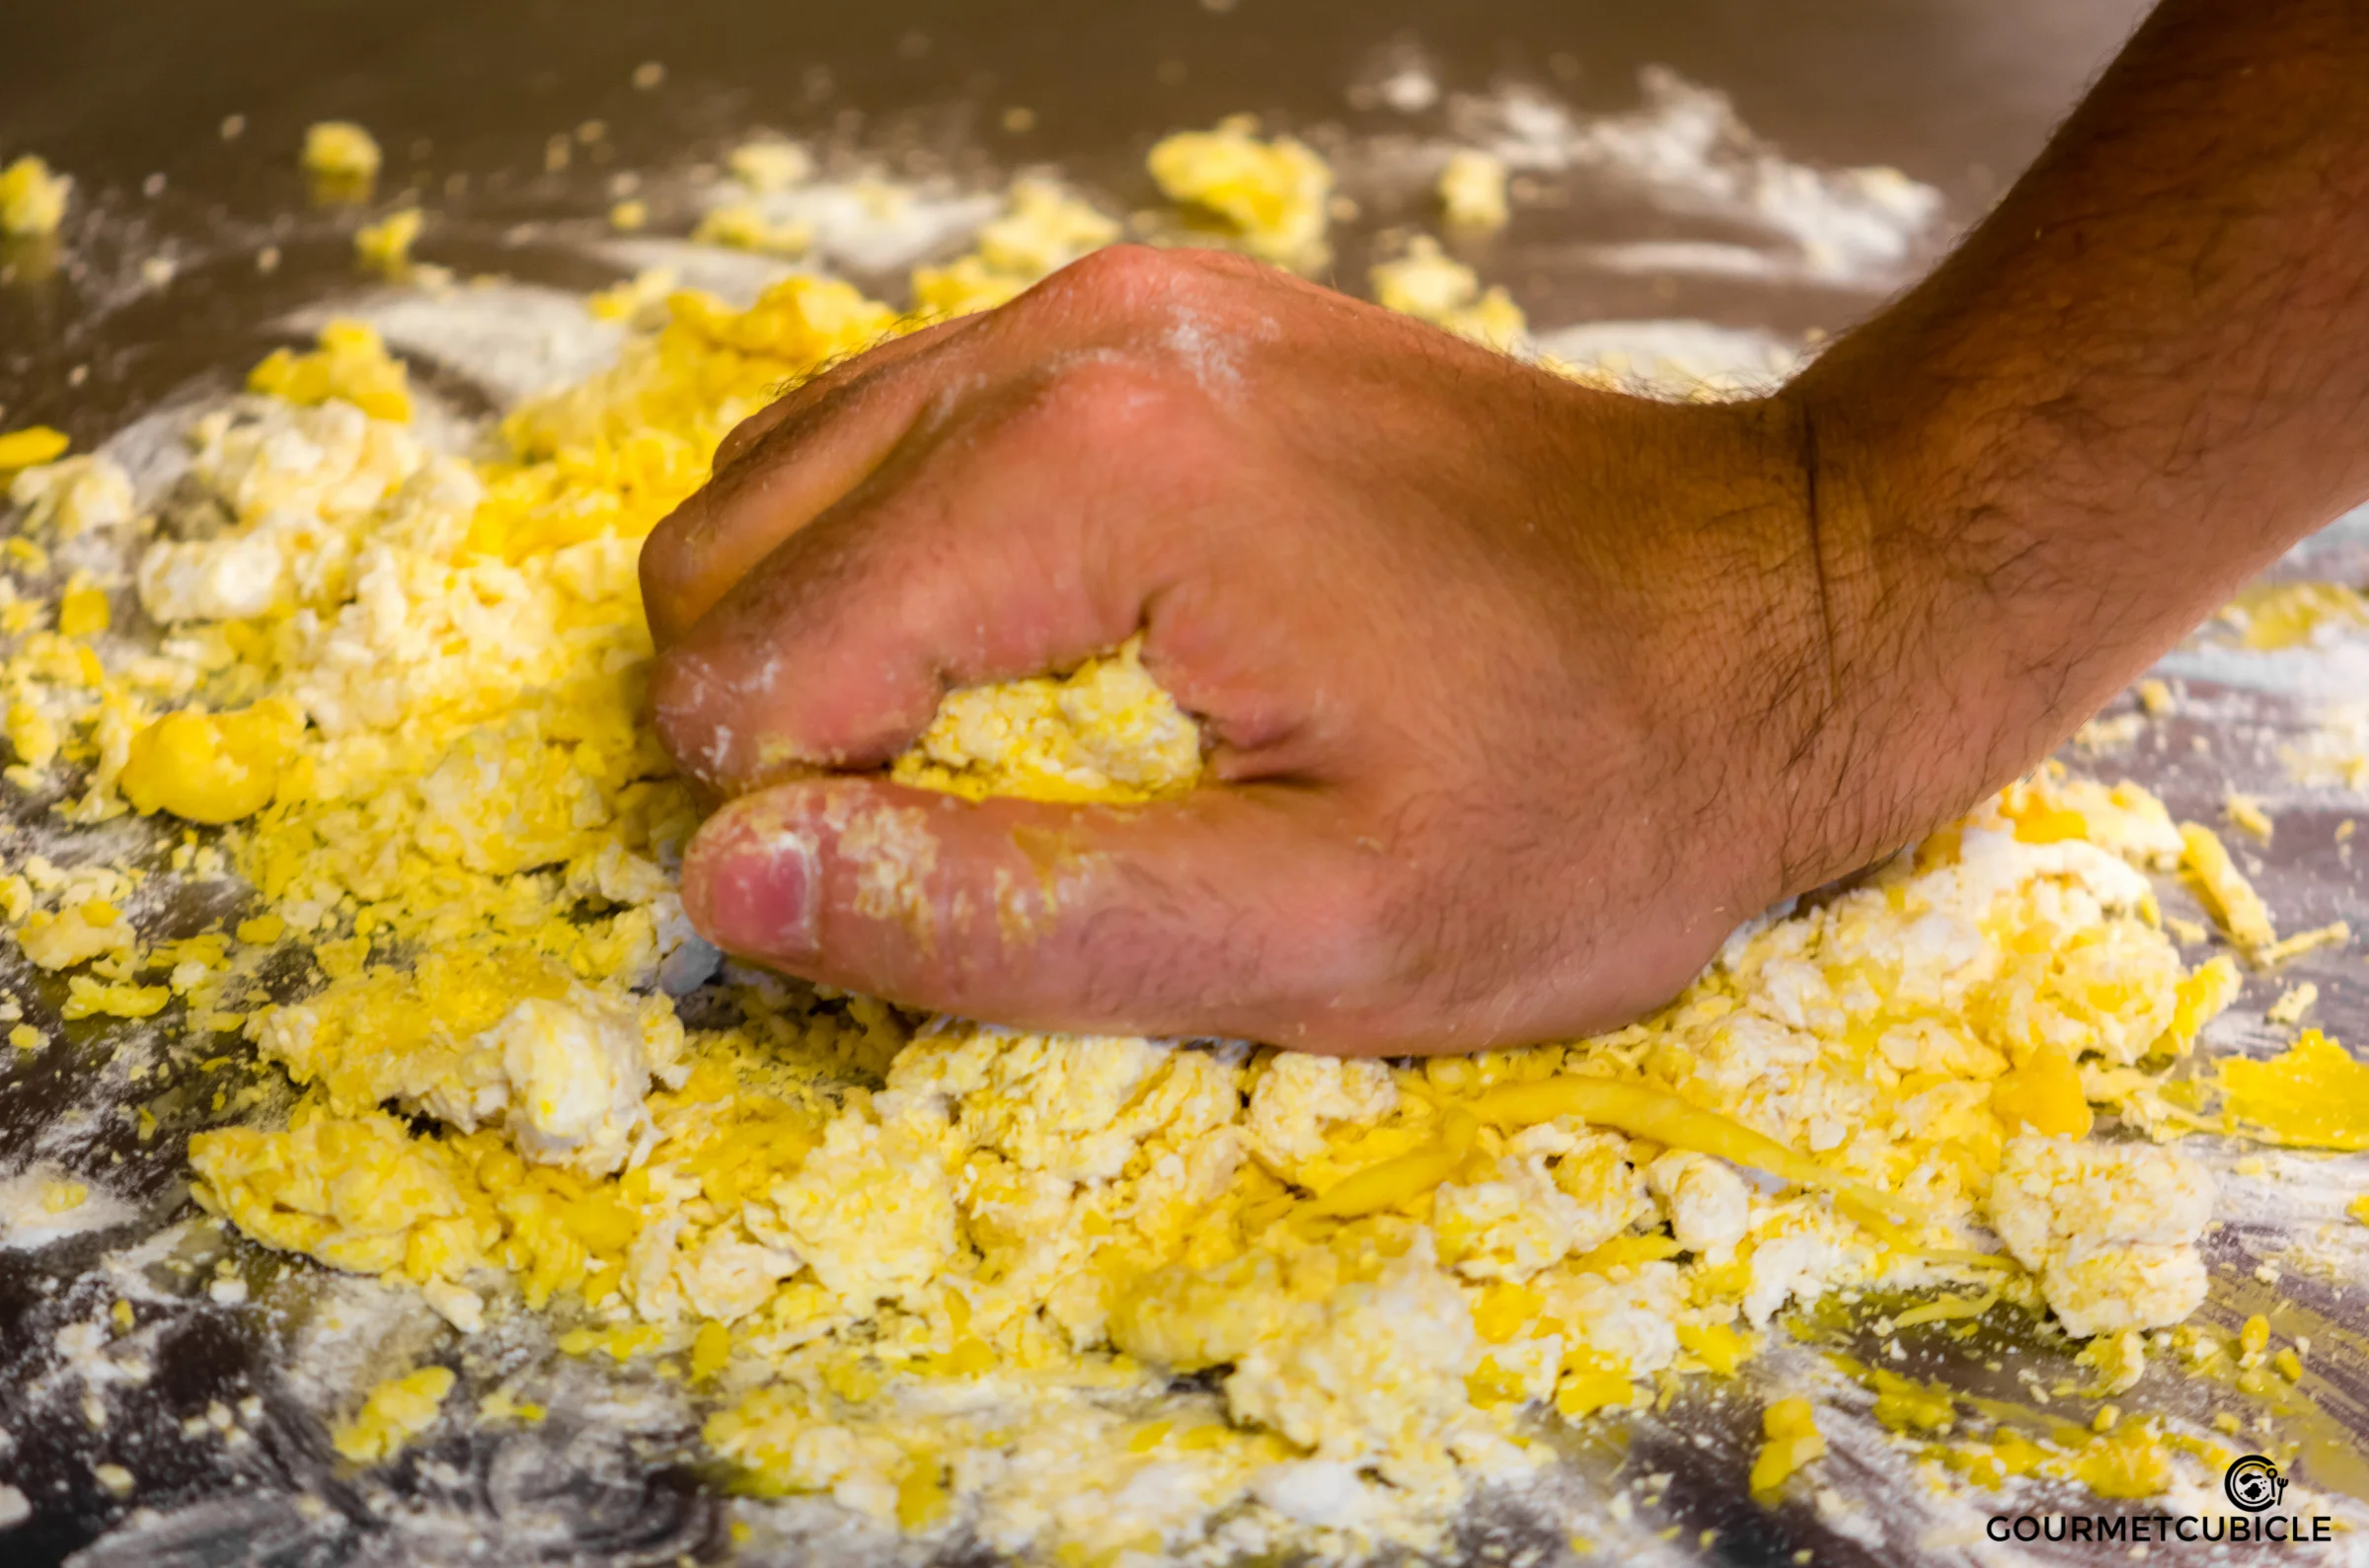
  1. Start with the pasta. In the center of your work station (preferably a large wooden cutting board) heap up a half pound of flour. Keep the rest nearby.  Make a “well" in the center and pour in the eggs and the yolks. Add salt and one tablespoon olive oil and beat the mixture lightly with a fork. Using your fingertips, gradually start incorporating the flour into the egg mixture. Gradually work the dough together until all the flour is mixed in. The dough should be sticky and it should hold together. Depending on the size of the eggs, you may need to hydrate your dough if it is too dry by adding one tablespoon of water.
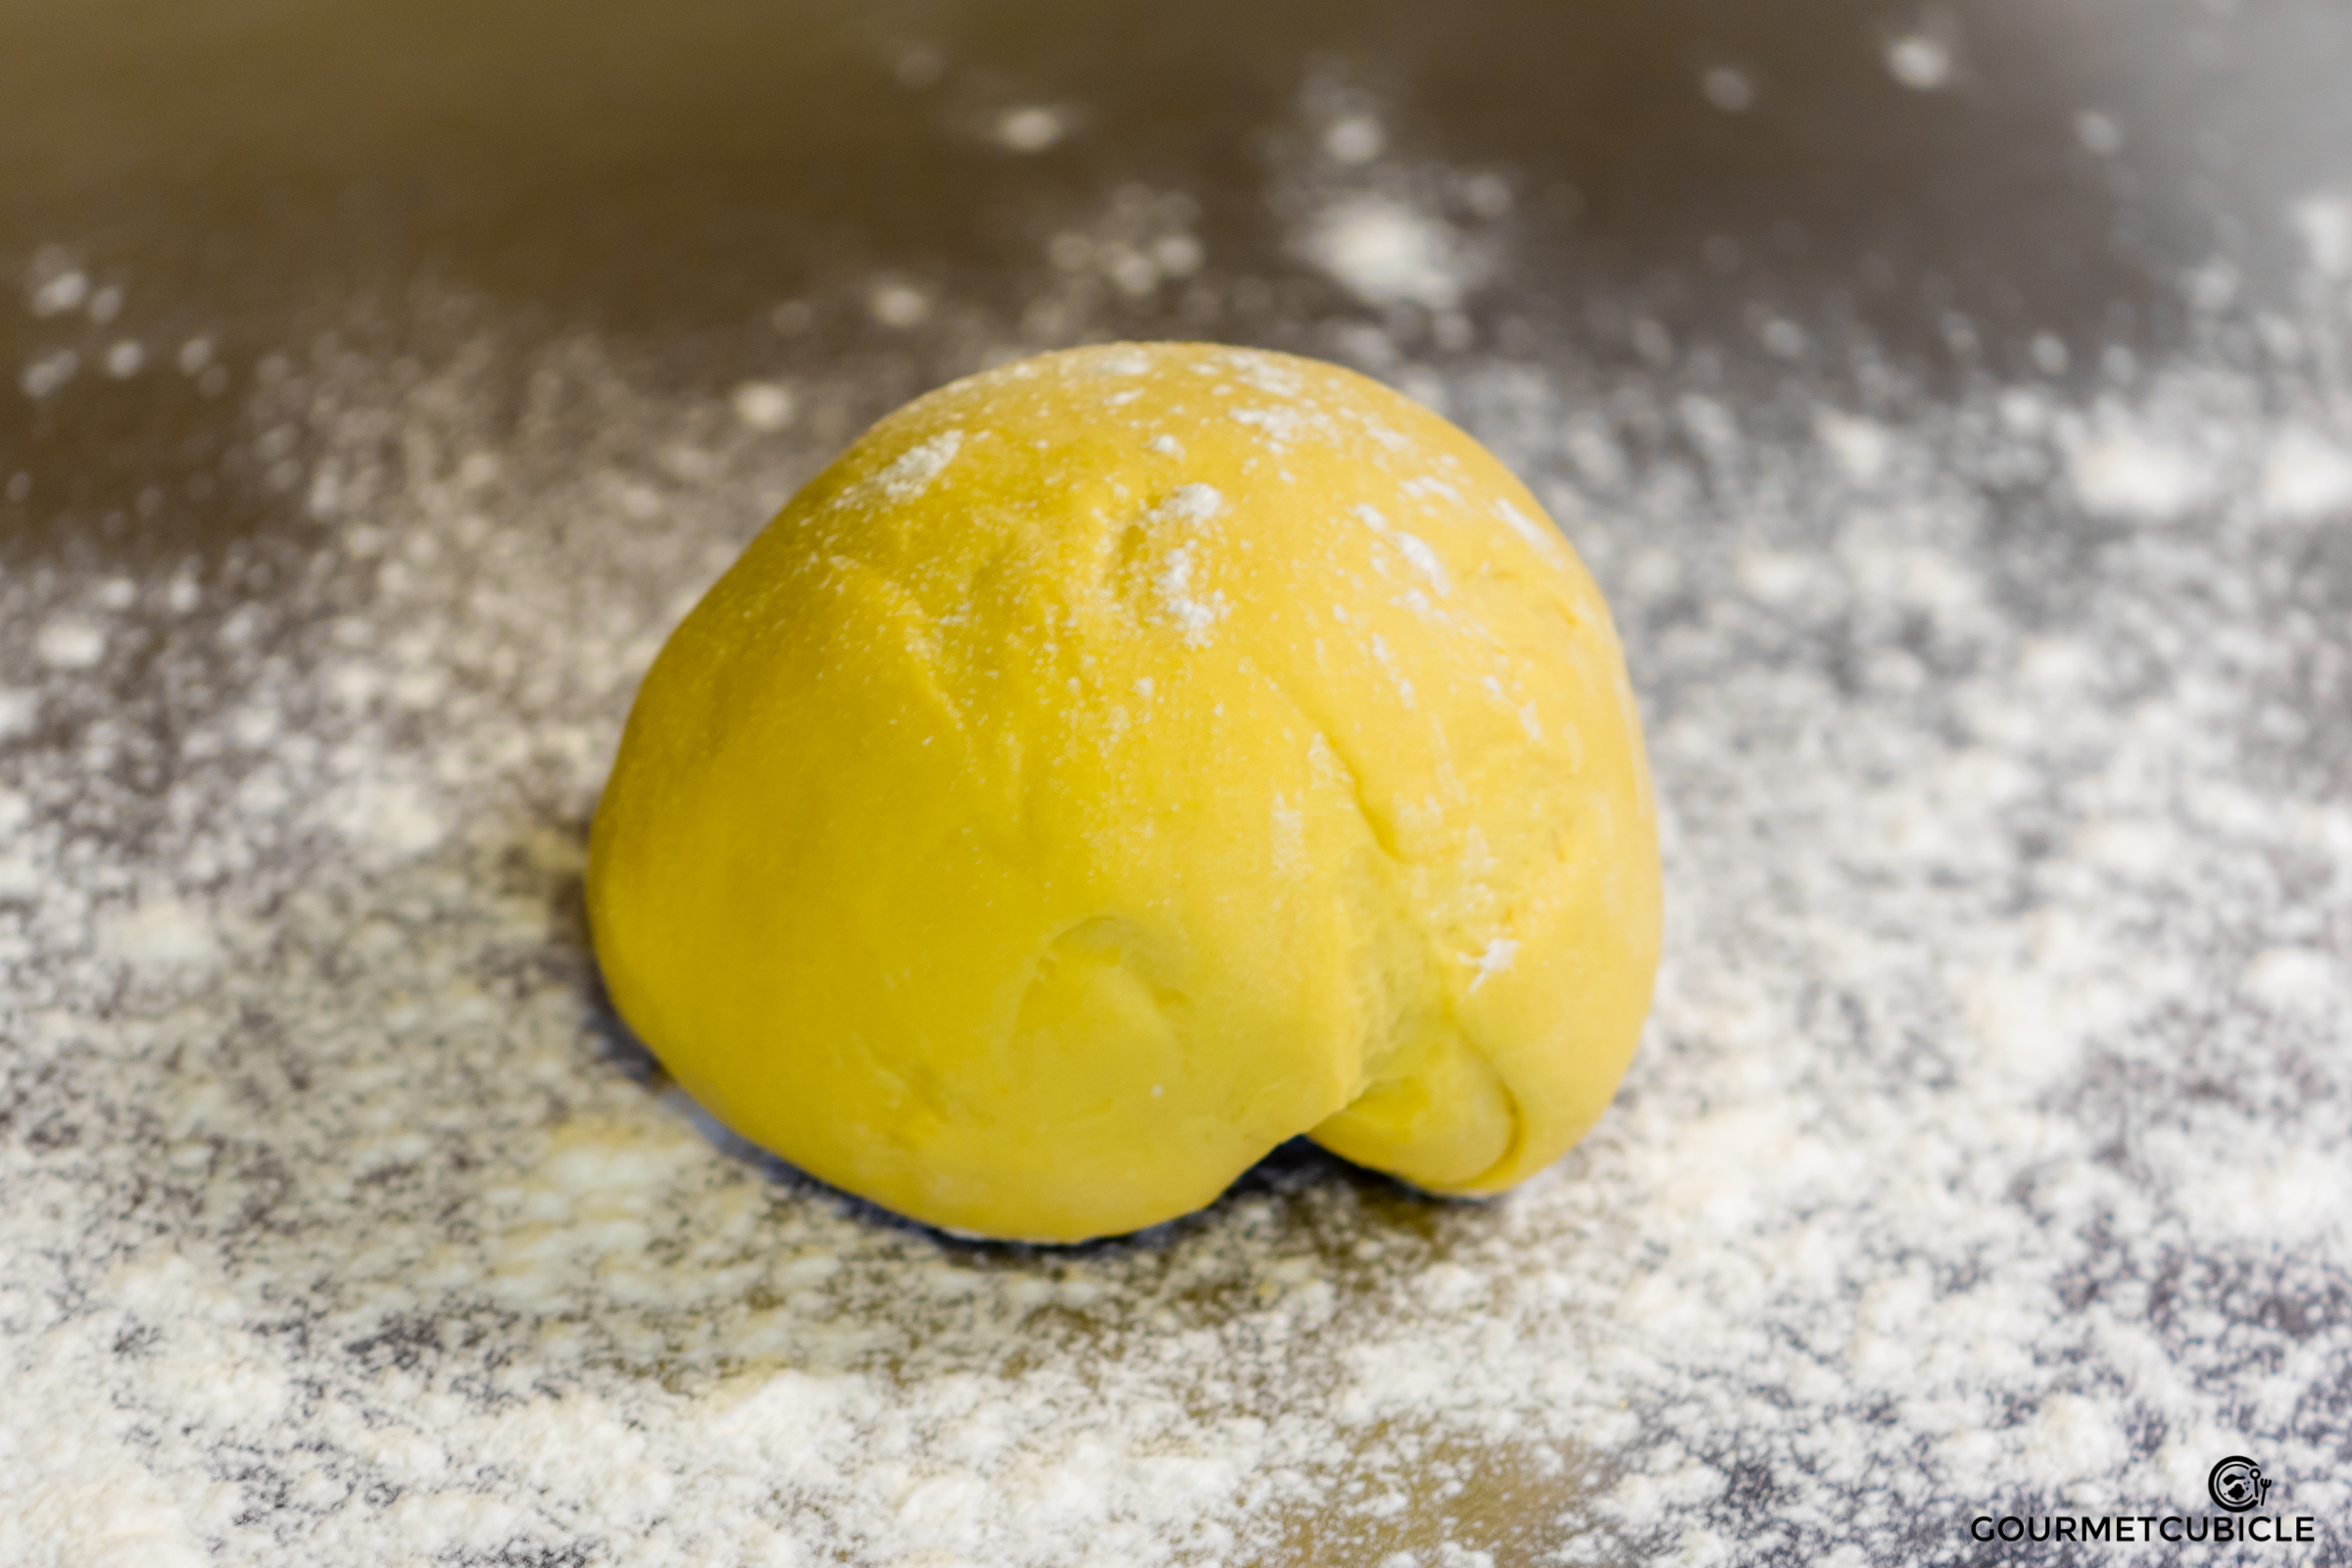
  2. Knead the dough using the palms of your hand, until the dough becomes smooth and elastic, about 5 minutes. Make a ball out of the dough, sprinkle flour, wrap ball in plastic, and let it rest in the refrigerator for at least half an hour.
  3. Remove the dough from the refrigerator and divide it in 5-6 equal parts. Slightly drizzle water over a kitchen towel and cover the 5-6 small dough pieces. You will work with one at a time, so the damp towel will keep them from drying out. 
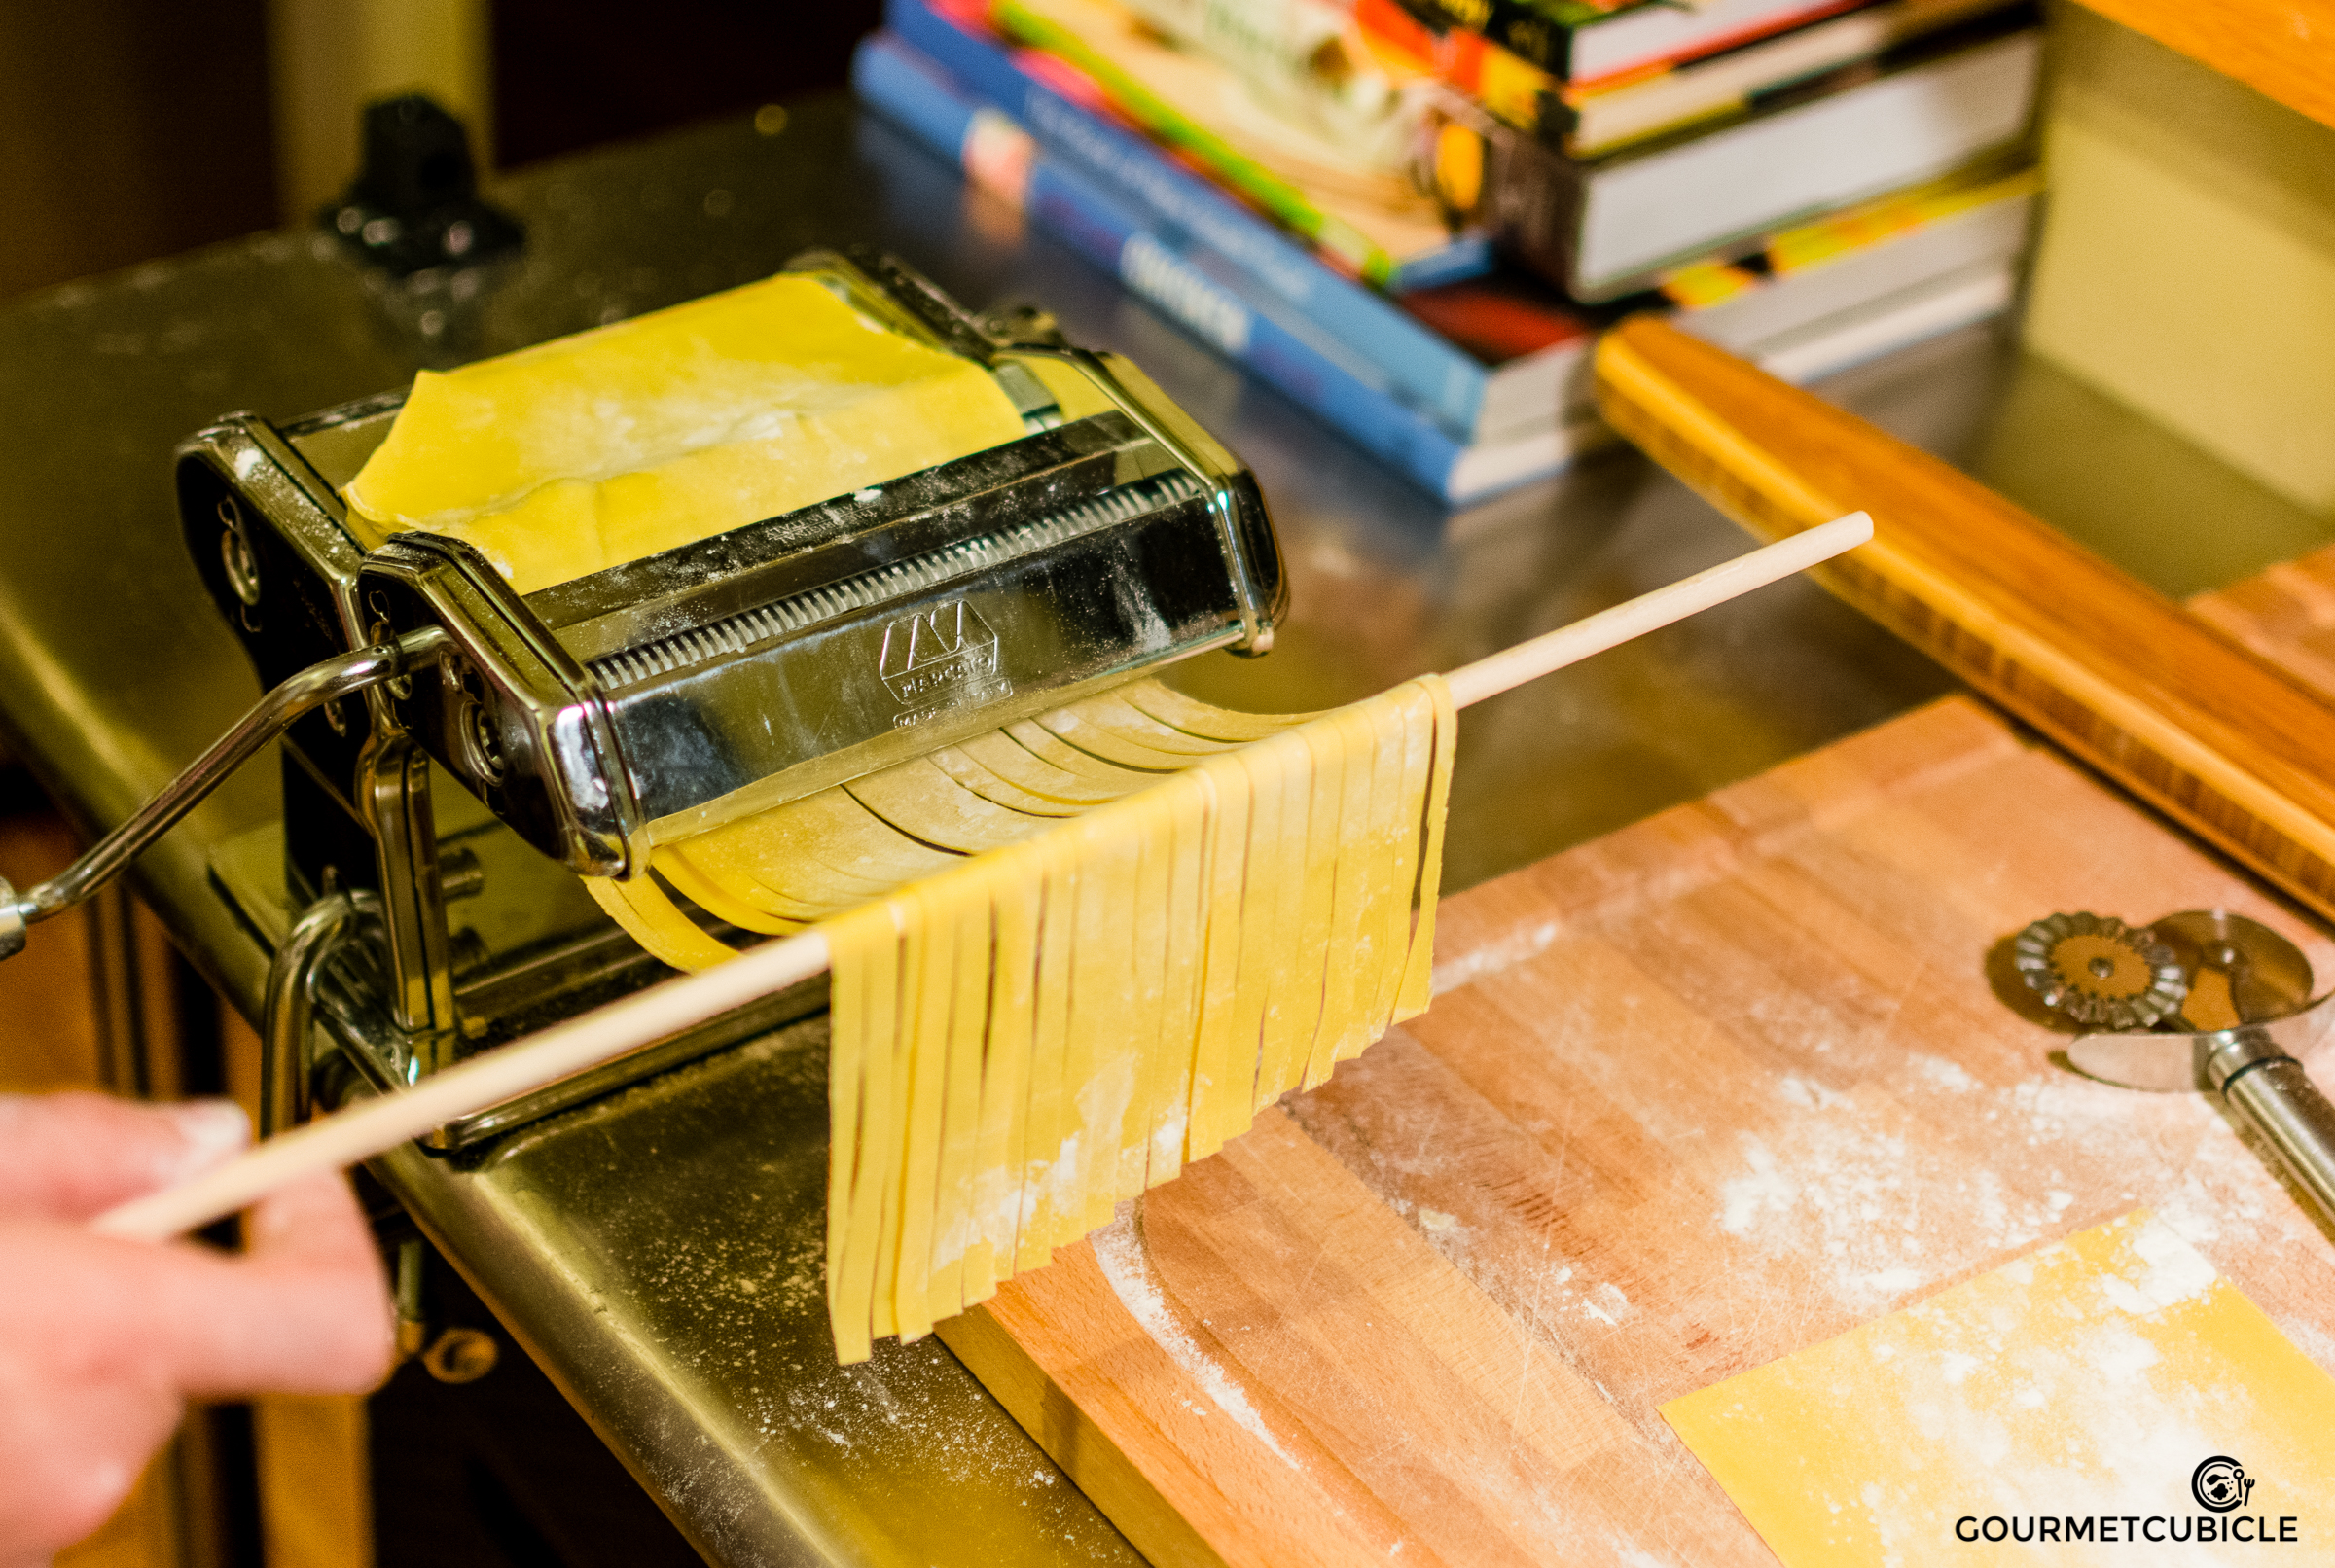
  4. Take the first piece of dough, flatten it with your hands so that it is 1-inch thick and sprinkle with a little flour on both sides. Using a pasta maker, roll out the dough. Start with the thickest setting and work your way to the desired thickness. For tagliatelle I usually stop at the 5 setting.
  5. To stretch the pasta into a sheet, roll it through the pasta maker on the rest of the settings, going down one level at a time, rolling it through about 2 or 3 times on each level. The more you run it through the machine, the silkier your pasta will be. If the dough starts sticking at any point, sprinkle some flour on it. 
  6. To cut the noodles, run your pasta sheet through whichever cutting attachment you prefer, running it through in the same way as when you stretched out the sheets.
  7. Once the noodles are cut, hang them to dry over a pasta hanger or place them on parchment paper and sprinkle with flour.
  8. Bring a large pot of generously salted water (one and a half tablespoons of salt) to a boil. 
  9. While the water is getting hot, heat butter in a deep skillet over medium-high heat. When the butter is melted and starts foaming, add chilis and garlic. Stir and cook for 2-3 minutes. Add brussels sprouts and cook for 10-15 minutes, stirring occasionally. Transfer the brussels sprouts from the pan to a plate and set aside. 
  10. In the same skillet that you used for the sprouts, heat one tablespoon of olive oil until it slides easily across the skillet. Toss in cracked pepper and roast for 2-3 minutes. Add the brussels sprouts back into the skillet and remove from the heat.
  11. When the water in the pot is boiling drop in tagliatelle and cook for 2-3 minutes at most. Fresh pasta takes a lot less time to cook. Save one cup of pasta water and then, drain the pasta using a colander. Shake off excess water and add pasta to the skillet with the brussels sprouts.
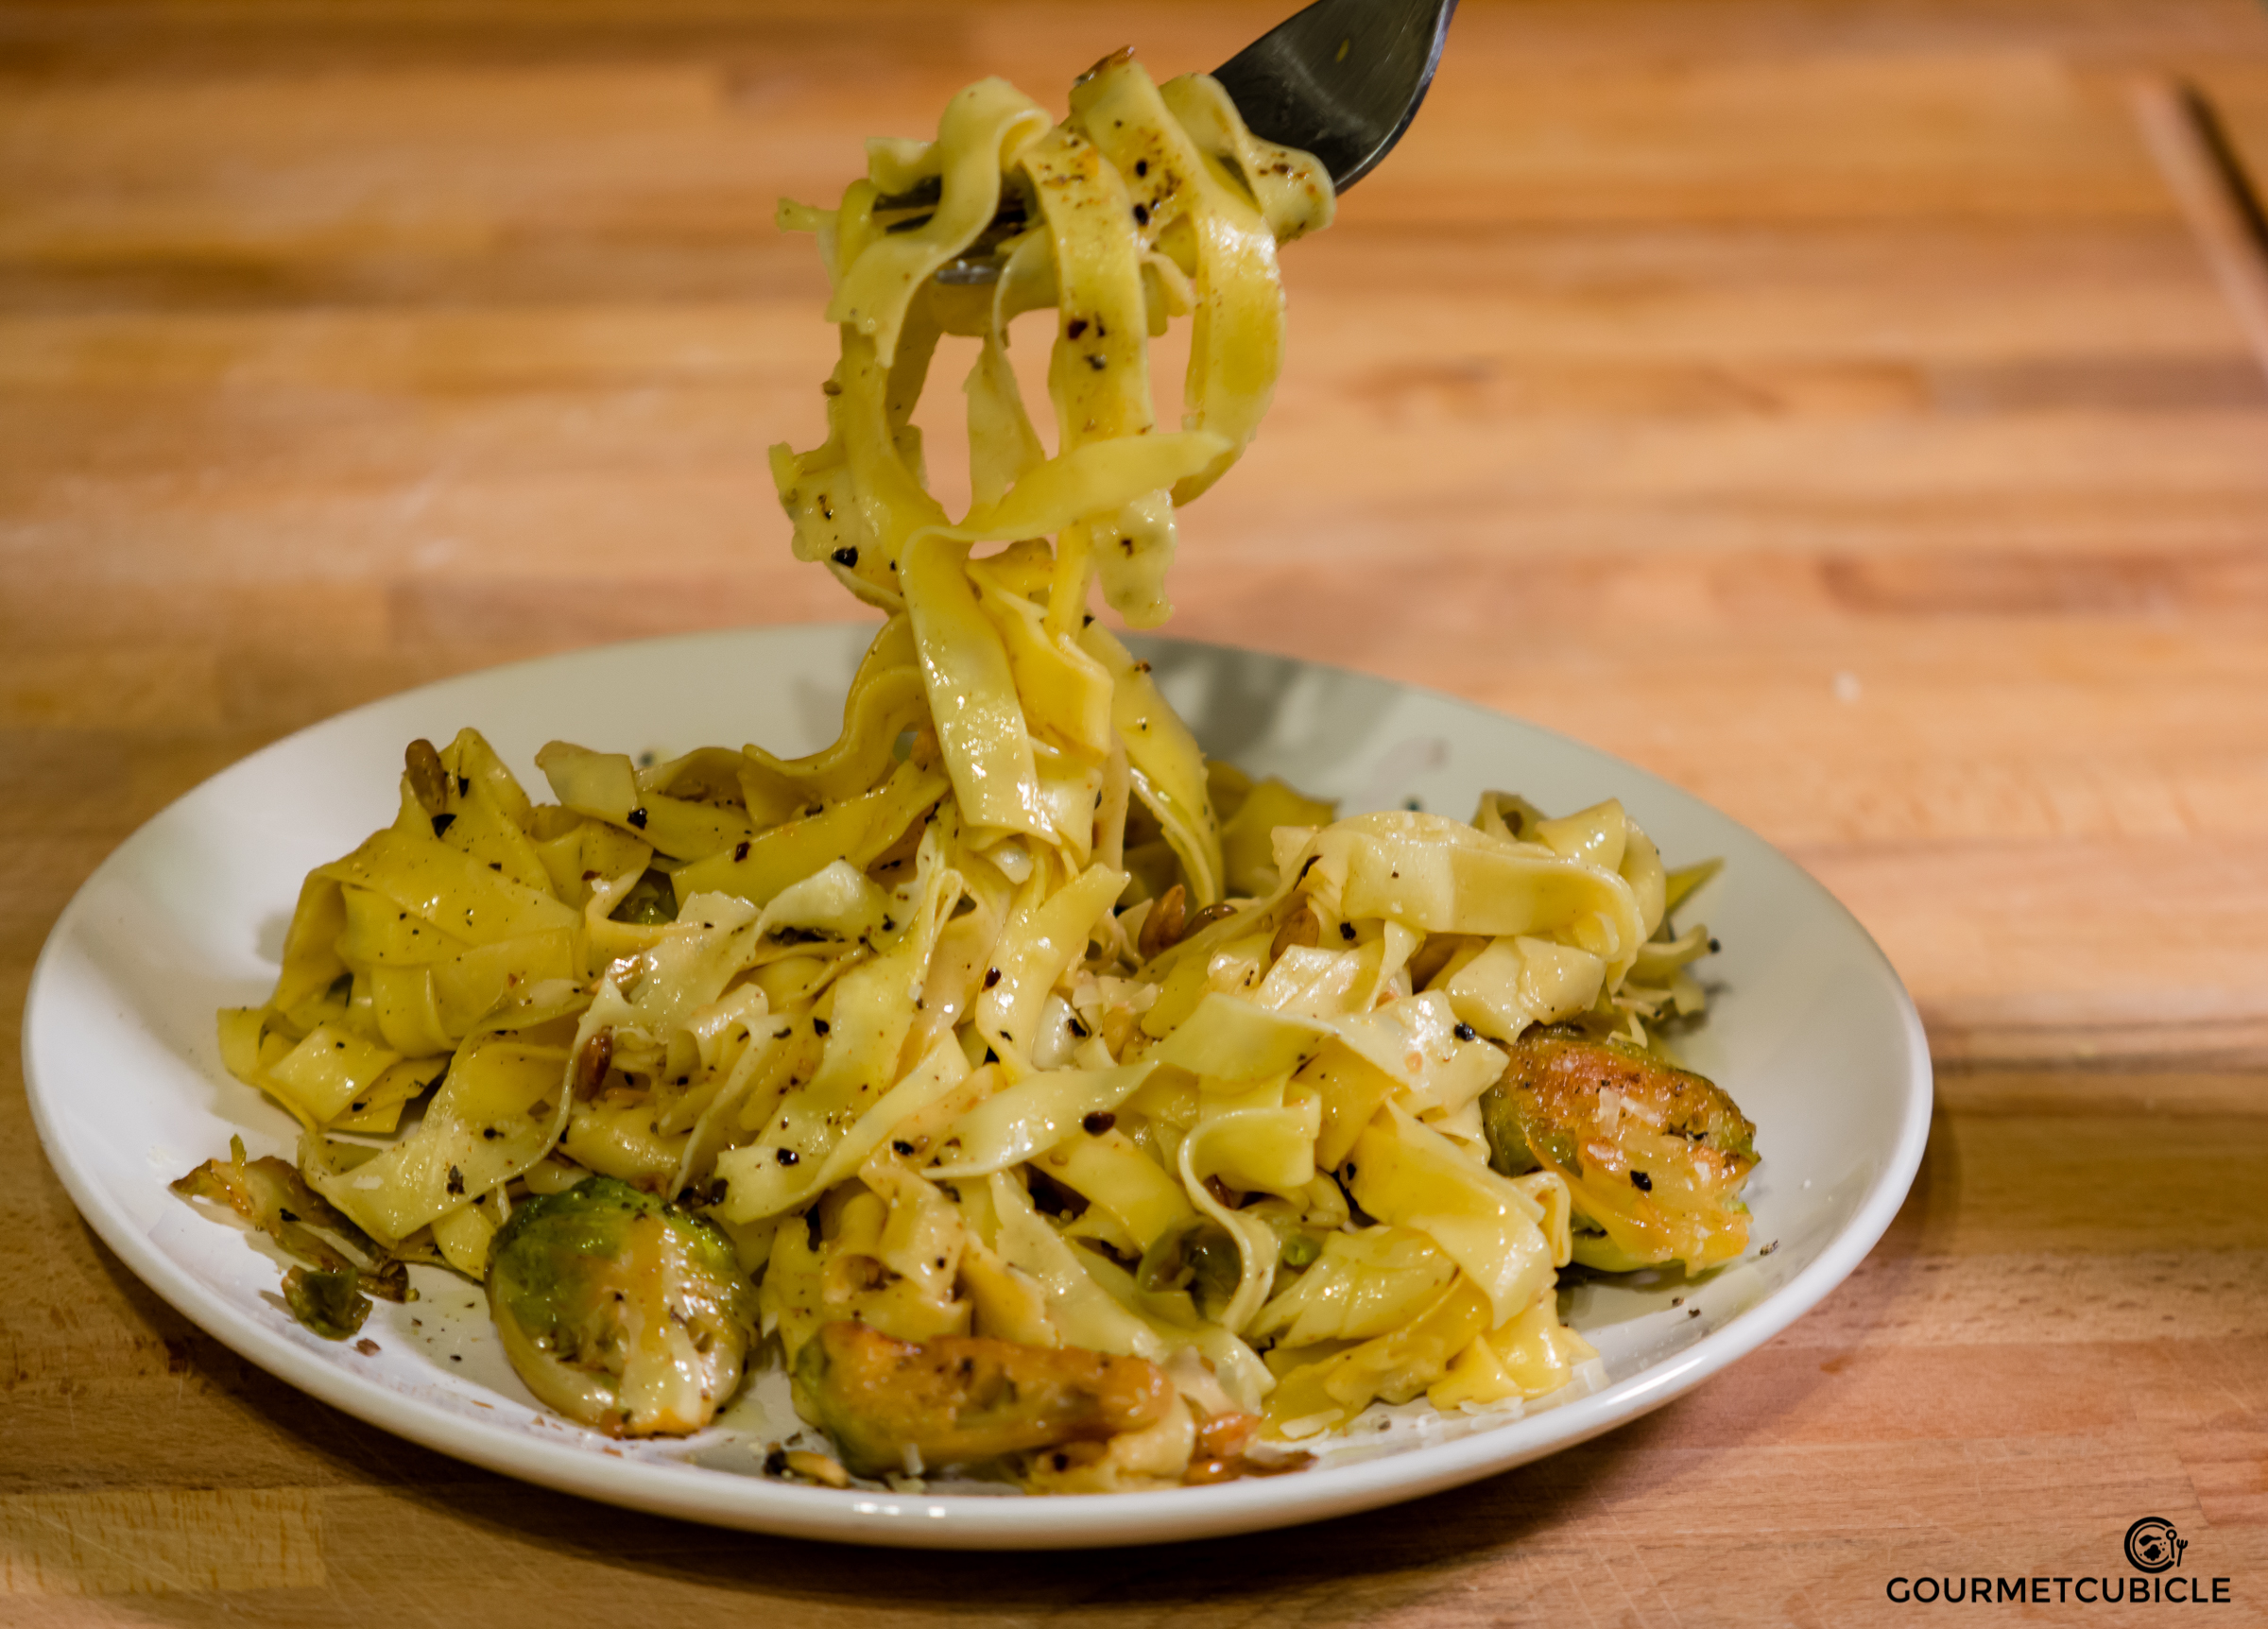
  12. Stir, add the pasta water and cook for about 2-3 more minutes until the pasta is al dente. Remove from heat and add the cheese.
  13. Toss well until pasta is evenly coated. Before serving, squeeze half a lemon all over the pasta and sprinkle toasted sunflower seeds on top. 

Notes

  • When using the pasta maker, run the dough through the largest setting at least 4-5 times, folding it in half after each roll.
  • When making tagliatelle, I recommend that you don't go higher than setting number 5-6 on the machine as your pasta will be too thin and will break easily. Also the texture is not going to be the same.
  • Make sure you don't burn the garlic as it will become bitter.
July 31, 2015 /Aurel Pop
pasta, vegetarian, brussels sprouts, Italian
Main Dish
Comment

Grilled Corn and Spinach Salad with Avocado Yogurt

July 28, 2015 by Aurel Pop in Salad

It seems like I brought the heat from Asia with me to Austin when I returned from Singapore earlier this month. Up until then, it felt like we were in the middle of the monsoon season with rains and flash flooding hitting Austin. A lot of people complained and begged for the normal Texas summer. Now it's here. It's been here for the last few weeks and it's as hot as ever. The heat combined with the extra pounds that I gained eating ramen every single day (sometimes even twice a day) made my appetite drop a bit.  

Starting this week I want to start eating more healthfully and to work out more so I can get rid of those extra pounds. Although I'm really good at finding excuses when it comes to working out, this time I mean it. Things like it’s too hot, Popsi injured her hind leg and I don't have running buddy, or I need to cook more aren't going to cut it anymore. 

I decided to start with eating healthier. I still eat a lot of cheese and fatty meats which don't exactly qualify as healthy, but I'm doing my best. Fortunately corn is in season which means that it can be found at any grocery store for really cheap. It is one of the most versatile and hard to mess up vegetables. It doesn't matter if you boil it, grill it or fry it, the flavor is going to be consistently good no matter what. 

Grilled corn is one of my favorite things to eat during the summer. My family in Romania boils corn which I almost never do anymore. It's not because I don't like it that way, but mostly because it takes too long. As a kid my favorite way of eating corn on the cob was by brushing it with butter, seasoning it with salt, wrapping it in aluminum foil and tossing it in the fire for about 10-15 minutes. We'd do the same with potatoes every time we made a camp fire. It's very simple, yet so delicious especially when served with butter. 

The inspiration for this salad came when Roni introduced me to a Tacodeli salad bowl. I think she was dieting or something because we almost never order salad at Tacodeli. The sweetness of the corn goes extremely well with the saltiness of the bacon, while the texture of the avocado contrasts nicely with the crunchy pumpkin seeds and the crispy bacon. It's heavenly!

I decide to grill a pork chop to add some extra protein to my salad. I need that, otherwise I get hungry half an hour after eating it. It is a very lean cut, so make sure you don't overcook it. It's usually best at 145F (63C) inside temperature, but I take it off the grill at around 140-142F (60C) and then wrap it in aluminum foil for about 10 minutes. The meat will continue cooking for a bit even after you removed it from the grill which will make the chop to reach 145F. Cheers!


GRILLED CORN AND SPINACH SALAD WITH AVOCADO YOGURT


Serves 2-4
Prep time: 15 minutes
Cook time: 25 minutes


Ingredients

  • 2 ears fresh corn
  • 1/2 TBS olive oil
  • 1 pork chop, 1 inch thick
  • 1/2 tsp kosher salt
  • 1/2 tsp black pepper, freshly ground
  • 5 slices bacon
  • 3-4 oz. fresh baby spinach
  • 1 medium avocado, pitted and sliced
  • 1/2 cup pickled onions
  • 1/4 cup pumpkin seeds, roasted
  • 2 TBS olive oil
  • 2 tsp black pepper, freshly ground
  • coarse sea salt, to taste

Avocado Yogurt Dressing

  • 1 thai chili, deseeded and chopped (or jalapeño, serrano, etc)
  • 1 medium shallot, finely sliced
  • 1 cup plain yogurt
  • 1 medium avocado, pitted and chopped
  • 1 TBS bacon fat (or olive oil)
  • 1/2 lemon, juiced
  • 1 tsp black pepper, freshly ground
  • salt, to taste

Instructions

  1. Preheat grill to 450F (230C) degrees.
  2. Pull the outer husks down the ear to the base. Strip away the silk from each ear of corn by hand. Lightly brush corn with oil.
  3. Pat the pork chop dry. Sprinkle with salt and pepper on both sides and let it rest for 5-10 minutes.
  4. Meanwhile, in a large cold skillet, lay bacon strips without overlapping them. In order for your bacon to become crisp don't overcrowd the pan and start with a cold skillet.
  5. Heat skillet over medium-low heat and cook bacon slowly. When it starts to buckle and curl, about 5 minutes, flip it to the other side. Keep flipping until you reach the crispiness level of your desire.
  6. Transfer bacon from the skillet to a wire rack or a paper towel lined plate. Save about 1-2 tablespoons of fat for the dressing. Once the bacon is cooled off, chop it roughly into bite-sized pieces.
  7. Crank up the heat under the skillet to medium-high. If you have too much grease left in the skillet, spoon out as much as you'd like, but leave about 1-2 tablespoons. Once it starts shimmering add the chilis. Cook for about 5 minutes, then reduce the heat to medium and add shallots. Cook, stirring occasionally until the shallots are soft and brown, about 10 minutes. Remove from the heat and scoop the shallot and chili mix into a food processor. Add yogurt, avocado, bacon fat, lemon juice, salt and pepper. Pulse until dressing becomes smooth and glossy. Let it rest in the refrigerator until you take care of the rest.
  8. Place corn and pork chop on the grill. Grill until corn starts to pop, about 5 minutes. Continue cooking and turning until all sides are slightly charred. The pork chop will need about 10-12 minutes on the first side. Flip over to the other side and cook for 6-7 more minutes or until the thermometer reads 140-145F (60-62C). Once the pork chop is ready, remove from the grill and wrap it in aluminum foil. Let it rest for 10 minutes before carving it. Remove the corn as well and let it cool until you can handle it.
  9. Cut the kernels from the cobs and add them to a large bowl. Add spinach, pumpkin seeds, bacon and pickled onions. Add a tablespoon of avocado dressing and toss until well mixed.
  10. Place salad on a plate, add avocado slices, pork chops slices and more dressing on the side. Sprinkle with coarse sea salt and fresh cracked pepper. Enjoy!

NOTE:

  • If you like bacon really crispy I recommend you use a wire rack. It's a restaurant secret.
  • When measuring the temperature use the thermometer where the meat is the thickest.
July 28, 2015 /Aurel Pop
bacon, spinach, corn, avocado, pork, onions
Salad
6 Comments

Breaded Sweet Farmers Cheese Dumplings (Túrógombóc)

July 23, 2015 by Aurel Pop in Dessert, Main Dish

I'm curled up in a blanket on the couch with a cup of coffee to my left and a snoring Popsi to my right. Roni and I both have our own rituals that we take very seriously on weekday mornings. While Roni likes turning on the news and sipping her coffee on the couch, I prefer reading the news on my laptop. I start my day browsing sports news in Romanian (God, I miss soccer) and then move on to reddit to checkout what's happening in the world, or to my blog to work on my next post.

I was browsing through my drafts to see which recipe to post and I came across these farmers cheese dumplings or túrógombóc, as we call them in Hungary, that I made with my mom and niece. I then realize that it's been already over a month since my visit to Hungary and Romania. It's scary how fast time flies. It seems like it was yesterday that I was hanging out with my family, eating a bunch of good food and going to Balaton with my niece, sister and mom.

My niece, Rebeka, helping me preparing the cheese mixture.

My niece, Rebeka, helping me preparing the cheese mixture.

Every time I go home and meet up with old friends we start talking about how things are in the US and how my life changed ever since I moved across the pond. It's usually a great conversation as I am usually asked about things that I almost never think about. It is not easy to explain the differences between Europe and the U.S. especially to my friends who have  never been here before. Of course they follow me on social media, but the problem is that I'm not that active on Facebook. Most of my posts are about food or travel, and just a few about my everyday life. Fortunately, Roni is tagging me in her posts, so people get an idea of what is it like for me to live here. 

Whenever I'm in Hungary, the most frequent question I'm being asked is what I like the most about living in the U.S. and what I miss the most about living in Europe. The first one is not a hard question to answer, the second one the other hand is a little more difficult. Apart from the standard "I miss my family and friends"- which holds true by the way- there is more that I miss about Europe. I had to think about it for a while, but once I did, a lot of things came to my mind. Small things that may seem insignificant at first, yet still, once they aren't present in you life anymore you realize how important they were. 

Amongst the things that I miss the most about Europe are the mornings and their dynamic. I realized this while I was in Debrecen. I was still jet lagged so I woke up earlier than usual and decided to take a walk to the neighborhood market for breakfast. It was 7am and the sun was already up, yet still the streets were almost empty. Think of it as the moment when you wake up. You're in bed, you slowly open your eyes and, unless you're some hard-core boot-camper, you start stretching and getting to your senses. That's how morning are in Europe- so peaceful, so slow.

There were only a handful of people on the streets walking towards the tram or bus station. No cars at all, just a few bicycles. Everyone was silent. All you could hear are the birds chirping. As I walked by the houses, I saw people with morning hair opening their windows and letting the fresh air wake them up. It was a bit chilly and even though I was wearing a t-shirt, I didn’t feel cold. I smelled fresh coffee. I looked to my right and I saw a young couple, still in their pajamas, sitting in silence on their apartment's balcony and sipping coffee almost in slow motion. They weren’t talking, just enjoying that moment of silence.

My mom, Rodica, holding a delicious bowl of túrógombóc

My mom, Rodica, holding a delicious bowl of túrógombóc

As I walked further down the street, I got closer to the market. I saw  more and more people. I saw the early birds, the elderly. Some of them trudged, some of them slowly rode their bicycles. I thought, "I rarely see elderly people on the streets in Austin. Where are they? What happened to them? I miss them." Soon enough the dynamic changed. More and more cars made their way on the streets, the bicycles started moving faster and more people waited at the bus stops. The day had started!


BREADED SWEET FARMERS CHEESE DUMPLINGS (TÚRÓGOMBÓC)


Serves 6-8
Prep time: 25 minutes
Cook time: 5 minutes
Inactive time: 1 hour


Ingredients

  • 2 lbs farmers cheese
  • 1/2 tsp salt
  • 5 TBS sugar
  • 6-inch vanilla bean pod (or 2 tsp vanilla extract)
  • 1/2 fresh lemon, zested
  • 1/4 cup raisins (optional)
  • 3 eggs, pasture raised
  • 10 TBS semolina
  • 2 TBS butter
  • 3 cups bread crumbs
  • 1 TBS salt
  • 3 TBS sugar
  • 1 1/2 tsp cinnamon, ground

Instructions

  1. In a medium mixing bowl combine farmers cheese, salt, sugar, vanilla, lemon zest, raisins, eggs and semolina. Using a wooden spoon stir well until all the ingredients are combined. Cover with a plastic wrap and place the bowl in the refrigerator for at least an hour. This will allow the semolina to absorb the moisture which will soften it. 
  2. In the meantime, add butter to a deep skillet. Heat butter on medium-high flame until the it melts. Add breadcrumbs to the skillet and toast until they become golden brown. Once brown, set the skillet aside. 
  3. Fill a large saucepan or pot half way through with water. Add one tablespoon of salt to the water and bring it to a boil over medium-high heat.
  4. Wet your hands, grab a small handful of the cheese mixture and form golf ball sized dumplings. Place the dumplings (túrógombóc) into the boiling water and repeat until you've used all the remaining mixture. Once the dumplings are done they will float to the surface, after about 5 minutes. Using a sieve or a slotted spoon scoop them out and gently shake them to get off the excess water. 
  5. Transfer dumplings to the breadcrumb skillet. Mix well until all the dumplings are well coated with breadcrumbs. 
  6. In a small cup mix the remaining sugar with the cinnamon. Sprinkle sugar cinnamon mixture over dumplings before serving.

Notes

Alternatively, serve túrógombóc with a side of homemade apricot jam, blueberry flambé or sour cream.

July 23, 2015 /Aurel Pop
Hungarian, cheese, cinnamon
Dessert, Main Dish
1 Comment

Potato and Leek Rösti with Poached Eggs

July 20, 2015 by Aurel Pop in Breakfast/Brunch

This week I'm going to show you how to make one of my favorite brunches. It's a vegetarian dish that can be served either as a side dish or on its own with a dollop of sour cream. It also can easily be turned into something more filling, by adding smoked salmon and poached or fried eggs to it. 

I love weekends so much especially when I don't have to travel. Not only because I get to relax, but mostly because I get to spend a lot of time around the kitchen cooking. Another important aspect of the weekends is that I can cook and eat my breakfast in my pajamas without having to fully wake up. I don't enjoy talking early in the morning, at least not until I get to eat. Roni also gets grumpy without having food or coffee first thing in the morning. For the sake of everyone in Austin, we try not to leave our house without eating or drinking coffee, and take out the grumpiness on each other. 

Although I named this dish rösti, which is a Swiss dish, I found inspiration for it during my time in Hungary. Over there it's called either tócsni or lepcsánka depending on which region you visit and who you ask. It is very similar to the traditional rösti, but Hungarians sometimes add flour and eggs to the concoction. I prefer it without flour as it makes me feel better about eating healthier.

I made a few modifications of course, namely I added leeks and parsley to the potatoes. I like bold flavors and find potatoes alone to be a bit bland. If you don't like leeks, you can substitute them for onions or carrots. Same goes the parsley- use spinach or kale instead if that's what you prefer. Dare to improvise and try different combos until you find your favorite. As for me, this is my favorite. Jó étvágyat!


POTATO AND LEEK RÖSTI WITH POACHED EGGS


Serves 2-4
Prep time: 15 minutes
Cook time: 40 minutes


Ingredients

  • 1 large leek, cleaned and finely chopped
  • 8-10 cremini mushrooms
  • 2 lbs Russet potatoes, peeled and grated
  • 1 cup fresh parsley, finely chopped
  • 1 jalapeño, deseeded and finely chopped
  • 1/2 TBS kosher salt
  • 1/2 TBS, black pepper, freshly ground
  • 1 tsp kosher salt
  • 1 TBS olive oil
  • 1 TBS butter, unsalted
  • 1 TBS olive oil
  • 8-10 tomatoes on the vine
  • 1/2 tsp black pepper, freshly ground
  • 1/2 tsp kosher salt
  • 1 TBS butter, unsalted
  • 1/2 TBS butter, unsalted
  • 2-4 eggs, pasture raised
  • kosher salt, to taste
  • 1 TBS white vinegar
  • 2 oz. smoked salmon (optional)
  • 1 TBS crème fraîche (or sour cream)(optional)

Instructions

  1. Clean the leek by cutting and discarding the dark green woody leaves and the root end. Clean, chop it finely.
  2. Clean the mushrooms by trimming the dry tip of the stem.
  3. In a medium bowl combine the grated potatoes, leeks, parsley and jalapeño. Sprinkle half tablespoon salt and mix well until the mixture is evenly coated with salt. Set aside and let it sit for about 5-10 minutes.
  4. Handful by handful, squeeze the potato and leek mixture to get rid of the starchy and salty water. Sprinkle half tablespoon of freshly cracked black pepper, one teaspoon salt, and one tablespoon of olive oil and stir until everything is well mixed together and evenly coated. 
  5. Heat one tablespoon butter in a non-stick skillet over medium heat. When the butter melts and starts foaming, scatter the potato mixture over the skillet. Using a spatula, gently press molding it into a 1/2-3/4 inch pancake. Cook for about 10-15 minutes, shaking skillet occasionally, until edges are golden brown.
  6. Meanwhile, heat a medium sized skillet over medium heat. Drizzle with one tablespoon olive oil. When the oil is shimmering, add the mushrooms and tomatoes to the pan. Sprinkle with a pinch salt and pepper. Let them cook while you flip and cook the other side of the rösti, shaking the pan every now and then. 
  7. Cover the skillet with an inverted large plate. Flip rösti onto the plate. Add another tablespoon of butter to the skillet and let it melt. Once the butter starts foaming, slide the rösti back into the skillet, cooked side up. Cook for another 10-15 minutes until the bottom becomes golden brown. While it is cooking, using a silicone brush, spread half tablespoon butter on the top of the rösti.
  8. Remove the tomatoes and mushrooms from the heat and set aside until you're ready to serve it.
  9. In the meantime, poach or fry the eggs, whichever you prefer.
  10. Poaching may be more challenging if you’ve never done it before. If poaching, fill a medium non-stick pan with about 2 inches water. Heat the water over medium heat. Add one tablespoon white vinegar and a pinch of salt and bring water to a simmer. Crack eggs one by one into a espresso cup and slide them into the simmering water. The vinegar in the water will prevent the egg whites from spreading. Turn heat to minimum, cover the pan and let the eggs poach for about 4 minutes. When done, remove with a sieve.
  11. Once the rösti is ready, slide it on a cutting board or a large plate. Cut in four and serve with smoked salmon and poached eggs on top and a side of roasted tomatoes and mushrooms. You can add a dollop of creme fresh or sour cream to the top, too. Enjoy!

Notes

  • To clean leek, use a pairing knife to slice it lengthwise starting from about 1/4 of inch from the root up to the leaves. Rotate the leek, and slice it again starting from the root. Fan the leeks open and place them under cold running water. Rinse out any dirt or sand until the leeks are clean.
  • To clean mushroom,  fill a quarter of a bowl with cold tap water. Drop mushrooms into the bowl. Submerge each one and then lift them out of the water with your hands. Place them on a paper towel and let them dry. Never clean mushrooms by rinsing them under running tap water, as the flavors will be washed away as well.
  • I love fresh black pepper, so I usually add more than half tablespoon to the potato and leek mixture.
July 20, 2015 /Aurel Pop
vegetarian, potatoes, leeks, eggs
Breakfast/Brunch
Comment

Eggplant Spread à la Rodica

July 14, 2015 by Aurel Pop in Appetizer

This past weekend was super awesome. After several weekends abroad I finally got to be lazy. I didn't cook much and I didn't post on here. Instead I just enjoyed the good weather, had Tacodeli for breakfast, and napped every single day. We had a blast. It all started on Saturday with a brunch at Roni's parents' place. Her mom made a traditional Israeli breakfast dish, shakshuka (a secret recipe that I want to learn from her), hummus, and carrot salad. We also had a delicious Israeli chopped salad that Roni's sister made. I decided to contribute my own mom's specialty to the meal- eggplant spread à la Rodica. If you were wondering what Rodica means, it is just my mother's name.

This spread is special for several reasons: 1) it's my mother's recipe, 2) it got even Roni's mom to eat an eggplant dish even though she's not a big fan of eggplant, and 3)  because it's my favorite spread from childhood.

It is very similar to baba ganoush, which is not surprising since Romanian cuisine has been greatly influenced by Ottoman cuisine. For almost 300 years Romania was under the rules of the Ottoman Empire and that's when eggplant, peppers and other nightshade fruits and vegetables made their way to Romanians' tables. Dishes like moussaka, eggplant stuffed with lamb meat, and zacusca are all based on eggplant and are very common in Romania. Of course, some recipes are a bit different from the traditional Ottoman ones but that's mostly due to the fact that some ingredients weren't available in Romania. People had to innovate by replacing those ingredients with whatever was easy to find. If baba ganoush uses tahini, my mother's eggplant spread uses homemade mayonnaise. I have never tried to make it with store bought mayo, and I recommend you not doing it either. It's just different and will taste nothing like Rodica's recipe.

This spread reminds me of hot summer days at my parents’ lake cabin at Mujdeni, Romania. It was beautiful and we loved spending time there. The scenery was gorgeous too as the whole lake is surrounded by hills and forests. Although the cabin had two stories, it wasn't very big. On the bottom floor we had the kitchen and living room with a big queen size bed. Usually my parents slept there. To get to the upper level you had to climb a ladder, so that was reserved for the kids. There were two smaller rooms upstairs with a twin bed in each. Normally you'd think that only my parents, my sister and I would sleep there, but sometimes we had cousins or family friends over for days. We slept on the floor on mattresses or in sleeping bags outside on the deck. It was so much fun and it never felt like the house was too small.

For outdoorsy kids like my cousins and I it was heaven on earth. We got to spend all day outside, swimming, sunbathing, playing soccer, badminton, volleyball or fishing. The adults loved it too. They would make the kids collect firewood from the forest so they could cook traditional dishes like Gulyás (goulash), Pörkölt (Hungarian stew) or Halászlé (a hot paprika based fish soup) all made in a bogrács, which is a traditional Hungarian enamel cauldron. Then they would grill all kinds of traditional Romanian meats (mititei, carnati de casa (homemade sausages) and slanina (bacon)) and veggies on a plow disc cooker simply called disc in Romanian. It was a feast and it always felt as if we were celebrating something.

All these dishes took a long time to cook though, so my mom always had to think ahead and prepare some "snacks" for the hungry kids who spent all day swimming in the lake or running and jumping in the sun. On a scale of 1 to 10 we were constantly at 10 in terms of hunger. Every 2 hours we'd get hungry and my mom would always have something for us. Something as simple as bread with homemade apricot or strawberry jam or bread and butter with cured meats and fresh tomatoes, onions, radishes and hard boiled eggs. Another  favorite was her eggplant spread. My cousins and I went crazy over it. Mom would make it out of 10-12 eggplants and we'd finish it within a day or two. We would eat thick loaves of fresh crispy bread loaded with a thick layer of the spread with a side of Telemea cheese (Romanian feta) and fresh tomatoes and cucumbers.

We were never bored there. We always found something to do. At night we'd play cards, tell stories or sing by the candlelight. The kids would sip on their homemade elderberry or sour cherry syrup mixed with club soda, while the adults would drink homemade wine or beer. We never complained about having to use the outhouse, not having electricity, or having to walk every morning to the spring for water for drinking, cooking and washing dishes. We were all so happy there.


Eggplant Spread à la Rodica


Serves 4-6
Prep time: 20 minutes
Cook time: 45 minutes
Inactive time: 1 hour


Ingredients

  • 3 large eggplants
  • 2 egg yolks, pasture raised
  • 1/2 tsp kosher salt
  • 1/2 tsp mustard powder
  • 1/2 tsp dijon mustard
  • 1/2 tsp white pepper
  • 1/2 cup sunflower seed oil (or peanut oil)
  • 1/2 lemon, juiced
  • 1/2 TBS white wine vinegar
  • 1 small red onion (or 1 medium shallot)
  • 2-3 cloves garlic, crushed and finely chopped
  • 1 tsp black pepper, freshly cracked
  • salt, to taste

Instructions

  1. Preheat grill to 450F (230C). Alternatively you can use a flattop cast iron grill (plancha) on medium-high heat. My mom swears by the latter. 
  2. Using a fork, pierce the eggplants. Place them on the grill rack (or on the plancha) and roast them until the skin blisters. I prefer charring them a bit, for that extra umami flavor. This should take about 35-40 minutes. Turn them every 10-15 minutes. 
  3. Once the eggplants are grilled, put them in a colander, cover with aluminum foil and let them rest for about 10-15 minutes. This will help get rid of the bitterness of the eggplant.
  4. Peel eggplants and chop them roughly. 
  5. You have two options now: a quick one, where you combine all the ingredients and using a hand mixer, mix them together until you get a smooth spread; or a longer one where you make the mayonnaise separately using the egg yolks, salt, mustard, white pepper, lemon juice, vinegar and oil and only then using a hand mixer to mix it with the eggplant, onion and garlic. My mom never bothered making the mayo separately, so I will leave it's up to you to decide which route to take. I tried both options and honestly neither I, nor my taste tester, Roni, was able to tell the difference.
  6. Taste and adjust seasoning. 
  7. Let the spread rest for at least 45 minutes in the refrigerator before serving. 
  8. Serve it on toast with feta cheese and paprika sprinkled on top or simply use it as a dip with pita bread. It goes really well with fresh tomatoes, cucumbers, radishes and peppers. 

Notes

  • The size of the eggplant will impact the grilling time, so if you have smaller eggplants it will take less.
  • Don't be surprised by the amount of salt you'll need to use. It's normal when working with eggplant. 
  • If you don't have a hand mixer, use a food processor, but be aware that making it this way you'll get  a much smoother and silkier spread. I like the hand mixer version, because the spread will be a bit chunky.
July 14, 2015 /Aurel Pop
eggplant, vegetarian, grill
Appetizer
2 Comments
  • Newer
  • Older

Copyright ©2017 Aurel Pop & gourmetcubicle. All rights reserved. Don't steal, ask.