gourmetcubicle

Tech by day. Cook by night.

The food blog of an engineer. Whether you're a tech nerd like me who wants to eat homemade meals and experiment with reproducing that amazing restaurant dish you ate, or a seasoned cook who wants to find inspiration for your next meal, you're in the right place.

  • home
  • blog
  • about
  • recipes
  • pantry essentials
  • contact

Cauliflower Risotto with Chicken Schnitzel and Pangrattato

May 07, 2015 by Aurel Pop in Main Dish, Side Dish

Roni and I got really hooked on MasterChef, specifically season 6. I love cooking shows, but for some reason this competitive cooking shows were never my cup of tea. I generally go for shows like Pepin's Essentials. In the competitive shows,zz drama out-shadows the essence of the show- the cooking itself. It should be about food and preparing interesting dishes and not about how a contestant passes out during cooking and another one cries her heart out because she's being sent home. 

Drama aside, I started watching it and turned Roni into a MasterChef junkie for a week. I found inspiration for a couple of new recipes and overall it was really entertaining up until the Final Five. That is when Roni decided that she needed to find out if a contestant had a food blog or not. Needless to say that when she Googled the name, the first search result was about that person winning the competition.

Her reaction spoiled it for me too, so from then on we just pretended to be thrilled when that cook was in the elimination challenges. After this incident I'm thinking about introducing a house rule where neither of us is allowed to google anything while watching this type of show. 

The inspiration to cook risotto came from the show. One contestant cooked a green apple risotto, and when I saw it I was immediately intrigued. I mean seriously? How did that idea even crossed her mind?

I was set on making risotto but since we didn't have green apples at home I started to think about alternatives. Whenever we go to the grocery store Roni has a funny habit of putting a cauliflower in the cart regardless of if the plan is to cook cauliflower or not. And that's how a great recipe was born! (Roni says, "You're welcome.")

I have cooked risotto several times before, but never with cauliflower. I started searching for recipes and oddly enough not too many of them popped up. The top one was Jamie Oliver's, so I looked there for inspiration and found his idea of using pangrattato (flavored, toasted breadcrumbs) to sprinkle over the risotto to be really smart and creative. For the breadcrumbs, instead of going the spicy route with red chili, I chose to make it more Italian by using basil, oregano, lemon zest and Parmesan cheese.

Schnitzel on the other hand, didn't require much research for this Eastern European. It may not be the healthiest food, but it's definitely one of the tastiest. Who doesn't like meat fried in a crispy and flavorful crust? When cooking chicken breast, I learned from my mom to season the flour with paprika and black pepper to add that extra flavor to the otherwise bland and boring meat. In the breadcrumbs, I like to mix in a bit of crushed nuts--almonds, walnuts or even hazelnuts--and some parmesan for an extra nutty aroma. 


Cauliflower Risotto with Chicken Schnitzel and Pangrattato


Serves 4
Prep time: 15 minutes
Cook time: 60 minutes


Ingredients

Cauliflower Risotto

  • 1 small cauliflower
  • 5 cups stock (vegetarian or chicken)
  • 4 TBS olive oil
  • 2 shallots, finely chopped
  • 1 1/2 cups arborio rice
  • 1/2 cup dry white wine
  • 1/2 cup fresh parsley, finely chopped
  • 5 fresh basil leaves, finely chopped
  • 1/2 cup parmesan, freshly grated
  • 4 TBS unsalted butter
  • 1 tsp black pepper, freshly ground
  • salt, to taste

Pangrattato

  • 1/2 cup bread crumbs
  • 5 anchovy fillets and 1 TBS anchovy oil
  • 1 clove garlic, crushed
  • 1 tsp lemon zest
  • 2-3 fresh basil leaves, chopped
  • 5 fresh oregano leaves, chopped
  • 1 TBS parmesan, freshly grated
  • 1/2 black pepper, freshly ground
  • 1 tsp olive oil

Chicken Schnitzel

  • 1 pound skinless, boneless chicken breast
  • 1/2 tsp black pepper, freshly ground
  • 1/2 tsp kosher salt
  • 1 cup all purpose flour
  • 1 tsp black pepper, freshly ground
  • 1 TBS paprika
  • 2 large eggs, pasture raised
  • 3 TBS whole milk or heavy cream
  • 1/4 cup parmesan, freshly grated
  • 1 cup breadcrumbs 
  • 1/4 cup almonds, crushed
  • salt, to taste
  • 1 cup oil, sunflower seed or peanut

Instructions

Pangrattato

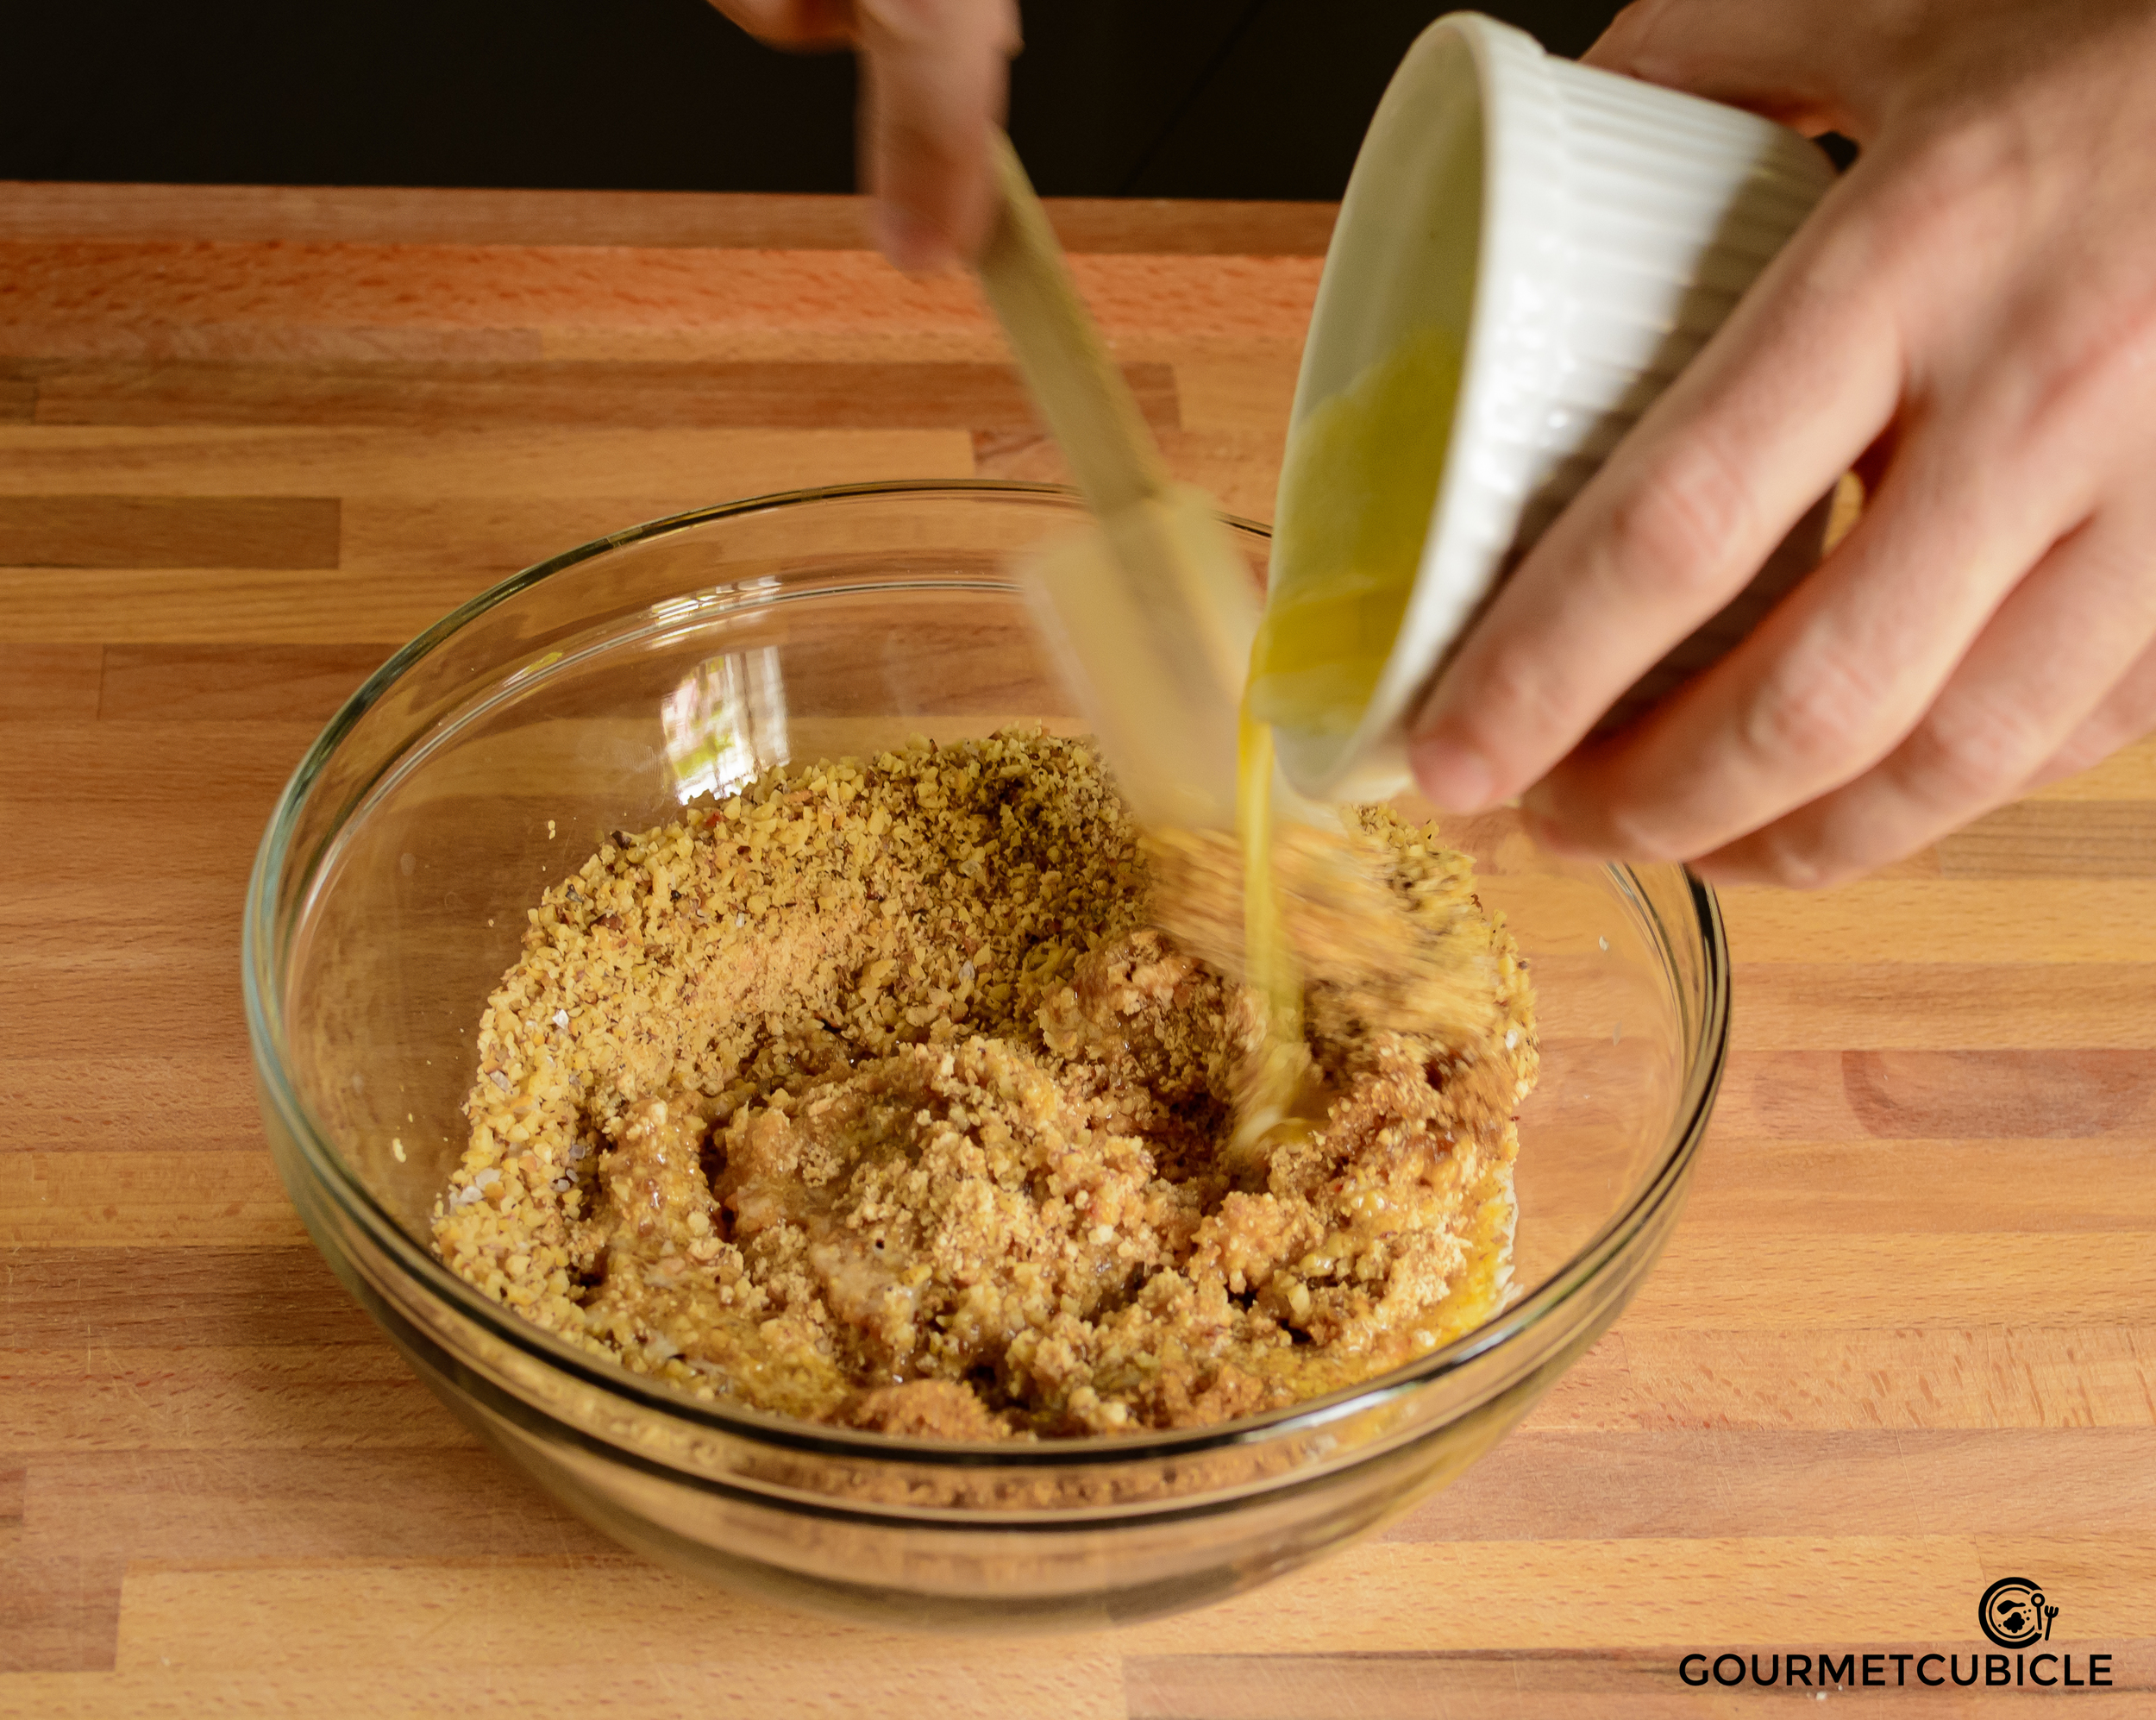
  1. Add all the ingredients to a food processor and pulse until the breadcrumbs are evenly coated. Heat olive oil in a frying pan and toast the breadcrumbs until they become golden brown, about 5-7 minuets. Stir and toss often so they don't burn.

Cauliflower Risotto

  1. Trim the leaves off the cauliflower and remove the stalk. The cauliflower will naturally fall apart into large florets. Cut these into small florets and save the tender stems. Finely chop the stems into small pieces.
  2. Bring stock to a boil in a medium pot over medium-high heat. Add the florets and continue boiling for about 5 minutes. Remove pot from the heat. Do not discard the stock.
  3. In a large saucepan sauté the shallots with olive oil over medium heat for about 3-4 minutes and then add the chopped cauliflower stems and continue to sauté for another 10 minutes, stirring frequently until soft. The vegetables should become translucent, not browned.
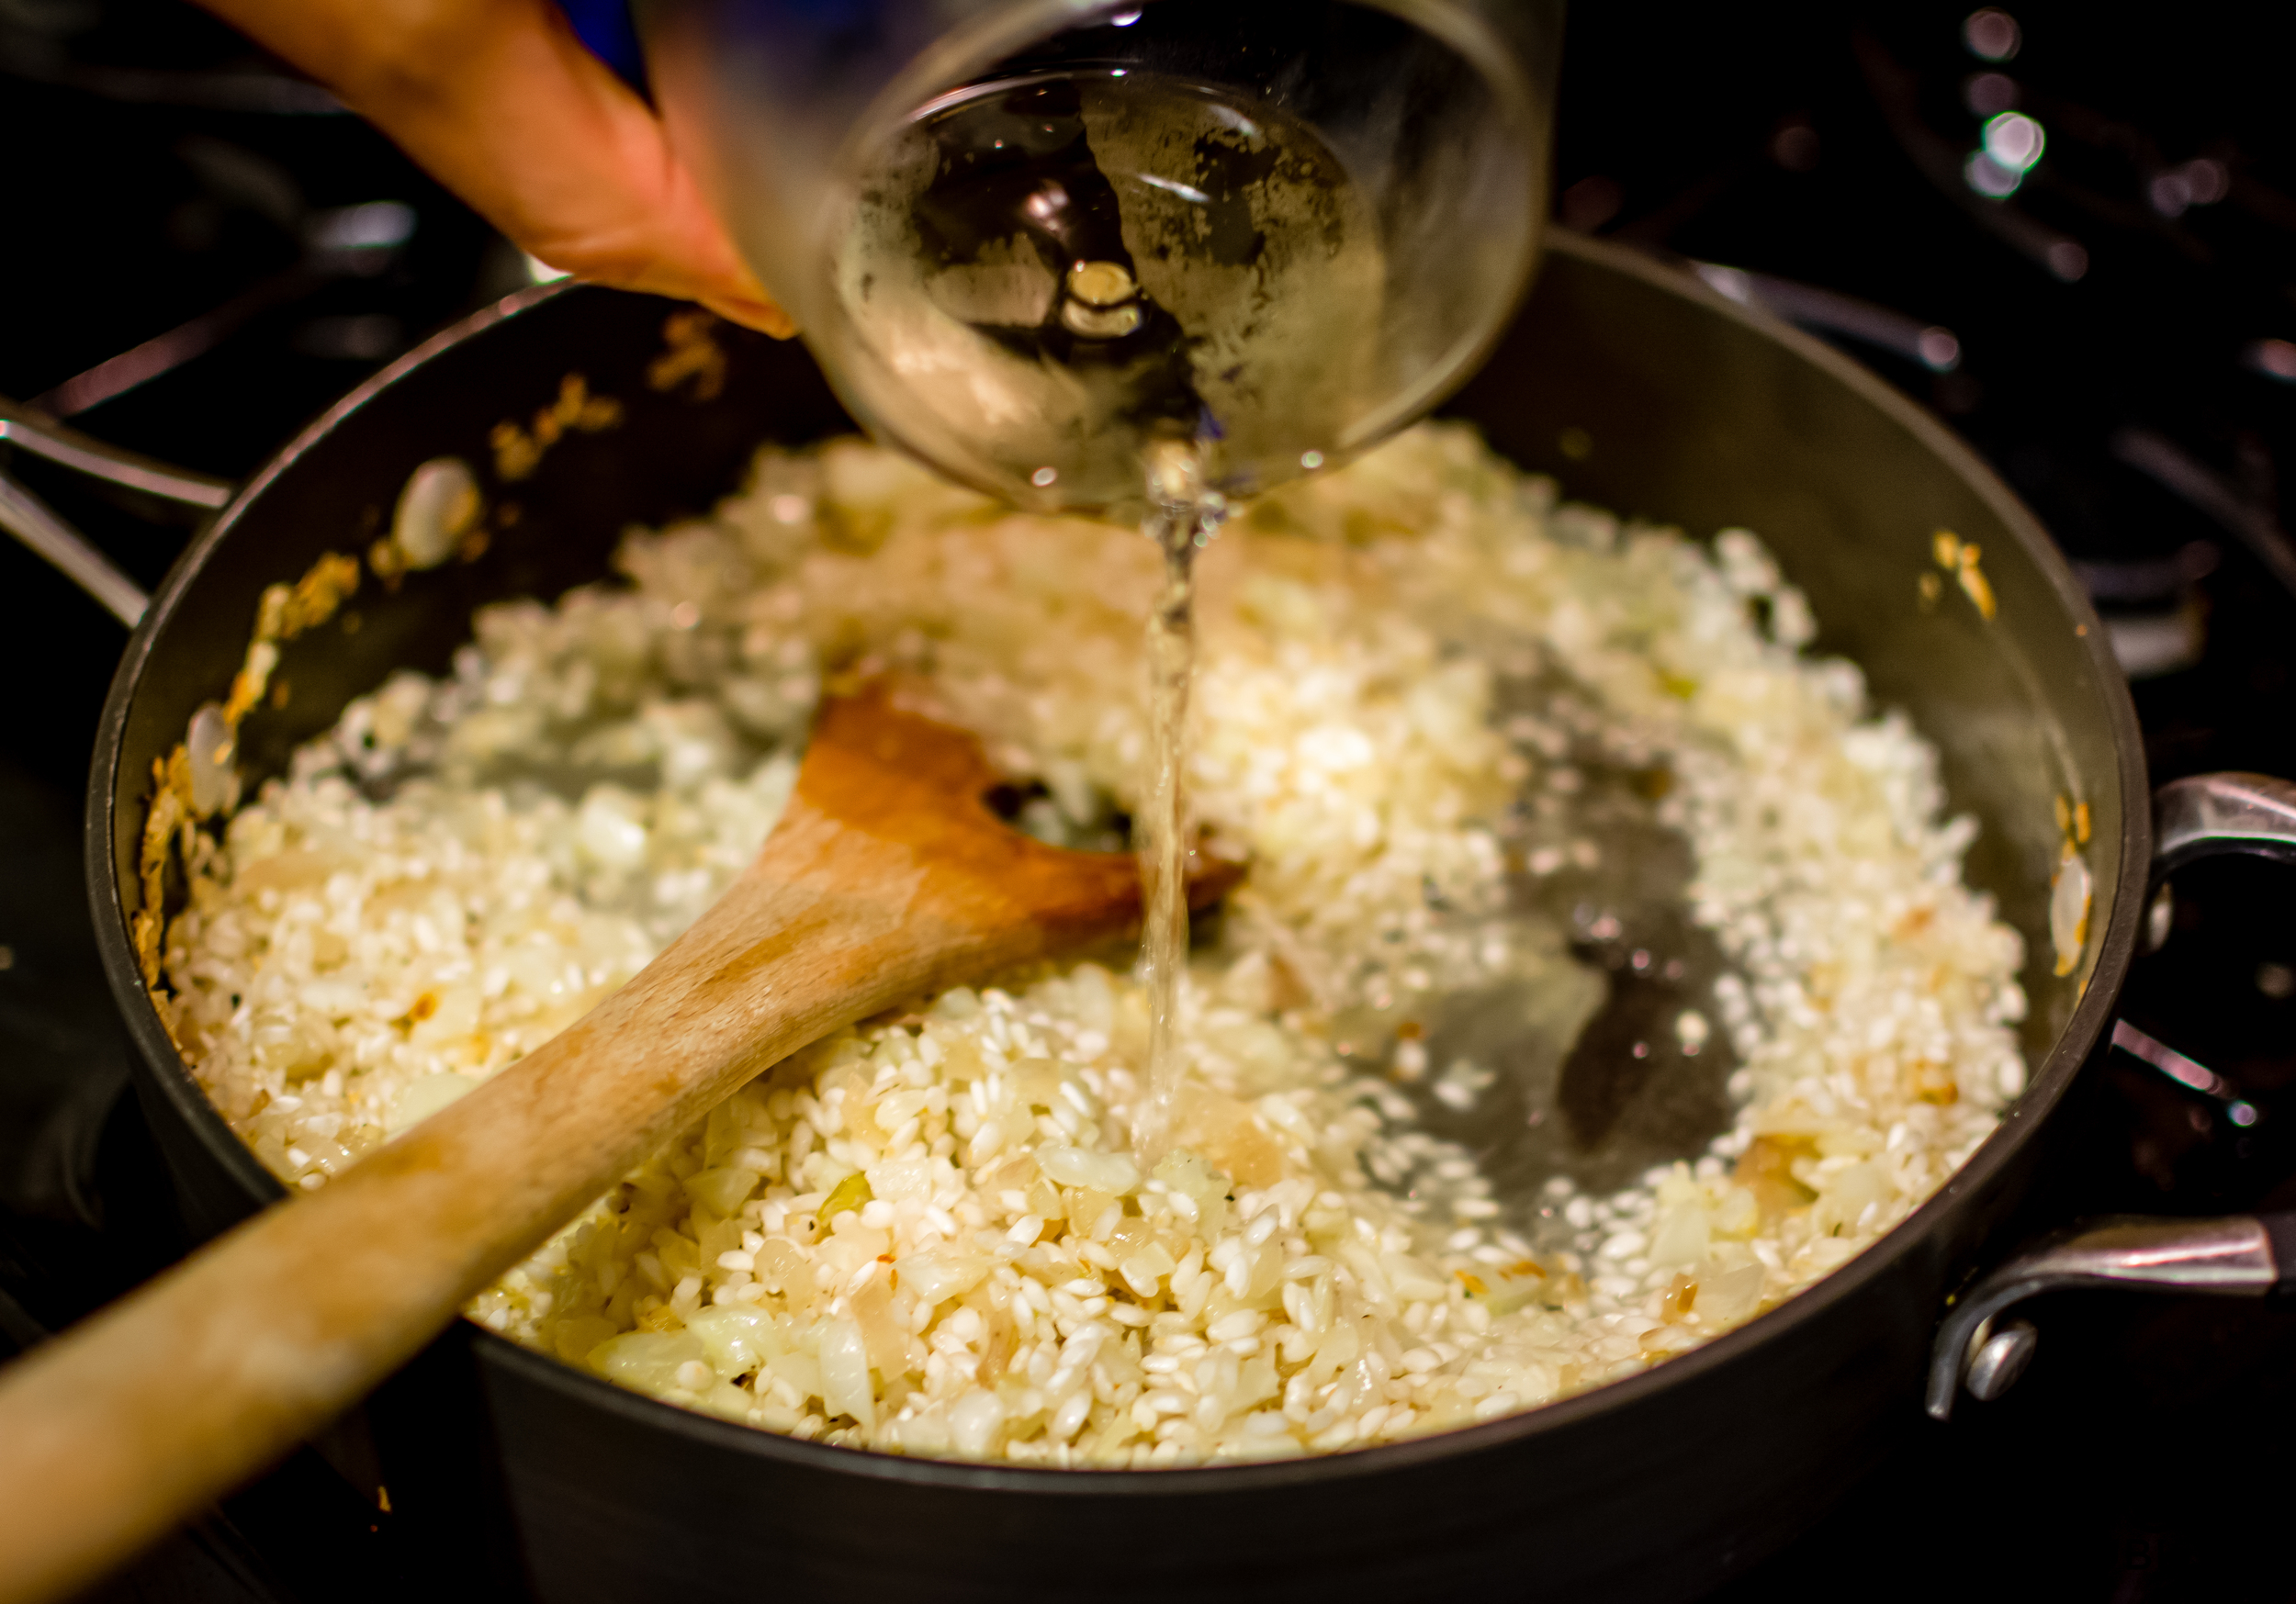
  4. Add rice and turn up the heat to high. Cook for a minute or two until the rice becomes translucent. Add white wine and cook until absorbed, stirring frequently.
  5. Reduce the heat to low. Using the stock in which you boiled the cauliflower, add stock to the rice one ladle at a time. Stir until the stock is absorbed to make sure the rice releases the creamy starch. Allow each ladle of stock to be absorbed before adding another one.
  6. When the rice is al dente add cauliflower florets with each ladle of stock crushing them into the risotto. Continue until rice is cooked. Taste as you go and adjust seasoning to your preference, but be careful with the salt. You will add parmesan next which will make it saltier. 
  7. When the risotto is done, remove from the pan from the heat and stir in the parsley, basil, parmesan cheese and butter. Mix well, taste again and adjust the seasoning. 
  8. Cover with a lid and let it rest until you finish the schnitzel.

Chicken Schnitzel

  1. Cut the chicken breast into 1/4 inch thick cutlets. Place them between two strips of plastic wrap. Pound the breasts with a meat tenderizer until the breasts become slightly thinner. Season with salt and freshly ground pepper.
  2. Mix flour, pepper and paprika and place mixture on a plate. Beat eggs and add milk or heavy cream in a shallow and wide bowl. On a third plate mix the breadcrumbs, almond crumbs and parmesan.
  3. Working with one chicken breast at a time, dredge meat in flour, shaking off excess, then dip into egg mixture, turning to coat evenly and then carefully coat with breadcrumb mixture. Transfer the breaded chicken to a plate.
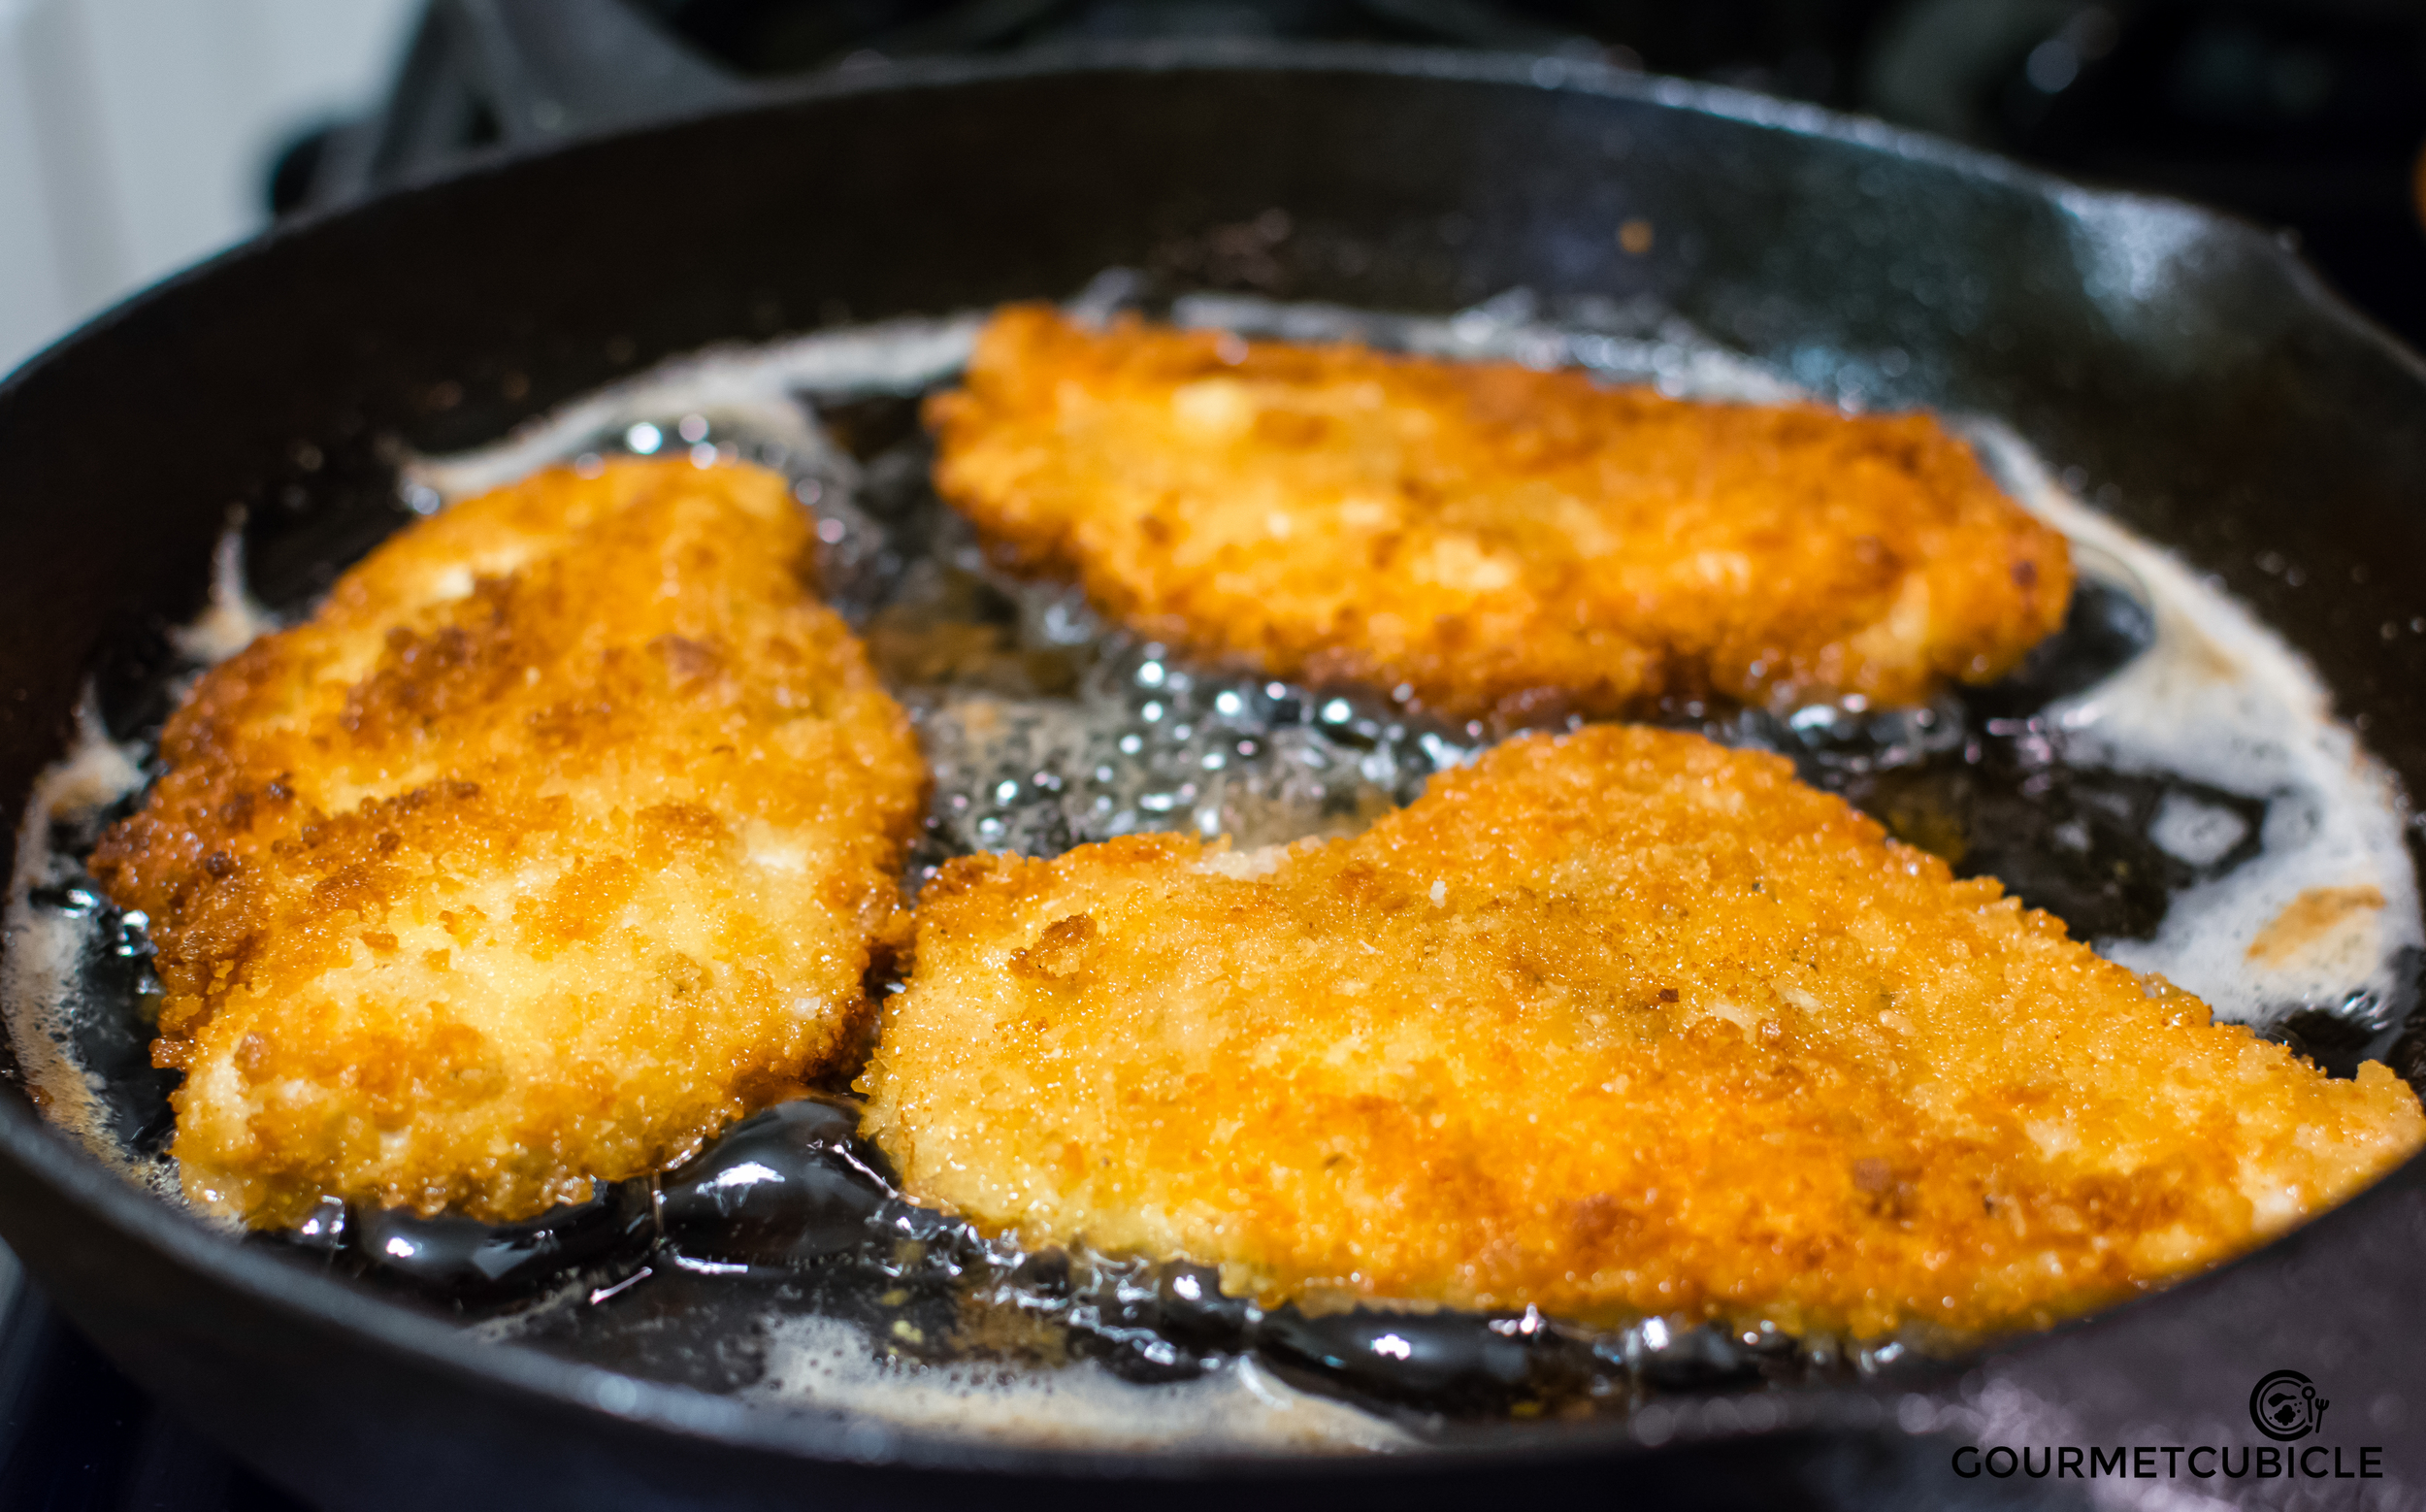
  4. Pour oil into a large skillet and heat over medium flame. When the oil is shimmering- the temperature should be around 400F (200C) if using sunflower seed oil- add the coated chicken breast and fry in a single layer. 2 or 3 breasts should fit into your skillet depending on the size of the schnitzel and skillet.
  5. Fry for about 5-6 minutes on each side until the breading becomes golden brown. If you used thicker breasts make sure that the inside temperature is over 155F (65C), but not more than 160F (70C). 
  6. Remove schnitzel from the skillet and place them over a paper towel patting off the excess grease.
  7. Serve with risotto sprinkled with pangrattato and a lemon wedge. 
May 07, 2015 /Aurel Pop
chicken, rice, German, Italian
Main Dish, Side Dish
Comment

Vegetable Hand Rolls

May 03, 2015 by Aurel Pop in Salad

Over the weekend I went to a friend's river house and floated the Comal River in New Braunfels, a favorite Texas summer pastime for grown ups. You float down the river on a tube while sunbathing and boozing. It's a lot of fun!

The only problem is that the sun and alcohol combo makes you hungry. Extremely hungry. After the float we usually fire up the grill and prepare Texas staples like steaks, hot dogs and burgers. The vegetable of choice is usually the potato..potato chip. They go well with beer after all.

A trip like this takes a big toll on my body though. I like to party and indulge in meat and beer, but these days I recover slower than I did in my early twenties. When I get home all I crave is fresh vegetables. Who says men don't feel guilty for what they've eaten?

Growing up, salads weren't the appetizer of choice. In Romania people prefer soups over salads. We would eat salads every now and then, but mostly when tomatoes were in season. My grandfather Bunu, who I dearly miss, had a big beautiful garden. He was very passionate about growing vegetables, which turned into his full time job after retirement. 

I loved spending my summers at my grandparents' house. My grandmother, Buna, would cook for me whatever I wanted. All I had to do was to tell her what I was craving and the next day that's what we'd eat. It was heaven on earth for a chubster like me.

Dinners were especially fun, because I got to help Buna with the cooking. I would go in the garden, pick the vegetables I wanted, chop them up in the kitchen, and ten minutes later there it was- a big bowl of fresh tomatoes, green onions, gogosari peppers (a Romanian sweet pepper with a spicy kick similar in taste to bell peppers) and red radishes topped with home-pressed sunflower oil, coarse salt and cracked pepper. Salads were always served with a crispy loaf of freshly baked bread. So simple, yet so flavorful.

I first had this type of roll at a Korean restaurant in Austin called Koriente. Their recipe includes a few other vegetables, but I found these five (cabbage, carrots, bell peppers, cucumbers and avocado) to be the ones that I have most often in my fridge. Feel free to experiment by adding fresh zucchini, white cabbage, celery, leeks of even sliced portobello mushrooms to the hand rolls. 

Also, I find that people have different opinions about the roasted seaweed, which you can find at any Asian market. Some love it, some don't. If you're in the second category wrap your veggies in green leaves like romaine, butterhead, round or looseleaf lettuce or just don't slice the cabbage leaves and use those.

The sweet and spicy gochujang dip will add that extra kick and flavor to the hand rolls. It is relatively easy to find at Asian markets, but if you can't, just go with good ol' Sriracha sauce. 

Whatever you do, you'll end up with a fresh, crisp and healthy meal that will be done within 15 minutes. Yesterday was the Kentucky Derby, so we served it up with a watermelon julep on the side. Enjoy!


VEGETABLE HAND ROLLS


Serves 8
Prep time: 10 minutes
Total time: 15 minutes


ingredients

Hand rolls

  • 1/4 head red cabbage, finely sliced
  • 1/2 red bell pepper, thinly sliced
  • 3-4 carrots, julienned
  • 1 avocado, thinly sliced
  • 1/2 English cucumber, deseeded and finely sliced
  • 2-3 sheets roasted seaweed, cut into 4x4 inch pieces

Sweet and Spicy Korean Chili Dip

  • 3 TBS korean chili paste (gochujang)
  • 1 clove garlic, crushed and finely chopped
  • 1 tsp ginger, grated
  • 1 1/2 TBS soy sauce
  • 1 1/2 TBS mirin 
  • 2 tsp rice vinegar
  • 1 TBS honey
  • 1/2 tsp sesame oil
  • 1/2 TBS roasted sesame seeds
  • 1 TBS cold water

Instructions

  1. In a small bowl combine gochujang paste, garlic, ginger, soy sauce, mirin, rice vinegar, honey, sesame oil and seeds. Mix them together well. Add 1 TBS cold water.
  2. Keep the sauce refrigerated until serving. If you end up with leftover dip store it in the fridge. It will stay good for weeks.
  3. Slice and julienne your veggies and place them on a tray or serving plate.
  4. Using a pair of scissors cut the roasted seaweed sheets into 4x4 pieces.
  5. Assemble hand rolls by placing vegetables on the seaweed. The proportions are up to your personal preference. 
  6. Serve with dipping bowls of soy sauce and Korean chili.
May 03, 2015 /Aurel Pop
vegan, korean, vegetarian
Salad
Comment
key lime pie gc.jpg

Key Lime Pie With Walnuts, Sea Salt and Meringue

April 30, 2015 by Aurel Pop in Dessert

I don't consider myself a baker. As a matter of fact, I had never made any desserts (other than crepes, but I usually fill them with ham and cheese) up until a couple of years ago. The reason is simple- I'm not a fan of sweets. I will eat a light fruit dessert, but I seldom have a sweet tooth. When I tell this to people, usually their first reaction is to ask me if I'm kidding. 

Growing up, I was the odd kid for not liking chocolate and sweets. When I got candy for Easter, Christmas or other special occasions from relatives and friends, I would just save them in my drawer and later trade them for fruit or sell them so that I could buy savory things. My sister was OK with this as she always got to eat my piece of cake. We fought a lot as kids, but it was never over dessert.

The situation hasn't changed much to this day, except now my girlfriend gets to eat all the chocolate and sweets in the house. Desserts are never a topic that we argue about. In her book, no dinner is complete without something sweet at the end. She doesn't have a sweet tooth, but rather a sweet megalodon.

As you might have guessed key lime pie isn’t exactly a dessert I had growing up in Eastern Europe. I first tasted it a few years ago and instantly liked it. The creamy texture of the filling combined with the crunchiness of the crust was something that got my attention. I found it to be my type of dessert- not too sweet, tart, and with an added citrus kick from the lime zest.

Although I knew that I found my favorite American dessert, It never actually crossed my mind to try making it on my own, thinking that it required some sort of special baking skills. Also, I feel like baking leaves me with little room for creativity. Baking is chemistry and bakers are very precise, something that I can't say about myself even though I'm an engineer. If you mess up the ratios in a cake recipe it is very likely that your dessert is either going to look like crap or taste like crap, if not both. Neither scenario is encouraging to me.

It was just this year that I made my first key lime pie. The inspiration came when we were visiting Roni's mom while she was recovering from surgery. I was warned that her sister would bring a key lime pie. THE key lime pie, as her family refers to it. What I wasn't warned about was that the pie would disappear within the blink of an eye. Suddenly I realized how different my life would've been, had I actually liked sweets as a kid. It would have been a struggle having to fight over every piece of dessert with my sister in the same way I now had to fight with Roni's family to get a bite of THE pie.

"I can totally make one of these”, I caught myself saying aloud and then started to browse the internet for recipes. I studied recipe after recipe and to my surprise none of them sounded that difficult. Why had I been so scared about baking it? This particular time I was scared because I have the bad habit of talking before thinking and found myself promising my girlfriend's family to match THE pie both in taste and presentation. 

And I did! I did match it and honestly think that I topped it. It wasn't easy, but by no means was it difficult. 

I prefer to use key limes (obviously), because I feel like they are less tart and a tad more bitter and smoother than the Persian ones. If it's difficult for you to get a hold of them, use regular Persian ones, but maybe reduce the amount of lime juice to 3/4 of a cup, unless you like your pie really tart.

My twist to the traditional recipe is the use of two secret ingredients: sea salt and walnuts. They will make the crust even crunchier adding more texture to the pie. The crust will contrast well with the smooth and creamy filling and the fluffiness of the meringue. 


KEY LIME PIE WITH WALNUTS, SEA SALT AND MERINGUE


Serves 8
Prep time: 30 minutes
Cook time: 35 minutes


Ingredients

Crust

  • 1 1/2 cup graham crackers
  • 1/2 cup English walnuts
  • 1/4 cup brown sugar
  • 1/2 tsp sea salt
  • 3/4 stick unsalted butter, melted

Filling

  • 3-4 egg yolks (pasture raised)
  • 1 TBS lime zest
  • 20 oz condensed milk
  • 15-20 key limes, juiced (about 1/2 cup)

Meringue

  • 3-4 egg whites
  • 1/2 tsp kosher salt (a pinch)
  • 1/2 TBS lime zest
  • 1 TBS lemon juice
  • 2-3 TBS white sugar

Instructions

  1. Preheat oven to 375F (190C).
  2. Whiz the graham crackers and walnuts in a food processor. In a bowl mix the crumbled crackers and walnuts, brown sugar and sea salt. Slowly add melted butter and mix well until the crumbs are evenly coated.
  3. Press mixture firmly into the bottom and up the sides of a 9-inch pie dish. Put it in the oven to bake  for about 12 minutes until golden brown. Remove from the oven and let it cool to room temperature. Don't worry too much if it doesn't look cooked yet, as it will return to the oven soon.
  4. Lower the heat in the oven to 340F (170C).
  5. In a separate bowl combine egg yolks and lime zest. Beat the mixture until the eggs become thick. Pour in the condensed milk and whisk for about 2-3 minutes. Finally add the lime juice and mix until well blended and smooth (another 2-3 minutes).
  6. Pour the filling into the cooled crust to the top edge. Return the pie to the oven and cook for not more than 10-12 minutes.
  7. In the meantime, mix egg whites, salt, lime zest and lemon juice in a bowl. Beat with an electric mixer on medium speed until foamy. Turn the mixer on high and slowly pour in the sugar. Beat until stiff and glossy peaks form. A good test to see if they are stiff enough is to slowly turn the bowl sideways or upside down without the meringue slipping out. 
  8. Remove the pie from the oven then raise the heat to 375F (190C) again. Cover the pie with the meringue and return it to the oven for about 8 more minutes until the peaks become golden brown. 
  9. Allow the pie cool down to room temperature then chill it in the refrigerator for about 2-3 hours. Serve cold and enjoy!
April 30, 2015 /Aurel Pop
pie, lime, walnuts
Dessert
1 Comment

Roasted Vegetable Salsa

April 26, 2015 by Aurel Pop in Condiment

I love Mexican cuisine and all of its American variations: Tex-Mex, New Mexican, Rancho, etc. I can't resist the bold flavors that fresh ingredients bring into these dishes, the a mix of hearty meats and cheeses with all kinds of sauces and vegetables.

In certain ways the abundance of flavors, textures and spices remind me of Eastern European cooking.  In Romania we have a spread called zacusca which has a bunch of variations in the Balkans like ajvar, ljutenica or pindjur. All of them are vegetable-based with ingredients like onions, peppers and tomatoes, and sometimes aubergines, mushrooms and beans. If you think about Mexican salsas, they are not that different ingredients-wise. One thing that's not common between the two is that the salsas are served fresh, whereas the relishes/spreads in the Eastern European cuisine are preserved. 

What blows my mind is that, even though the two cultures are so different and the two regions are so far away from each other, there are still similarities when it comes to flavors and ingredients.

I find salsa to be one of the most important ingredients in Mexican food. A good salsa has the ability to make a decent dish amazing. It's the ingredient that will take your taco or burrito game to the next level. What's amazing about them is how easily they can be made. If you read my previous blog post, I shared my Blackened Fish Taco recipe. That taco is marvelous as is, but if you add a spoon of this salsa or my other favorite, the TacoDeli-inspired Doña salsa (recipe to come), I guarantee that your tasting taste buds will have an orgasm.

This salsa recipe is my take on a traditional charred vegetable salsa. I've tried several other combinations and this is the best I could come up with. I added a little twist by grilling the lime and adding a bit of cumin, but the main ingredients are the traditional onions, peppers and tomatoes. 

My version is on the milder side of the spectrum. I use poblano and jalapeño peppers instead of serranos and I usually remove the seeds and most of the white membrane that holds the seeds (placental tissue). That's not because I don’t like heat, but because it’s a good balance to my more fiery salsa mentioned above. You can use it for your tacos, burritos, on your breakfast eggs or as a dip with warm corn tortilla chips. No matter how you eat it, this salsa is going to make your food taste better. 

Enjoy!


Roasted vegetable salsa


Yields 2-3 cups
Prep time: 30 minutes
Cook time: 15 minutes


Ingredients

  • 2 large tomatoes, halved
  • 1 large red onion, halved
  • 1/2 medium yellow onion, halved
  • 2 poblano peppers, halved and deseeded
  • 1 jalapeño, halved and deseeded
  • 1 bulb garlic, halved
  • 1 lime, halved
  • 2 tsp olive oil, drizzled
  • 1/2 cup cilantro, chopped
  • 1/2 lime, juiced (about 1-2 TBS fresh lime juice)
  • 1/2 tsp cumin, ground
  • 1 tsp black pepper, freshly cracked
  • salt, to taste

Instructions

  1. Preheat the grill to medium-high heat. If you're using your oven pre-heat it to 425F (220C) degrees. 
  2. Place the tomatoes, onions, poblano and jalapeño peppers, garlic and lime halves in a medium bowl. Drizzle with the olive oil and sprinkle with salt and pepper. The amount of salt shouldn't matter at this point so don't sweat too much over it.
  3. Transfer the vegetables to the grill. If you're roasting them in the oven, transfer them to a baking tray that's lined with aluminum foil. 
  4. Grill until the veggies are blistered and charred, about 10-15 minutes, turning them occasionally.
  5. Remove the vegetables from the grill. Start with the tomatoes as they cook faster. If you're broiling them in the oven, jut take the tray out and let them cool for a bit. 
  6. Once the veggies are cooled down, press the garlic out of its shell, remove the skins of the tomatoes and peppers, clean the peel off the onions and gently squeeze the charred limes into the food processor. Make sure that only the juice gets out of the lime because the pulp and the white membrane is going to make your salsa bitter.
  7. Transfer the vegetables and juices to a food processor, add the cilantro and pulse until you reach your preferred level of chunkiness. Add the lime juice, cumin, black pepper and salt to taste and pulse one more time to mix in the spices.
  8. Transfer to a mason jar and refrigerate for a couple of hours before serving. If properly cooled, it will stays good for about 10 days. 
     
April 26, 2015 /Aurel Pop
Mexican, vegetarian, salsa, spicy, tacos
Condiment
Comment

Blackened Fish Tacos with Pickled Onions and Mango Salsa →

April 23, 2015 by Aurel Pop in Main Dish

The warm weather finally arrived. And if you live in Texas like I do, by warm I mean hot. I am personally not a big fan of torrid weather mostly because here in Austin, summers seem to never end. It's always hot and the cold weather seems to last for 2 weeks max. Back home in Romania, I was used to eating hearty food year-round, but it just doesn't feel right in this heat. My appetite diminishes. I crave simple, refreshing and easy dishes like tacos.

I am a taco fan, but my girlfriend is their number one fan. She's a taco groupie. As a matter of fact, she's fairly convinced that tacos are the ultimate food. She will have them for breakfast, lunch, dinner or as a snack. You know how they say that there are seasonal dishes? Hearty and heavy during the colder months, and light and simple during the warmer ones? Well for Roni the taco season lasts all year long (and most Austinites would agree).

And you know what? She's right. Tacos are awesome! What's great about them is that they can be done with minimal effort and cooking skills. Heck, you can build them based on personal preference! If you're a health freak grill your protein, add veggies and go easy on the cheese and salsas. If you're a filthy animal like me, pan-roast your protein and then load your tacos with cheese instead of veggies and top everything with your favorite salsa (a few recipes to come). 

20150322-fish_tacos3.jpg

The choices are endless. Next time you plan a trip to Austin, go to Veracruz, TacoDeli, Taco More or Papalote and experience it for yourself. You will find all sorts of tacos from pork or fish to cauliflower or beans.  Put eggs in them and call them breakfast tacos. You can't go wrong with tacos.

I consider myself a newbie to the taco scene. I ate them for the first time 4 years ago when I moved to Austin from Hungary. I clearly remember that moment- I had a Baja Shrimp and a Mr. Pink at Torchy's. From that minute I knew that I had to start making them for myself.

My obsession with tacos escalated to the point where I turned my sister into a taco junkie. Two years ago she visited me and stayed for 2 weeks. I took her to different places so she can experience the Austin food scene, but the one thing she kept mentioning (and still does when we Skype) are the tacos. She became addicted to them. She was so desperate that when she returned to Hungary she packed (read: loaded) fresh cilantro and bottles of salsa in her luggage. Ever since I call her the Pablo Escobar of cilantro.

Over the years I have tried several recipes and experimented with non-conventional ingredients only to come to the same conclusion - keep it simple. As I was playing with the different variations and flavors I became more and more interested in breakfast tacos and fish tacos, as they are the two types of tacos that people are most opinionated about. I've tried several spice combinations for blackening the fish and I can confidently say that after 4 years I found the perfect one.

The combination of flavors in this recipe is amazing. The sweetness of the mango will cancel out the tartness of the pickled onions and the heat of the jalapeños, while the warm tortilla and flakey fish chunks will melt in our mouth. 

Now enough with the talk, let's get down to business. Ladies and gentlemen, I present you with the perfect Blackened Fish Taco! 


BLACKENED FISH TACOS WITH PICKLED ONIONS AND MANGO SALSA


Serves 3-4
Prep time: 35 minutes
Cook time: 30 minutes


INGREDIENTS

Blackened Fish Tacos

  • 2 tsp smoked paprika
  • 1 tsp Hungarian paprika
  • 1/2 tsp garlic powder
  • 1 tsp onion powder
  • 1 tsp dried thyme
  • 1 tsp dried oregano 
  • 1 tsp ground black pepper
  • 1 tsp salt
  • 2 big tilapia fillets (replace with sea bass, flounder, halibut, catfish, cod)
  • 1/2 cup peanut oil (or canola oil, or sunflower seeds oil)
  • 2 TBS unsalted butter
  • 2 cloves garlic, crushed
  • 2 sprigs rosemary or thyme
  • 9-12 tortillas (corn, wheat or flour)

Pickled onions

  • 1 cup apple cider vinegar
  • 1/2 cup brown sugar
  • 1/2 cup water
  • 10-15 black peppercorns, whole
  • 3 whole cloves, whole
  • 2 bay leaves
  • 1 tsp salt
  • 1 big red onion, thinly sliced 
  • 1/2 cup carrots, julliened or grated

Mango Salsa

  • 1 ripe mango, peeled, pitted and diced
  • 1/2 bell pepper, diced
  • 3 green onions, sliced
  • 1/2 red onion, finely chopped
  • 2 cloves garlic, finely chopped
  • 1/2 cup finely chopped cilantro
  • 1 jalapeño, deseeded and diced
  • 1/2 poblano pepper, deseeded and diced
  • 1 lime, juiced
  • 1/2 tsp freshly ground pepper
  • salt, to taste

Instructions

Blackened Fish Tacos

  1. In a small bowl combine smoked paprika, Hungarian paprika, garlic and onion powder, thyme, oregano, salt and pepper.
  2. Dry the fillets thoroughly with paper towels then coat each fish fillet with plenty of spice mix. Let them rest for 10 minutes at room temperature.
  3. In a large cast iron skillet, heat the oil over medium-high heat. Once the oil is sizzling, add the fillets and cook for 3 minutes on each side.
  4. Reduce the heat to medium and add the butter, crushed garlic and the sprigs of aromatic herbs. Continue cooking the fillets turning them over a few times (so that they brown evenly) and basting with the lightly browned butter. Cook for about 3 more minutes until fish is white and opaque.
  5. Transfer the fillets to a serving platter and let it rest for a few minutes.
  6. Break up the fish into chunks and assemble the tacos on a warm tortilla (corn is my personal favorite) by adding pickled onions and mango salsa. 

Pickled Onions

  1. In a small saucepan mix vinegar, water, brown sugar, peppercorns, bay leaves, cloves and salt.
  2. Bring to a boil over medium-high heat. Whisk for about 5 minutes until all sugar is dissolved. 
  3. Add onions and carrots to the pan and gently stir to combine. Remove from the heat after 1 minute.
  4. Let the mixture cool down to room temperature then transfer it to a mason jar or to a hermetic glass container.
  5. I prefer the way they taste after refrigerated for at least an hour.

Mango Salsa

  1. In a medium bowl mix mango, bell pepper, green and red onions, garlic, cilantro, jalapeño and poblano peppers. Squeeze the lime all over the salsa and season with pepper and salt to your liking. Toss and combine.
  2. Keep refrigerated for an hour before serving. That way the flavors will blend and the salsa (pico) will taste a lot better.
April 23, 2015 /Aurel Pop
tacos, seafood, salsa, tex-mex
Main Dish
Comment
  • Newer
  • Older

Copyright ©2017 Aurel Pop & gourmetcubicle. All rights reserved. Don't steal, ask.